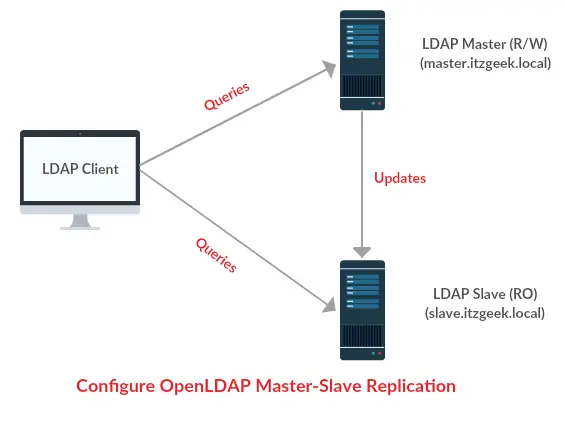
This guide focuses on how to configure OpenLDAP Master-Slave Replication. I assume that you have two LDAP servers ready for the replication.
Read: Step by Step OpenLDAP Server Configuration on CentOS 7 / RHEL 7
Setup Master Server:
To begin, let’s create a user who will have a read access to all LDAP objects, to avoid using LDAP root (ldapadm) account for replication due to security reason.
[root@master ~]# vi rpuser.ldif
Paste the below lines to the above LDIF file.
dn: uid=rpuser,dc=itzgeek,dc=local
objectClass: simpleSecurityObject
objectclass: account
uid: rpuser
description: Replication  User
userPassword: root1234
Use the ldapadd command to add a new user to OpenLDAP directory.
[root@master ~]# ldapadd -x -W -D "cn=ldapadm,dc=itzgeek,dc=local" -f rpuser.ldif
Output:
Enter LDAP Password:
adding new entry "uid=rpuser,dc=itzgeek,dc=local"
Enable syncprov module on the master server.
[root@master ~]# vi syncprov_mod.ldif
Copy and paste the below lines to syncprov_mod.ldif file.
dn: cn=module,cn=config
objectClass: olcModuleList
cn: module
olcModulePath: /usr/lib64/openldap
olcModuleLoad: syncprov.la
Now send the configuration to the LDAP master server.
[root@server ~]# ldapadd -Y EXTERNAL -H ldapi:/// -f syncprov_mod.ldif
Output:
SASL/EXTERNAL authentication started
SASL username: gidNumber=0+uidNumber=0,cn=peercred,cn=external,cn=auth
SASL SSF: 0
adding new entry "cn=module,cn=config"
We would require enabling syncprov for each directory.
[root@master ~]# vi syncprov.ldif
Copy and paste the below text into the above file.
dn: olcOverlay=syncprov,olcDatabase={2}hdb,cn=config
objectClass: olcOverlayConfig
objectClass: olcSyncProvConfig
olcOverlay: syncprov
olcSpSessionLog: 100
Update the configuration on LDAP server.
[root@master ~]# ldapadd -Y EXTERNAL -H ldapi:/// -f syncprov.ldif
Output:
SASL/EXTERNAL authentication started
SASL username: gidNumber=0+uidNumber=0,cn=peercred,cn=external,cn=auth
SASL SSF: 0
adding new entry "olcOverlay=syncprov,olcDatabase={2}hdb,cn=config"
Setup Slave Server:
Now we will configure the replication by placing the most important configurations such as LDAP server URI, LDAP user, and password into the file of each of your slave node.
[root@slave ~]# vi rp.ldif
The above file should have below content. But don’t forget to change the “rid=xxx” information, this should be unique for each server, a three digit number.
dn: olcDatabase={2}hdb,cn=config
changetype: modify
add: olcSyncRepl
olcSyncRepl: rid=001
  ### LDAP Master URI ###
  provider=ldap://192.168.12.11:389/
  bindmethod=simple
  ### LDAP Domain ###
  binddn="uid=rpuser,dc=itzgeek,dc=local"
  ### Replication user credential ###
  credentials=root1234
  searchbase="dc=itzgeek,dc=local"
  scope=sub
  schemachecking=on
  type=refreshAndPersist
  retry="30 5 300 3"
  interval=00:00:05:00
Send the slave configuration to the LDAP.
[root@slave ~]# ldapmodify -Y EXTERNAL -H ldapi:/// -f rp.ldif
Output:
SASL/EXTERNAL authentication started
SASL username: gidNumber=0+uidNumber=0,cn=peercred,cn=external,cn=auth
SASL SSF: 0
modifying entry "olcDatabase={2}hdb,cn=config"
Test the LDAP replication:
Let’s create a user in LDAP called “ldaprptest“, to do that, create a .ldif file on the master LDAP server.
[root@master ~]# vi ldaprptest.ldif
Update the above file with below content.
dn: uid=ldaprptest,ou=People,dc=itzgeek,dc=local
objectClass: top
objectClass: account
objectClass: posixAccount
objectClass: shadowAccount
cn: ldaprptest
uid: ldaprptest
uidNumber: 9988
gidNumber: 100
homeDirectory: /home/ldaprptest
loginShell: /bin/bash
gecos: LDAP Replication Test User
userPassword: {crypt}x
shadowLastChange: 17058
shadowMin: 0
shadowMax: 99999
shadowWarning: 7
Add a user to LDAP server using the ldapadd command.
[root@server ~]# ldapadd -x -W -D "cn=ldapadm,dc=itzgeek,dc=local" -f ldaprptest.ldif
Output:
Enter LDAP Password:
adding new entry "uid=ldaprptest,ou=People,dc=itzgeek,dc=local"
Search for “ldaprptest” on the slave server.
[root@slave ~]# ldapsearch -x cn=ldaprptest -b dc=itzgeek,dc=local
Output:
# extended LDIF
#
# LDAPv3
# base <dc=itzgeek,dc=local> with scope subtree
# filter: cn=ldaprptest
# requesting: ALL
#

# ldaprptest, People, itzgeek.local
dn: uid=ldaprptest,ou=People,dc=itzgeek,dc=local
objectClass: top
objectClass: account
objectClass: posixAccount
objectClass: shadowAccount
cn: ldaprptest
uid: ldaprptest
uidNumber: 9988
gidNumber: 100
homeDirectory: /home/ldaprptest
loginShell: /bin/bash
gecos: LDAP Replication Test User
userPassword:: e2NyeXB0fXg=
shadowLastChange: 17058
shadowMin: 0
shadowMax: 99999
shadowWarning: 7

# search result
search: 2
result: 0 Success

# numResponses: 2
# numEntries: 1
Extras:
Configure LDAP client to bind with slave server, too.
authconfig --enableldap --enableldapauth --ldapserver=master.itzgeek.local,slave.itzgeek.local --ldapbasedn="dc=itzgeek,dc=local" --enablemkhomedir --update
That’s All.
Reference: Official site