Nginx is a free, open-source, high-performance HTTP server. Nginx is known for its stability, rich feature set, simple configuration, and low resource consumption. This tutorial shows you how to install Nginx on a Linux mint 18 with PHP support (through PHP-FPM) and MySQL support. PHP-FPM is an alternative PHP FastCGI implementation. It has some additional features useful for sites of any size, especially busier sites).
Install MySQL:
First, we will install the MySQL by issuing the following command. You will be asked to create MySQL admin password.
$ sudo apt-get install mysql-server
Start MySQL server.
$ service mysql start
Install Nginx:
Add Nginx repository by placing following information.
$ sudo nano /etc/apt/sources.list

deb http://nginx.org/packages/ubuntu/ trusty  nginx
deb-src http://nginx.org/packages/ubuntu/ trusty  nginx
Update repositories.
$ sudo apt-get update
Install Nginx using the following command.
$ sudo apt-get install nginx
Start the Nginx after the installation.
$ service nginx start
Open a web browser and visit http://your-ip-address, you should see the following page; this will confirm you that the Nginx is successfully installed on the server.
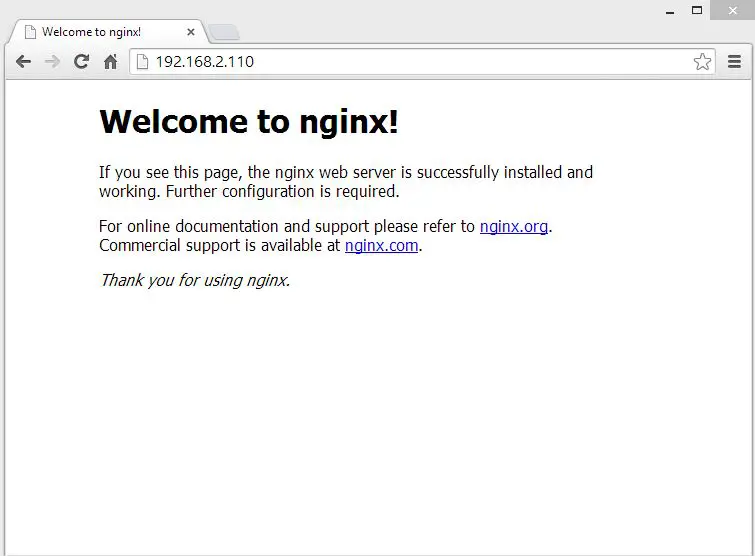
The default nginx document root on Linuxmint 17 is /usr/share/nginx/html/. The configuration files are under /etc/nginx directory.
Install PHP5-FPM:
Next is to install PHP through PHP-FPM (PHP-FPM (FastCGI Process Manager), it is an alternative PHP FastCGI implementation. it has some additional features useful for sites of any size, especially busier sites). Install it by issuing the following command.
$ sudo apt-get install php5-fpm php5-mysql php5-cli
Edit /etc/php.ini.
$ sudo nano /etc/php5/fpm/php.ini
set cgi.fix_pathinfo=0
cgi.fix_pathinfo=0
Edit /etc/php5/fpm/pool.d/www.conf file,
$ sudo nano /etc/php5/fpm/pool.d/www.conf
Make sure the following values are UN-commented.
listen = /var/run/php5-fpm.sock
EnablePHP-FPM Support on Virtual Host:
Let’s create name based virtual host on Nginx server for the following details.
Server Name : server.itzgeek.com
Document Root : /usr/share/nginx/html/itzgeek.com
Create the configuration file called virtual.conf and Edit /etc/nginx/conf.d/virtual.conf.
$ sudo nano /etc/nginx/conf.d/virtual.conf
Add the following content.
server {
server_name server.itzgeek.com;
root /usr/share/nginx/html/itzgeek.com;

location / {
index index.html index.htm index.php;
}

location ~ \.php$ {
include /etc/nginx/fastcgi_params;
fastcgi_pass unix:/var/run/php5-fpm.sock;
fastcgi_index index.php;
fastcgi_param SCRIPT_FILENAME /usr/share/nginx/html/itzgeek.com$fastcgi_script_$
}
}
Create host entry for your domain (server.itzgeek.com) in /etc/hosts file.
$ sudo nano /etc/hosts
Add host entry. The line should look like below.
127.0.0.1 localhost.localdomain localhost server.itzgeek.com
Testing PHP-FPM support on the Virtual host:
Create the document root directory.
$ sudo mkdir /usr/share/nginx/html/itzgeek.com
For testing the PHP, Place one PHP file on to the document root of the created virtual host, In the terminal copy/paste the following line:
# vi /usr/share/nginx/html/itzgeek.com/index.php
This will open up a file called index.php, Copy/Paste this line into the index.php file:
<?php phpinfo(); ?>
Save and close the file.
Restart the services.
$ sudo service nginx reload
$ sudo service php5-fpm reload
Now open up your web browser and type your domain in the web address:
http://server.itzgeek.com
The page looks like below:
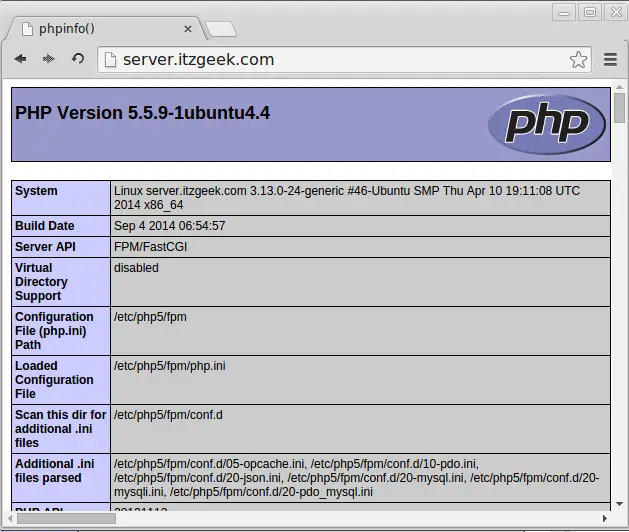
From the above screen shot, PHP is working, and it’s working through FPM/FastCGI, as shown in the Server API line. If you scroll further down, you will see all modules that are already enabled in PHP.
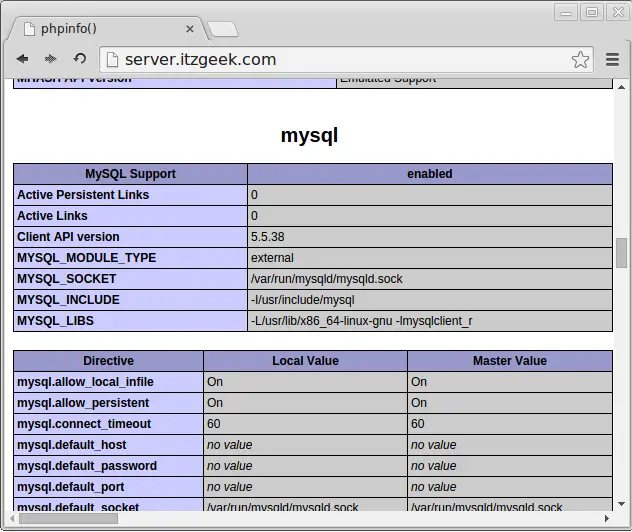
Scroll down the browser and look for the MySQL support information.
Extras:
If you get any error related to permission denied like below on /var/log/nginx/error.log, you need to follow below steps
connect() to unix:/var/run/php5-fpm.sock failed (13: Permission denied) while connecting to upstream.
Edit the following file.
sudo nano /etc/php5/fpm/pool.d/www.conf
Change owner from www-data to nginx and enable permission too.
listen.owner = nginx
listen.group = nginx
listen.mode = 0660
READ: phpMyAdmin with Nginx on LinuxMint 18 / LinuxMint 17
That’s all!