 Apache web server is the most widely used web server application in the world, it shares 63% word web server market. It supports all major distribution such as windows, Linux, Solaris, and Mac operating systems, it considerably has large usage on Unix platform due to the package bundled with the operating system disc, and also it is the default web server for Linux operating system. Linux itself more secure and with the Apache server, Linux has dominated the worldwide market. Here is the small tutorial about installing the Apache web server on Ubuntu 13.04.
Installation:
1. Installing web server:
Apache webserver binary comes along with installation disc, the package can be installed either by selecting web server package while performing the os installation or manually using the following command
Once Apache is installed, it must be configured to run.
2. Installation Overview:
Installation of Apache server creates multiple directories and files which are very much important, some important directories are listed below.
| /etc/apache2 | Main Apache root configuration directory. |
| /etc/apache2/conf.d | Additional Apache configuration files provided by third-party software. |
| /etc/apache2/apache2.conf | Main Configuration file. |
| /etc/apache2/mods-enabled | Configuration files for additional modules. |
| /etc/apache2/sites-enabled | Contains virtual host configurations. |
| /var/www | Main web document root directory. |
3.Testing:
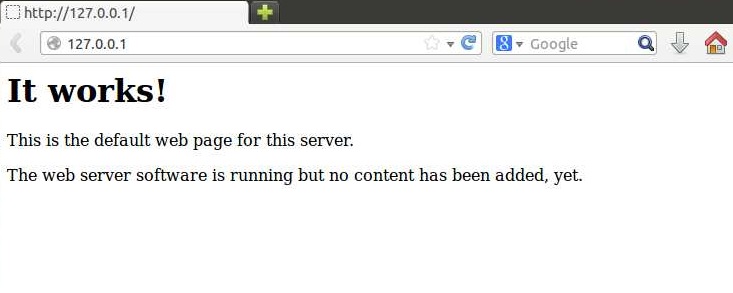
Open up the web browser and navigate to 127.0.0.1 or http://localhost, it should show the following web page, it verifies that Apache server has been installed properly.
Configuration:
1. Virtual Host:
VirtualHost is a virtual container that handles web requests from clients, web requests can be either name-based (Ex. www.example.com) or ip based (Ex. http://192.168.0.1). Name-based virtual hosts can be found everywhere, almost all web servers use name-based virtual host which is very common in the current situation. More information on the virtual hosts can be found here.
The following comprises the virtual host, virtual hosts must contain the following directives to get it to work.
| <VirtualHost *:80> | This ensures the Virtual Host listening on port 80, change this to listen on other port. |
| ServerAdmin | Mail Id of the Server administrator. |
| DocumentRoot | Location of the web documents. |
| ServerName | Domain name of the Virtual Host (like www.example.com). |
| ErrorLog | Error Log location of the particular virtual host. |
| CustomLog | Log location of the particular virtual host. |
| </VirtualHost> | End of virtual host container. |
Virtual hosts can be created either on main configuration file (/etc/apache2/apache2.conf) or on additional configuration directory ( /etc/apache2/sites-enabled/***). Creating the virtual host under the additional configuration directory is the best option because it would be best practice to be out of the main config file. Here we look into Name-based Virtual Host, there is some assumptions to be made before creating the virtual host.
| Server Name | www.example.com |
| Ip address | 192.168.0.1 |
| DocumentRoot | /var/www/example |
| Access Log | /var/log/apache2/example.com.access.log |
| Error Log | /var/log/apache2/example.com.error.log |
Default virtual host file (/etc/apache2/sites-enabled/000-default) can be found under additional config directory, duplicate that file and use it for name based virtual host.
Edit the Virtual Host file.
Add the following, remove the unwanted entries.
ServerAdmin [email protected]
ServerName www.example.com
DocumentRoot /var/www/example
ErrorLog ${APACHE_LOG_DIR}/example.com.error.log
CustomLog ${APACHE_LOG_DIR}/example.com.access.log combined
</VirtualHost>
The above config file is shorter than the copied one, copied file includes directory browsing, SymLink support etc.. which are not necessary as for as beginners concerned.
2. Document upload:
Create “example” directory under “/var/www”.
Place index.html document under document root mentioned above, in our case it is /var/www/example. Create index.html under the document root.
Place the following information to identify the virtual host.
Once you placed the above, save and close it.
3.Host Entry:
Name-based virtual host uses a domain name, it requires a DNS server to resolve the name. Setting up a DNS server is a little bit complicated as it is out of our tutorial. Host entry can be used instead of DNS, host entry does the same work that done by DNS; as it is limited to resolve the name to ip address. The host can be done by editing hosts file under /etc directory.
Add the following entry.
Save and close it. Restart the webserver to take effect on changes that we did.
4.Testing:
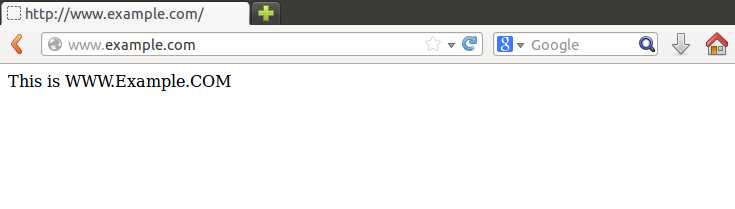
Open up the browser and navigate to http://www.example.com, if your setting is proper; you should get the following page. The following image verifies that the server works according to our settings.
Conclusion:
The server successfully configured to serve the name-based virtual host, it is very commonly used in web hosting servers. Apache webserver supports plain HTML document as the default document file, PHP support can be added by installing modules. You can also add support of the secure layer (ssl) by installing ssl modules.