![]()
This is the fourth part of configuring neutron (Networking) on Ubuntu 14.04, you can go through previous article on Configure Neutron #1 , Configure Neutron #2, and Configure Neutron #3 in which we have installed and configured Networking components on Controller, Network, and Compute node.
Here, we will be creating initial network, this must be created before launching VM instance.
Creating external Network:
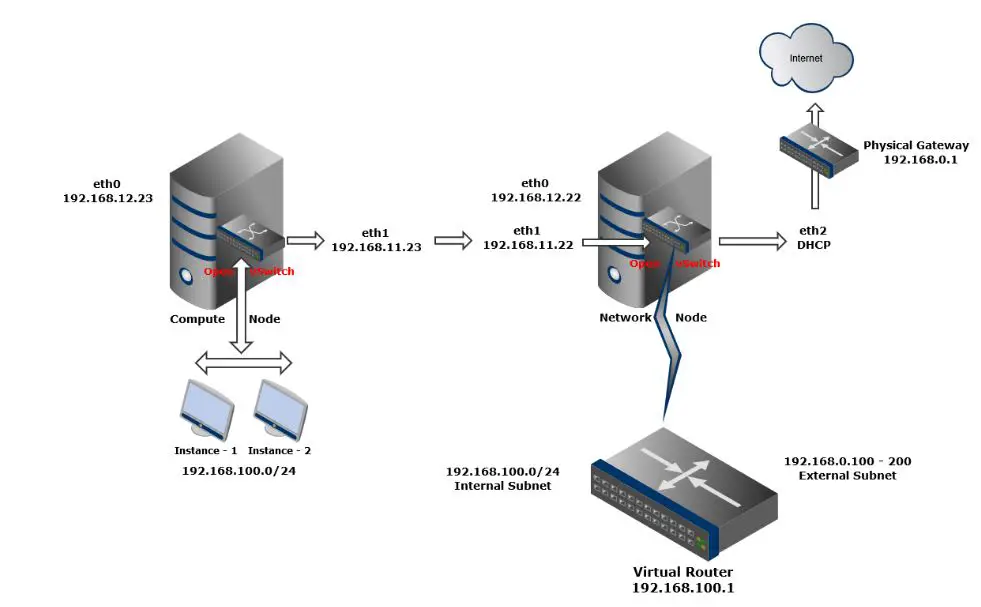
The external network provides internet access to instances using NAT (Network Address Translation), internet access can be enabled to individual instances using a floating ip address with the suitable security rules.
Load credentials on controller node.
# source admin-openrc.sh
create the network.
# neutron net-create ext-net --router:external --provider:physical_network external --provider:network_type flat

Created a new network:
+---------------------------+--------------------------------------+
| Field                     | Value                                |
+---------------------------+--------------------------------------+
| admin_state_up            | True                                 |
| id                        | b4c8d5fc-a4b9-42dc-b705-48c0d4217137 |
| mtu                       | 0                                    |
| name                      | ext-net                              |
| provider:network_type     | flat                                 |
| provider:physical_network | external                             |
| provider:segmentation_id  |                                      |
| router:external           | True                                 |
| shared                    | False                                |
| status                    | ACTIVE                               |
| subnets                   |                                      |
| tenant_id                 | 9b05e6bffdb94c8081d665561d05e31e     |
+---------------------------+--------------------------------------+
Create a subnet on the external network.
For example, using 192.168.0.0/24 with floating IP address range 192.168.0.200 to 203.0.113.250 with the physical gateway 192.168.0.1. This gateway should be associated physical network
# neutron subnet-create ext-net 192.168.0.0/24 --name ext-subnet --allocation-pool start=192.168.0.200,end=192.168.0.250 --disable-dhcp --gateway 192.168.0.1
Created a new subnet:
+-------------------+----------------------------------------------------+
| Field             | Value                                              |
+-------------------+----------------------------------------------------+
| allocation_pools  | {"start": "192.168.0.200", "end": "192.168.0.250"} |
| cidr              | 192.168.0.0/24                                     |
| dns_nameservers   |                                                    |
| enable_dhcp       | False                                              |
| gateway_ip        | 192.168.0.1                                        |
| host_routes       |                                                    |
| id                | b32eb748-9bc0-4e57-ae26-cd17033b635e               |
| ip_version        | 4                                                  |
| ipv6_address_mode |                                                    |
| ipv6_ra_mode      |                                                    |
| name              | ext-subnet                                         |
| network_id        | b4c8d5fc-a4b9-42dc-b705-48c0d4217137               |
| subnetpool_id     |                                                    |
| tenant_id         | 9b05e6bffdb94c8081d665561d05e31e                   |
+-------------------+----------------------------------------------------+
Creating internal network:
The internal network provides internal network access for instances, internal networks are isolated from each other. Only the instance running on same network can communicate each other, not to or from other networks.
Create the internal network (int-net).
# neutron net-create int-net
Created a new network:
+---------------------------+--------------------------------------+
| Field                     | Value                                |
+---------------------------+--------------------------------------+
| admin_state_up            | True                                 |
| id                        | 187a7b6c-7d14-4d8f-8673-57fa9bab1bba |
| mtu                       | 0                                    |
| name                      | int-net                              |
| provider:network_type     | gre                                  |
| provider:physical_network |                                      |
| provider:segmentation_id  | 1                                    |
| router:external           | False                                |
| shared                    | False                                |
| status                    | ACTIVE                               |
| subnets                   |                                      |
| tenant_id                 | 9b05e6bffdb94c8081d665561d05e31e     |
+---------------------------+--------------------------------------+
Create a subnet on the internal network. For example, using 192.168.100.0/24 network with the virtual gateway 192.168.0.1
# neutron subnet-create int-net 192.168.100.0/24 --name int-subnet --gateway 192.168.100.1
Created a new subnet:
+-------------------+------------------------------------------------------+
| Field             | Value                                                |
+-------------------+------------------------------------------------------+
| allocation_pools  | {"start": "192.168.100.2", "end": "192.168.100.254"} |
| cidr              | 192.168.100.0/24                                     |
| dns_nameservers   |                                                      |
| enable_dhcp       | True                                                 |
| gateway_ip        | 192.168.100.1                                        |
| host_routes       |                                                      |
| id                | 7f75b54f-7b87-42e4-a7e1-f452c8adcb3a                 |
| ip_version        | 4                                                    |
| ipv6_address_mode |                                                      |
| ipv6_ra_mode      |                                                      |
| name              | int-subnet                                           |
| network_id        | 187a7b6c-7d14-4d8f-8673-57fa9bab1bba                 |
| subnetpool_id     |                                                      |
| tenant_id         | 9b05e6bffdb94c8081d665561d05e31e                     |
+-------------------+------------------------------------------------------+
Create the virtual router.
A virtual router passes network traffic between two or more virtual networks, In our case, we need to create a router and attach internal and external networks to it.
# neutron router-create int-router
Created a new router:
+-----------------------+--------------------------------------+
| Field                 | Value                                |
+-----------------------+--------------------------------------+
| admin_state_up        | True                                 |
| distributed           | False                                |
| external_gateway_info |                                      |
| ha                    | False                                |
| id                    | a47b81d7-2ad8-4bdc-a17a-0026ad374dcf |
| name                  | int-router                           |
| routes                |                                      |
| status                | ACTIVE                               |
| tenant_id             | 9b05e6bffdb94c8081d665561d05e31e     |
+-----------------------+--------------------------------------+
Attach the router to the internal subnet.
# neutron router-interface-add int-router int-subnet
Added interface cb36eb61-5e3a-4c85-b747-8e230b5d1fec to router int-router.
Attach the router to the external network by setting it as the gateway.
# neutron router-gateway-set int-router ext-net
Set gateway for router int-router
You can verify the connectivity by pinging 192.168.0.200 from the external physical network. This is because we used subnet 192.168.0.0/24, floating ip ranges from 192.168.0.200 – 250, tenant router gateway should occupy the lowest IP address in the floating IP address range ie 192.168.0.200
C:\>ping 192.168.0.200

Pinging 192.168.0.200 with 32 bytes of data:
Reply from 192.168.0.200: bytes=32 time<1ms TTL=64
Reply from 192.168.0.200: bytes=32 time<1ms TTL=64
Reply from 192.168.0.200: bytes=32 time<1ms TTL=64
Reply from 192.168.0.200: bytes=32 time=1ms TTL=64

Ping statistics for 192.168.0.200:
Packets: Sent = 4, Received = 4, Lost = 0 (0% loss),
Approximate round trip times in milli-seconds:
Minimum = 0ms, Maximum = 1ms, Average = 0ms
That’s All!!!, you have successfully configured Networking (Neutron). You are good to go for launching an instance.