Method 1:
Switch to root user.
[geeksite@geeksite]$ su -
Password:
Edit the /etc/selinux/config.
[root@geeksite]# vi /etc/selinux/config
Change SELinux=enforcing
# This file controls the state of SELinux on the system.
# SELINUX= can take one of these three values:
#     enforcing - SELinux security policy is enforced.
#     permissive - SELinux prints warnings instead of enforcing.
#     disabled - No SELinux policy is loaded.
SELINUX=enforcing
# SELINUXTYPE= can take one of these two values:
#     targeted - Targeted processes are protected,
#     mls - Multi Level Security protection.
SELINUXTYPE=targeted
to SELinux=disabled
# This file controls the state of SELinux on the system.
# SELINUX= can take one of these three values:
#     enforcing - SELinux security policy is enforced.
#     permissive - SELinux prints warnings instead of enforcing.
#     disabled - No SELinux policy is loaded.
SELINUX=disabled
# SELINUXTYPE= can take one of these two values:
#     targeted - Targeted processes are protected,
#     mls - Multi Level Security protection.
SELINUXTYPE=targeted
This will disable SELinux on next reboot.
To disable SELinux without rebooting, use the following command.
[root@geeksite]# setenforce 0
This will disable SELinux until you reboot the system.
Method 2:
Type the following command in Terminal.
[root@geeksite]# setup
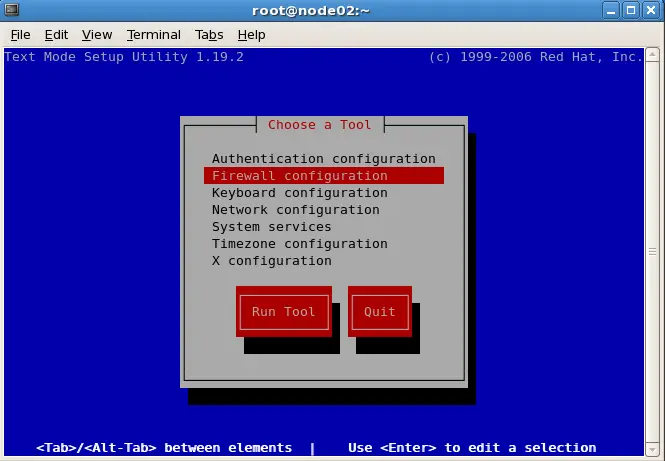
You will get the following window, select firewall configuration and select OK and press Enter.
Disable it by using Tab and Select OK and press Enter.
Select Quit and Hit Enter and Now the SELinux disabled message will appear in terminal.
Method 3:
Type the following command in Terminal.
[root@geeksite]# lokkit
Or
[root@geeksite]# system-config-securitylevel-tui
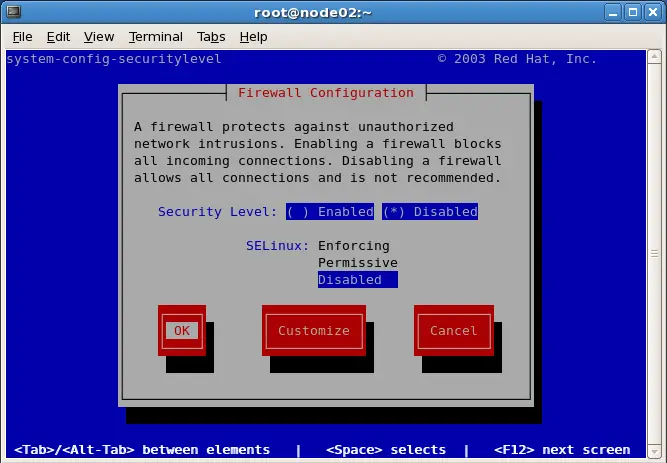
You will get the following firewall configuration sreen, Tab to select the SELinux disabled and also select OK, then press Enter.
Now you will get SELinux disabled message in terminal. That’s all! you have sucessfuly disabled SELinux on CentOS 5. Here is the tutorial about how to disable SELinux under CentOS 6.