When you consider the top needs for your company, your consultancy, your school work, or your personal information, one of the most important issues will be data backups. Without a solid backup solution, you could easily wind up on the wrong side of disaster. It happens … all too often. In fact, spend enough time on social media and you’ll see far too many instances of users crying out about data loss. Without backups, it’s not a matter of if, but a matter of when.
That is why it is crucial you have a backup plan in action. But how? What tools should you use? A quick Google search will reveal a host of available solutions up for the task. One such tool is CloudBerry Backup.
This solution offers:
- 256-bit AES encryption
- Image-based backup
- MS SQL Server, MS Exchange and Oracle backup
- Restore as a VM in the Cloud (EC2, Azure VM)
- Data Deduplication
On top of its short list of very important features, CloudBerry makes use of a highly intuitive interface that offers an incredibly easy means for backing up to cloud services like Amazon S3, Amazon Glacier, Microsoft Azure, Google Cloud Storage, Openstack Swift, and more. I like to walk you through the installation of CloudBerry and then how to configure a backup to Amazon S3. I’ll be demonstrating the installation on Ubuntu. Although the installation varies from platform to platform, the usage is identical.
With that said, let’s install and use CloudBerry Backup.
Installation
Installing CloudBerry Backup on Linux is actually quite simple. Head to the CloudBerry Backup page, click on the Linux Server tab, and click on the DOWNLOAD FREE TRIAL button. Click on the top option (Ubuntu 12/14/16, Debian 7.11/8.10/9.3) and save the .deb file to the ~/Downloads directory on your local drive. Once the download has completed, open up a terminal window, change into the directory housing the file with the command cd ~/Downloads, and install with the command:
sudo dpkg -i ubuntu14_CloudBerryLab*.deb
Once the installation completes, you should find the CloudBerry Backup entry in your desktop menu. Start up the application from the desktop menu. At this point, you will have a 14-day free trial. Once you get beyond that point, you’ll need to purchase a license to continue using the software. Licensing options can be found in this price/feature matrix. Upon the first run, you’ll be asked which version you want to use. You can either select to go with the free Home Edition, start the 15-day free trial, or activate a commercial edition.
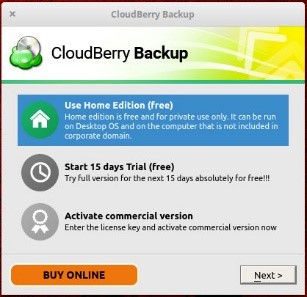
If you don’t have a license, you can click BUY ONLINE to open a browser to the CloudBerry license purchase page. Click Next. You will then be asked to enter a User Name and Email. Once you’ve done that, click Get registration key and a key will be sent to the configured email address.

Paste the registration key (from the email you will receive from CloudBerry) in the provided section, click Finish, and you’re ready to go.
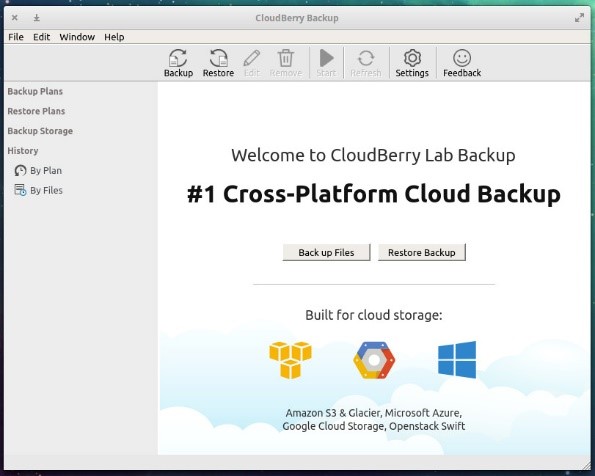
Creating a backup
From the CloudBerry Backup main window, click File >> Create Backup Plan.
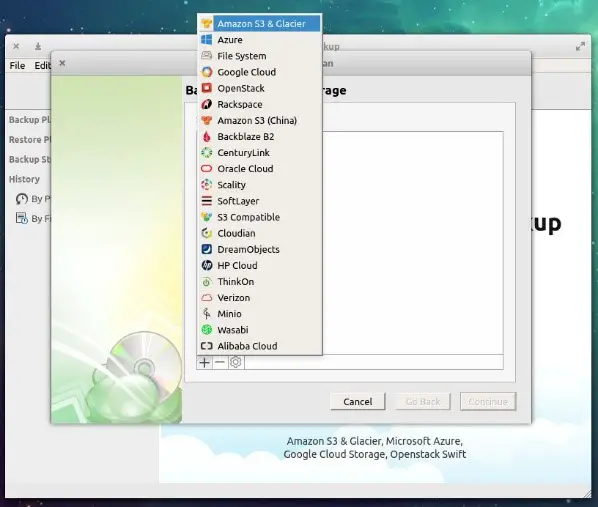
In the resulting window, click the + button and then select the Amazon S3 entry from the list of supported cloud services.
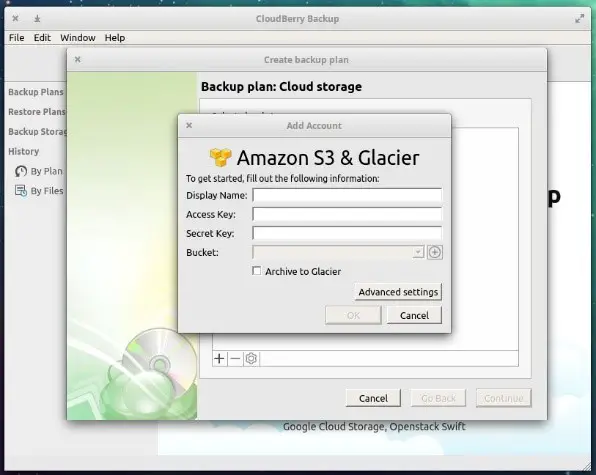
Once you’ve done that, you would require entering your Amazon S3 authentication information. To connect an Amazon S3 account, you will need:
- Display Name
- Access Key
- Secret Key
- Bucket
In the resulting window, fill out that information and click OK.
And that’s it. Once CloudBerry Backup authenticates against your Amazon S3 account, you can then select what directories/files to backup. When you find yourself back at the Select cloud storage window, click the Continue button and you’ll then be presented with individual windows to finish up the configuration of your backup. This includes:
- Specifying the backup plan name
- Select the directories/files to be backed up
- Enabling compression and encryption (not available in the Home Edition)
- Configuring the backup retention policy
- Scheduling the backup
Each of the above will be specific to your needs. Make sure to take care of each step, to ensure your backup to Amazon S3 is exactly what you need.
That’s all there is to it. You should now be able to log into your Amazon S3 account and see the specified files backed up to your Amazon S3 target bucket.
Congratulations, you now have a scheduled backup to a reliable cloud service, thanks to CloudBerry Backup.