 OpenVAS known as Open Vulnerability Assessment System is an open source vulnerability suite to run the test against servers for known vulnerabilities using the database (Network Vulnerability Tests), OpenVAS is a free software, its components are released under GNU General Public License (GNU GPL). Here is the small guide to install OpenVAS on Ubuntu 16.04 / Ubuntu 14.04.
Setup Repository:
Offical OpenVAS packages are available on launchpad. Issue the following command to add OpenVAS PPA on your machine.
sudo add-apt-repository ppa:mrazavi/openvas
Update your system repository cache.
sudo apt-get update
Install & Setup OpenVAS:
OpenVAS repository includes newer packages for OpenVAS 9. If you do not mention the version name in apt-get install command, you may end up installing OpenVAS 8 instead of OpenVAS 9 on your system.
### OpenVAS 9 ###

sudo apt-get install -y openvas9

### OpenVAS 8 ###

sudo apt-get install -y openvas
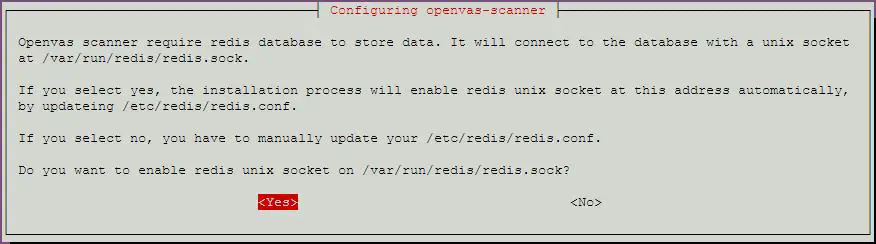
During the package installation, let the installer automatically configure Redis database for OpenVAS scanner.
Upon completion of installation. You would need to download a set of NVT’s (Network Vulnerability Tests) from OpenVAS Feed service. To begin the download, execute the following command.
### OpenVAS 9 ###

sudo greenbone-nvt-sync

### OpenVAS 8 ###

sudo openvas-nvt-sync
Upon completion, run following command to download and update our security content automation protocol data (SCAP).
### OpenVAS 9 ###

sudo greenbone-scapdata-sync

### OpenVAS 8 ###

sudo openvas-scapdata-sync
This will take longer time, but not more than 30 minutes (Depends on your internet connection).
Download certdata as well.
### OpenVAS 9 ###

sudo greenbone-certdata-sync

### OpenVAS 8 ###

sudo openvas-certdata-sync
This will also take some time to complete, but lesser than what it takes for downloading SCAP data.
Restart the OpenVAS scanner and OpenVAS Manager.
sudo service openvas-scanner restart
sudo service openvas-manager restart
Now Rebuild the OpenVAS database.
sudo openvasmd --rebuild --progress
Working with OpenVAS Web Interface:
In OpenVAS 9, default port number of the web interface is 4000. So, to access the web interface for version 9, go to,
To access the web interface of OpenVAS 8, go to
Change Interface Port Number (Optional) – Ubuntu 16.04:
You can change the port number of web interface by editing /etc/default/openvas-gsa.
PORT_NUMBER=4000
Restart the openvas-gsa service to take an effect of the port number change.
sudo service openvas-gsa restart
Once Completed, Start the OpenVAS Manager.
openvasmd
Run the first security scan:
OpenVAS 9:
OpenVAS 8:
That’s All, Place your valuable comments below.