The LEMP stack, which stands for Linux, Nginx web server, MariaDB/MySQL database server, and PHP, is the perfect technology stack to host traffic-intensive websites and applications.
This LEMP stack is an alternative to the LAMP stack that uses Apache as a web server instead of Nginx.
In this post, we will see how to install LEMP Stack on Ubuntu 22.04.
Install Linux
Follow the step-by-step guide to install Ubuntu 22.04 or upgrade Ubuntu 20.04 to Ubuntu 22.04.
Proceed to the installation of AMP (Nginx v1.18, PHP-FPM v8.1, MariaDB v10.6) on Ubuntu 22.04.
Install EMP Stack
Install Nginx
Nginx is an open-source web server that provides HTTP, reverse proxy, caching, and load-balancing functionality. It’s a great alternative to Apache, and it’s effortless to set up.
From Ubuntu Repository
Nginx package is available on the Ubuntu repository. Installing Nginx from the Ubuntu repository is the easiest method. Use the apt command to install Nginx.
sudo apt update

sudo apt install -y nginx
Nginx webserver’s default document root is /var/www/html/ and the configuration files are found under the /etc/nginx/ directory.
By now, the Nginx web server should be up and running. To test the Nginx, open a web browser and visit the below URL.
You will get a web page Welcome to nginx! that confirms the Nginx has been successfully installed and is up and running.
From Nginx Repository
First, install the below packages for setting up the Nginx repository.
sudo apt update

sudo apt install -y curl gnupg2 ca-certificates lsb-release
Then, Add the Nginx repository and signing key to the system.
curl -fsSL https://nginx.org/keys/nginx_signing.key  | sudo gpg --dearmor -o /usr/share/keyrings/nginx-keyring.gpg

echo "deb [arch=amd64 signed-by=/usr/share/keyrings/nginx-keyring.gpg] https://nginx.org/packages/ubuntu `lsb_release -cs` nginx" | sudo tee /etc/apt/sources.list.d/nginx.list
Finally, install the Nginx package using the apt command.
sudo apt update

sudo apt install -y nginx
Nginx’s default document root is /usr/share/nginx/html. The configuration files are found under the /etc/nginx/ directory.
If required, start the Nginx service after the installation.
sudo systemctl start nginx
To test the web server, open a web browser and visit the below URL.
You will get a web page Welcome to nginx! that confirms the Nginx has been successfully installed and is up and running.
Install MariaDB
MariaDB is a drop-in replacement for MySQL that supports all standard MySQL features. We will set up MariaDB as part of a LEMP stack in our installation.
Install the MariaDB server v10.6 from the Ubuntu repository.
sudo apt install -y mariadb-server mariadb-client
MariaDB service should be up and running at this moment. So, check the status of the MariaDB service using the below command.
sudo systemctl status mariadb
Then, make the MariaDB server secure by running the mysql_secure_installation command.
Install PHP
The PHP FastCGI Process Manager (FPM) is a process manager to manage FastCGI SAPI (Server API) in PHP. It is an alternative PHP FastCGI implementation and is helpful for bigger and busier sites. PHP-FPM can handle more requests per second than other PHP FastCGI implementations.
Install php-fpm package and PHP MySQL extension.
sudo apt install -y php-fpm php-mysql php-cli
Depending on the PHP version, change the ownership and group from www-data to nginx for Unix socket.
sudo sed -i 's/listen.owner \= www-data/listen.owner \= nginx/g' /etc/php/8.1/fpm/pool.d/www.conf

sudo sed -i 's/listen.group \= www-data/listen.group \= nginx/g' /etc/php/8.1/fpm/pool.d/www.conf
Create Nginx Server Blocks
Now, create a virtual host on the Nginx server for the following details to test the LEMP stack.
Server Name: www.itzgeek.local
Document Root : /usr/share/nginx/html/site.itzgeek.local OR /var/www/html/site.itzgeek.local
Create a virtual host configuration file www.itzgeek.local.conf in /etc/nginx/conf.d/ OR /etc/nginx/sites-enabled/ directory.
Add the following server block to the above file. You may modify the server_name and root as per your requirement.
server {
   server_name itzgeek.local www.itzgeek.local;
   root /usr/share/nginx/html/www.itzgeek.local;

   location / {
       index index.html index.htm index.php;
   }

   location ~ \.php$ {
      include /etc/nginx/fastcgi_params;
      fastcgi_pass unix:/run/php/php8.1-fpm.sock;
      fastcgi_index index.php;
      fastcgi_param SCRIPT_FILENAME $document_root$fastcgi_script_name;
   }
}
Then, create the document root directory for the server block.
sudo mkdir /usr/share/nginx/html/www.itzgeek.local
Next, place a PHP file onto the document root to validate the processing of PHP.
echo "<?php phpinfo(); ?>" | sudo tee /usr/share/nginx/html/www.itzgeek.local/index.php
Finally, restart the Nginx and PHP-FPM services.
sudo systemctl restart nginx

sudo systemctl restart php8.1-fpm
Test LEMP Stack
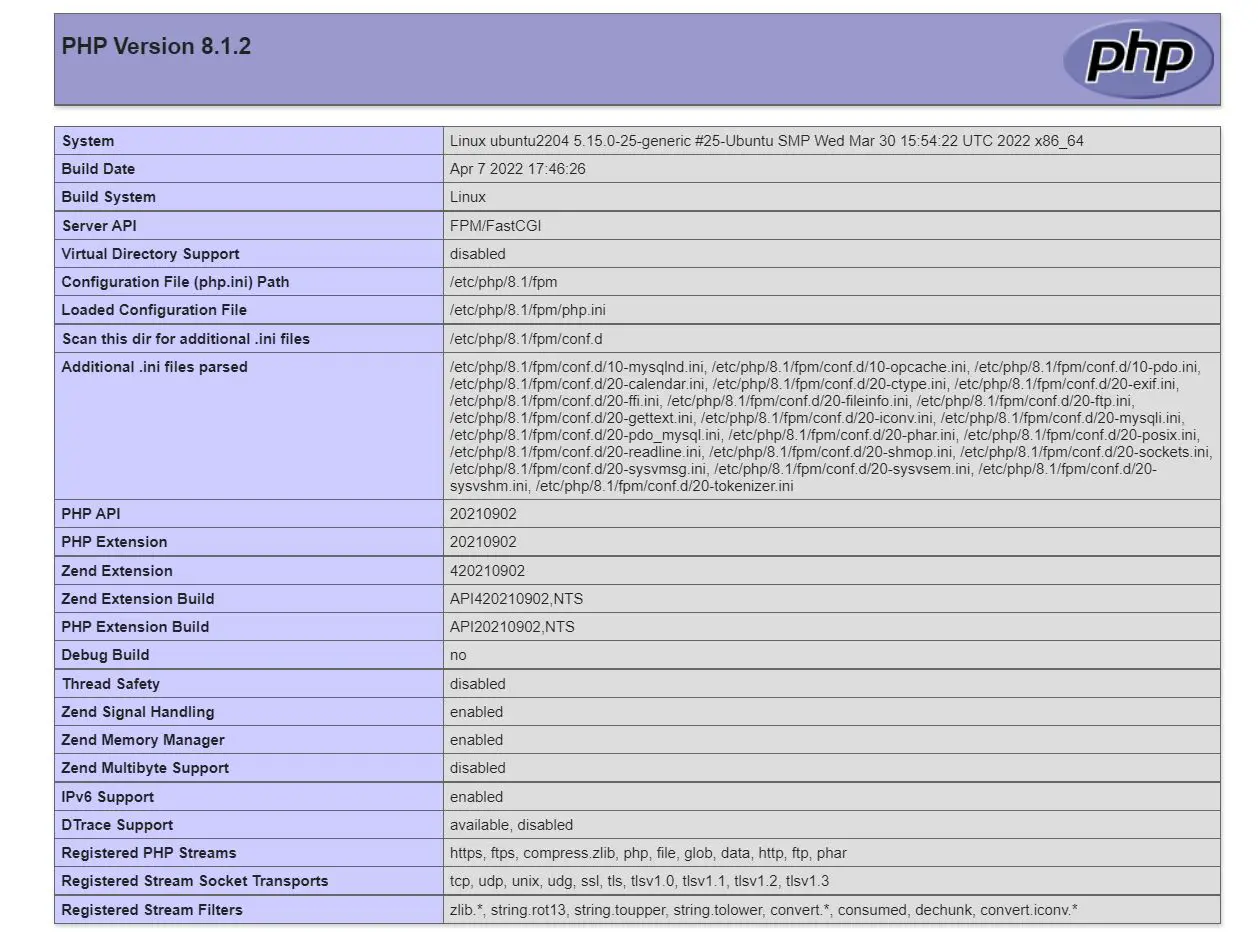
First, create a host entry for your domain (www.itzgeek.local) in the /etc/hosts file to test the LEMP stack locally. Then, open up your web browser and type your domain name in the address bar.
The page will look like the below:
As you can see in the screenshot, the PHP is working through FPM/FastCGI (Server API).
Scroll down the page to view the PHP support for MySQL, XML, and other extensions.
Conclusion
I hope this post helped you install LEMP Stack on Ubuntu 22.04.