Nagios server provides ability to monitor the windows box using the NSClient++ agent on it, you can able to monitor the attributes like Memory usage,CPU load,Disk usage,Service states,Running processes, etc.Without the agent you can not monitor any attributes, it acts as a proxy between Nagios plugin which actually does the monitoring and attributes of the machine. Nagios server does the check_nt plugin to communicate with the NSClient++ agent.
Nagios Server —–> Check_nt ——-> NSClient++ ——–> M/C Attributes
Follow the 2 simple steps to achieve this.
1. Install NSClient++
2. Configure Nagios Server
Install NSClient++ Agent:
Download the latest NSClient++ from the SourceForge.net, Install it on the windows machine. While installing the agent you might require to give input such as Nagios server information, password and module selection information.
1. Install by double clicking on the installer
2. Accept the license agreement
3. Select the Typical Installation.
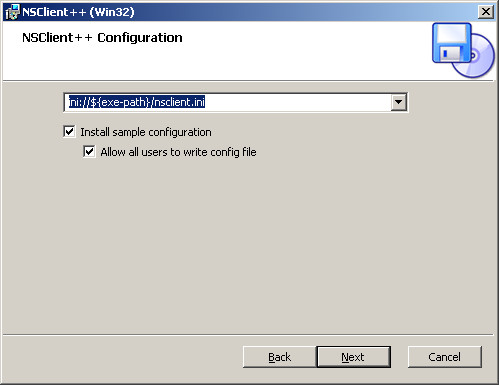
4. Select the location of the nsclient.ini file ( Leave as it is).
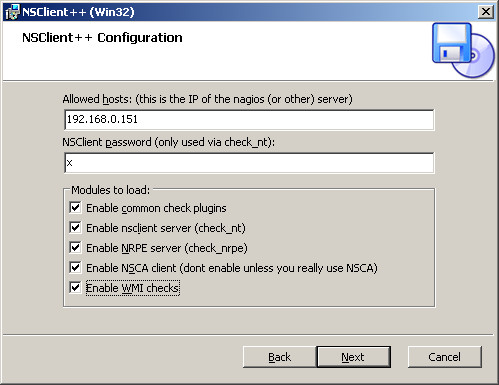
5. Give the Nagios server ip address and Protected password of your wish ( Later this password has to be entered on command.cfg file).
6. Finish the installation.
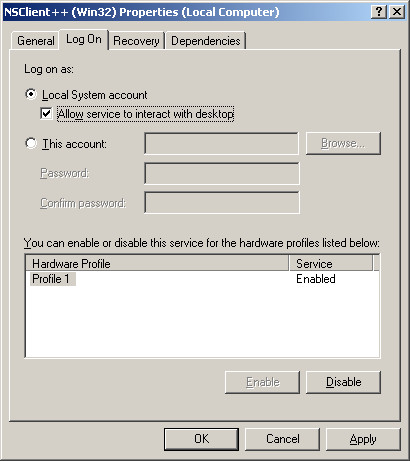
7. Go to the Run —> services.msc —> NSClient++ service —> Logon —> Allow service to interact with desktop.
8. Almost you can do the all configuration while installing, if you left anything to do you can edit the nsclient.ini file (located in the C:\Program Files\NSClient++) and make the changes:
Enable or Disable the modules listed in the [modules] section.
Optionally require a password for clients by changing the ‘password’ option in the [Settings] section.
Setup the ‘allowed_hosts’ option in the [Settings] section. Add the IP address of the Nagios server to this line, or leave it blank to allow all hosts to connect.
Setup the ‘port’ option in the [NSClient] section is uncommented and set to ‘12489’ (the default port).
Configure Nagios Server:
define host{
Define the Service, replace the wipro.iii.local with your host name.
define service{
}
define service{
use generic-service
host_name wipro.iii.local
service_description Uptime
check_command check_nt!UPTIME
}
Password Protection:
Add the entry of password ( -s your-password that you given while installing ) right next to the -p 12489 in the file.
define command{
command_name check_nt
command_line $USER1$/check_nt -H $HOSTADDRESS$ -p 12489 -s x -v $ARG1$ $ARG2$
}
Once done, open the nagios.cfg and uncomment the following entry.
Remove # from the entry.
Restart the Nagios server.
Login into the web interface and monitor the windows machine.
That.s all you have perfectly configured your Nagios monitoring client on the windows server. Now you can monitor the basic stuffs.
Search Term:
Install Nagios
Monitor Windows server with Nagios
Monitor 2003 Server Nagios
Monitor Win 2003 with Nagios
Setup 2003 Server with Nagios
Install Nagios 3.4.4
Install Nagios on CentOS
Install Nagios on CentOS 6
Install Nagios on Redhat
Install Nagios on RHEL 6
Setup Nagios on CentOS
Configure Nagios on CentOS 6
Configire Nagios on RHEL 6
Install Nagios on Fedora
Step by Step Nagios installation