Setting up the network and bringing servers into the network is the primary administration task for any system administrator.
In some cases, these tasks are automated using DHCP (Dynamic Network Configuration Protocol) which takes care of assigning IP Address to Desktop/Servers.
READ: How To configure DHCP server on CentOS 7, Ubuntu 18.04 & Debian 9
But, if you go to the bigger organizations, they use static (manual) IP to avoid network issues due non-availability of DHCP servers.
Configure Static IP Address in CentOS 7 / RHEL 7
Let us configure our system for the following information.
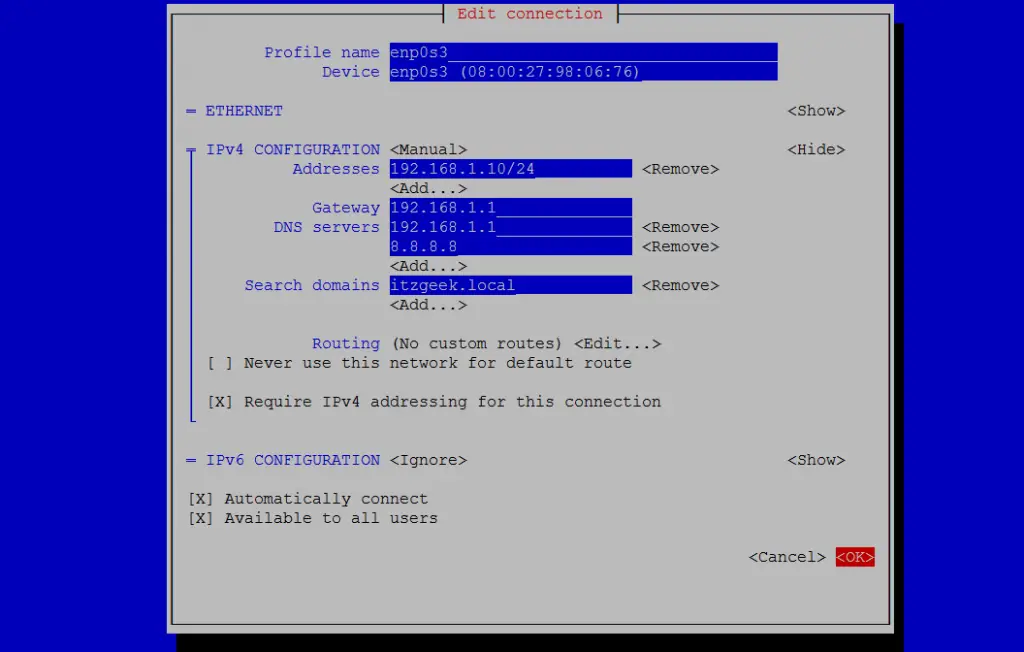
IP Address: 192.168.1.10
Netmask: 255.255.255.0
Gateway (Router): 192.168.1.1
DNS Server 1: 192.168.1.1
DNS Server 2: 8.8.8.8
Domain Name: itzgeek.local
Find the available network interfaces on your system
You can use any one of the below commands to list down the available network interfaces on the system.
ifconfig -a
OR
ip a
Choose the desired network interface
The output of ifconfig -a may look like below. Here, I wish to change the IP address of enp0s3.
enp0s3: flags=4163<UP,BROADCAST,RUNNING,MULTICAST>  mtu 1500
        inet 192.168.1.7  netmask 255.255.255.0  broadcast 192.168.1.255
        inet6 fd50:1d9:9fe3:1400:a00:27ff:fe98:676  prefixlen 64  scopeid 0x0
        inet6 fe80::a00:27ff:fe98:676  prefixlen 64  scopeid 0x20
        ether 08:00:27:98:06:76  txqueuelen 1000  (Ethernet)
        RX packets 2997  bytes 3497708 (3.3 MiB)
        RX errors 0  dropped 0  overruns 0  frame 0
        TX packets 1487  bytes 135487 (132.3 KiB)
        TX errors 0  dropped 0 overruns 0  carrier 0  collisions 0

lo: flags=73<UP,LOOPBACK,RUNNING>  mtu 65536
        inet 127.0.0.1  netmask 255.0.0.0
        inet6 ::1  prefixlen 128  scopeid 0x10
        loop  txqueuelen 0  (Local Loopback)
        RX packets 0  bytes 0 (0.0 B)
        RX errors 0  dropped 0  overruns 0  frame 0
        TX packets 0  bytes 0 (0.0 B)
        TX errors 0  dropped 0 overruns 0  carrier 0  collisions 0
Configure the Static IP Address
Method 1
In this method, we will edit the network interface file found under /etc/sysconfig/network-scripts/ directory. For interface enp0s3, the file name would be ifcfg-enp0s3.
vi /etc/sysconfig/network-scripts/ifcfg-enp0s3
Update the interface file as per the requirement.
HWADDR=08:00:27:98:06:76
TYPE=Ethernet
# Static IP Address #
BOOTPROTO=none
# Server IP #
IPADDR=192.168.1.10
# Netmask #
NETMASK=255.255.255.0
# Default Gateway IP #
GATEWAY=192.168.1.1
# DNS Servers #
DNS1=192.168.1.1
DNS2=8.8.8.8
DEFROUTE=yes
IPV4_FAILURE_FATAL=no
# Disable ipv6 #
IPV6INIT=no
# Device Name #
NAME=enp0s3
DEVICE=enp0s3
# Optional – This is system specific and can be created using ‘uuidgen enp0s3’ command #
UUID=02d4a47b-3dbe-4e0b-ae4b-841a8c58e807
# Activate on Boot #
ONBOOT=yes
# Default Domain Search #
DOMAIN=itzgeek.local
Method 2
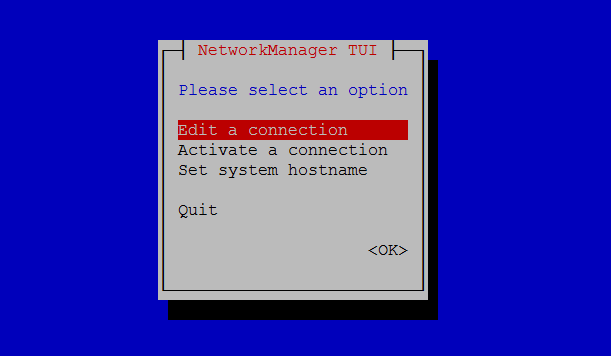
You can also use nmtui, a text-based user interface for configuring network interfaces.
nmtui
Select Edit a connection and press Enter.
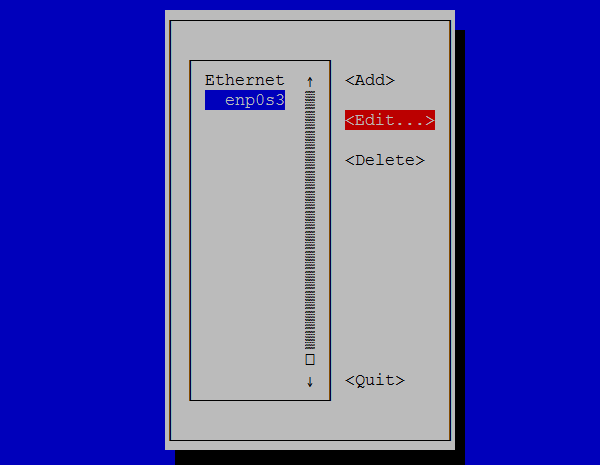
Choose the network interface and then Edit.
Set the IP Address and enter OK.
Restart Network
Finally, restart the network service using the following command to have these changes take effect.
systemctl restart network
Verify Static IP Address
Use ifconfig -a command to verify the static ip address.
enp0s3: flags=4163<UP,BROADCAST,RUNNING,MULTICAST>  mtu 1500
        inet 192.168.1.10  netmask 255.255.255.0  broadcast 192.168.1.255
        inet6 fd50:1d9:9fe3:1400:a00:27ff:fe98:676  prefixlen 64  scopeid 0x0
        inet6 fe80::a00:27ff:fe98:676  prefixlen 64  scopeid 0x20
        ether 08:00:27:98:06:76  txqueuelen 1000  (Ethernet)
        RX packets 55  bytes 6637 (6.4 KiB)
        RX errors 0  dropped 0  overruns 0  frame 0
        TX packets 84  bytes 12745 (12.4 KiB)
        TX errors 0  dropped 0 overruns 0  carrier 0  collisions 0

lo: flags=73<UP,LOOPBACK,RUNNING>  mtu 65536
        inet 127.0.0.1  netmask 255.0.0.0
        inet6 ::1  prefixlen 128  scopeid 0x10
        loop  txqueuelen 0  (Local Loopback)
        RX packets 0  bytes 0 (0.0 B)
        RX errors 0  dropped 0  overruns 0  frame 0
        TX packets 0  bytes 0 (0.0 B)
        TX errors 0  dropped 0 overruns 0  carrier 0  collisions 0
Also, verify the DNS server entries.
cat /etc/resolv.conf
Output:
# Generated by NetworkManager
search itzgeek.local
nameserver 192.168.1.1
nameserver 8.8.8.8
Conclusion
That’s All. I hope you have learned how to configure a static IP address on CentOS 7 / RHEL 7.