ONLYOFFICE 8.9 Released – Install the full-featured office and productivity suite on Debian/Ubuntu/Linux Mint
ONLYOFFICE is an open source feature-rich, Web-based office suite that enables you to store and co-edit documents, manage projects, emails and customer relations at one place. It is developed for small and mid-size companies as an effective platform for business operations.
ONLYOFFICE comprises viewers and editors for texts, spreadsheets and presentations, fully compatible with MS Office and OpenDocument formats that offers the support for all the popular formats: DOC, DOCX, TXT, ODT, RTF, ODP, EPUB, ODS, XLS, XLSX, CSV, PPTX, HTML and enables to co-edit documents in real time.
Flavours:
ONLYOFFICE comes in two flavors. The open source version – ONLYOFFICE Community Edition – is distributed under AGPL v.3. The commercial version – ONLYOFFICE Enterprise Edition – is also available.
What’s new in ONLYOFFICE Community Edition:
Online editors 4.0.0:
- fast real-time co-editing like in Google Docs;
- commenting and integrated chat;
- reviewing and tracking changes;
- version history;
- text art;
- named ranges;
- adding, removing and modifying the available formatting styles.
Collaborative system 8.9.0:
- mail and calendar integration;
- enabling a mail autoreply;
- creating an address book;
- giving the Review access rights to documents.
For more information about ONLYOFFICE features, read here.
System requirements:
- CPU: Dual-core 2 GHz or better;
- RAM: 6 GB or more;
- HDD: at least 40 GB of free space;
- At least 8 GB of swap;
- OS: 64-bit Red Hat, CentOS or another compatible distributive with kernel version 3.10 or later, 64-bit Debian, Ubuntu or another compatible distributive with kernel version 3.13 or later;
- Docker: version 1.10 or later (if you are installing ONLYOFFICE with Docker);
Install ONLYOFFICE:
ONLYOFFICE can be installed in three different ways,
1. Install ONLYOFFICE using Repository (read the step by step instructions here),
2. Install ONLYOFFICE using Docker,
3. Install ONLYOFFICE using virtual machines with Community Edition pre-installed (visit the official website to download)
Install ONLYOFFICE using Docker:
This Docker installation will help you to set up the full-featured collaborative suite on one single Linux machine with one single dependency needed to be installed – Docker. So before going ahead, you must install Docker on your system. You can also go through steps to install Docker on Ubuntu here.
Install ONLYOFFICE using Docker images:
ONLYOFFICE Community Edition includes three servers: Community Server (collaborative system), Document Server (text, spreadsheet and presentation editors) and Mail Server. Using the official Docker images you can install the ONLYOFFICE servers one by one selecting the tools you need. To install all the components, follow these steps:
Step 1. Run Docker and create the ‘onlyoffice’ network.
$ sudo docker network create --driver bridge onlyoffice
Step 2. Install ONLYOFFICE Document Server:
$ sudo docker run --net onlyoffice -i -t -d --restart=always --name onlyoffice-document-server onlyoffice/documentserver
Step 3. Install Mail Server:
$ sudo docker run --net onlyoffice --privileged -i -t -d -p 25:25 -p 143:143 -p 587:587 -h yourdomain.com onlyoffice/mailserver
Where yourdomain.com is your registered domain name for the mail server.
Step 4. Install Community Server:
$ sudo docker run --net onlyoffice -i -t -d --restart=always --name onlyoffice-community-server -p 80:80 -p 5222:5222 -p 443:443 -e DOCUMENT_SERVER_PORT_80_TCP_ADDR=onlyoffice-document-server -e MAIL_SERVER_DB_HOST=onlyoffice-mail-server onlyoffice/communityserver
These commands will install the ONLYOFFICE servers with all the dependencies needed.
Install ONLYOFFICE using Docker script:
To install the whole solution at once – Community Server, Document Server, and Mail Server – you can use the official Docker script.
Step 1. Download the official Docker script:
$ wget https://download.onlyoffice.com/install/opensource-install.sh
Step 2. Install ONLYOFFICE executing the following command:
$ sudo bash opensource-install.sh -md "yourdomain.com"
Where yourdomain.com is your registered domain name for the mail server.
To perform this action, you must be logged in with root rights.
Install ONLYOFFICE using Docker Compose:
The Docker Compose allows you to install ONLYOFFICE Community Edition at once with one single command. But before go ahead you need to install Docker Compose first. Refer to the official documentation for installation instructions.
When installed, execute the following command to install ONLYOFFICE:
$ wget https://raw.githubusercontent.com/ONLYOFFICE/Docker-CommunityServer/master/docker-compose.yml docker-compose up -d
Run ONLYOFFICE:
Open a web browser and navigate to (https://ip-address) address of your server. The portal start-up and initialization processes will start. It might take some time. Once completed, the wizard page will open:
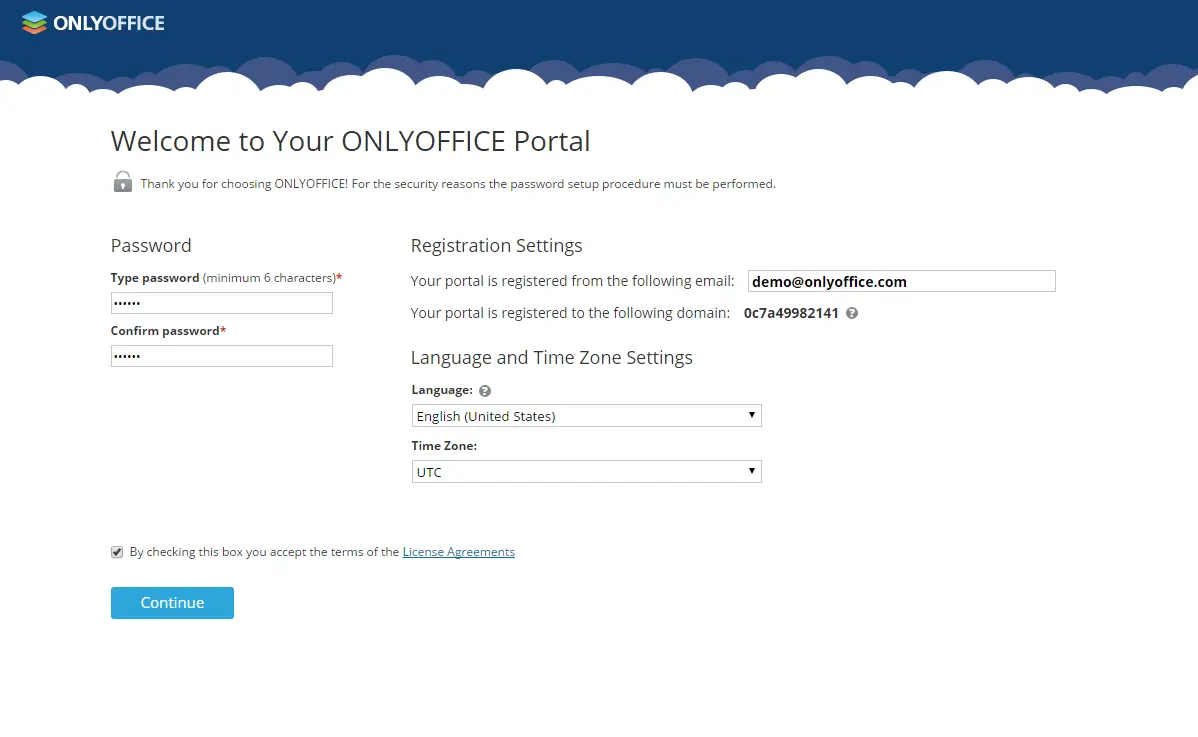
Enter a password and confirm it. Specify your email address to use it to access your web-office the next time. Choose the appropriate interface language and set up the correct time zone. Accept the license terms by checking the corresponding box and click Continue. The ONLYOFFICE Welcome page will open:

That’s All!.