LEMP stack stands for Linux, Nginx, MariaDB, and PHP stack. It is widely used tech stack to host websites and blogs.
This tutorial shows you how to install Nginx with PHP support (through PHP-FPM) and MySQL support on Ubuntu 16.04.
Install LEMP Stack
Install Nginx
Download signing key from the official website.
wget https://nginx.org/keys/nginx_signing.key
Add it to avoid warnings during the installation of nginx.
sudo apt-key add nginx_signing.key
Add the Nginx repository by placing the following information.
echo "deb https://nginx.org/packages/mainline/ubuntu xenial nginx" | sudo tee /etc/apt/sources.list.d/nginx.list
Update repositories.
sudo apt-get update
Install Nginx using the following command.
sudo apt-get install -y nginx
Start the Nginx service after the installation.
sudo systemctl start nginx
Open a web browser and visit https://your-ip-add-ress.
You should see the following page, and this page confirms that the Nginx is successfully installed on the server.
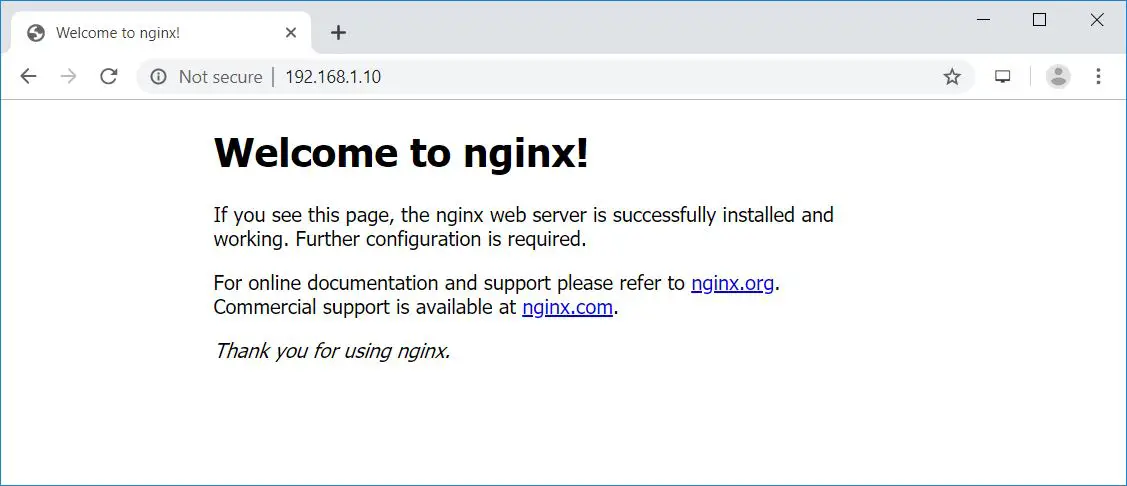
The default nginx document root on Ubuntu 16.04 is /usr/share/nginx/html/. The configuration files are under /etc/nginx directory.
Install MariaDB
Ubuntu 16.04 ships MariaDB v10.0 which is already the end of life. So, we will be installing MariaDB v10.4 from the official repository.
Add MariaDB repository on your system.
sudo apt-get install -y software-properties-common

sudo apt-key adv --recv-keys --keyserver hkp://keyserver.ubuntu.com:80 0xF1656F24C74CD1D8

sudo add-apt-repository 'deb [arch=amd64,arm64,i386,ppc64el] https://nyc2.mirrors.digitalocean.com/mariadb/repo/10.4/ubuntu xenial main'

sudo apt-get update
Install MariaDB using the below command.
sudo apt-get install -y mariadb-server mariadb-client
Next, secure the MariaDB installation with mysql_secure_installation command.
NOTE: RUNNING ALL PARTS OF THIS SCRIPT IS RECOMMENDED FOR ALL MariaDB
      SERVERS IN PRODUCTION USE!  PLEASE READ EACH STEP CAREFULLY!

In order to log into MariaDB to secure it, we'll need the current
password for the root user. If you've just installed MariaDB, and
haven't set the root password yet, you should just press enter here.

Enter current password for root (enter for none):  << No Password - Press Enter
OK, successfully used password, moving on...

Setting the root password or using the unix_socket ensures that nobody
can log into the MariaDB root user without the proper authorisation.

You already have your root account protected, so you can safely answer 'n'.

Switch to unix_socket authentication [Y/n] N << Disabling Unix Socket login and enabling password Login
 ... skipping.

You already have your root account protected, so you can safely answer 'n'.

Change the root password? [Y/n] Y  << Change MariaDB root password
New password:  << Enter Password
Re-enter new password:  << Re-Enter Password
Password updated successfully!
Reloading privilege tables..
 ... Success!


By default, a MariaDB installation has an anonymous user, allowing anyone
to log into MariaDB without having to have a user account created for
them.  This is intended only for testing, and to make the installation
go a bit smoother.  You should remove them before moving into a
production environment.

Remove anonymous users? [Y/n] Y  << Remove Anonymous users
 ... Success!

Normally, root should only be allowed to connect from 'localhost'.  This
ensures that someone cannot guess at the root password from the network.

Disallow root login remotely? [Y/n] Y  << Disallow root login remotely
 ... Success!

By default, MariaDB comes with a database named 'test' that anyone can
access.  This is also intended only for testing, and should be removed
before moving into a production environment.

Remove test database and access to it? [Y/n] Y  << Remove test database
 - Dropping test database...
 ... Success!
 - Removing privileges on test database...
 ... Success!

Reloading the privilege tables will ensure that all changes made so far
will take effect immediately.

Reload privilege tables now? [Y/n] Y  << Reload privilege
 ... Success!

Cleaning up...

All done!  If you've completed all of the above steps, your MariaDB
installation should now be secure.

Thanks for using MariaDB!
Install PHP
Next is to install PHP through PHP-FPM (PHP-FPM (FastCGI Process Manager), it is an alternative PHP FastCGI implementation. it has some additional features useful for sites of any size, especially busier sites).
Ubuntu 16.04 ships PHP-FPM v7.0 which is already the end of life. So, we will be installing PHP-FPM v7.3 from the Ondřej Surý repository.
READ: How To Install PHP 7.3/7.2/7.1 on Ubuntu 16.04
Add the repository.
sudo add-apt-repository ppa:ondrej/php

sudo apt-get update
Install PHP-FPM v7.3 by using the following command.
sudo apt-get install -y php7.3-fpm php7.3-mysql php7.3-cli
Edit the below file to configure PHP-FPM to use TCP connection instead of Unix socket.
sudo nano /etc/php/7.3/fpm/pool.d/www.conf
Change the listen parameter shown like below.
listen = 127.0.0.1:9000
Test LAMP Stack
Let’s create name-based virtual host on Nginx server for the following details.
Server Name: server.itzgeek.local
Document Root: /usr/share/nginx/html/server.itzgeek.local
Create the configuration file called virtual.conf under /etc/nginx/conf.d/ directory.
sudo nano /etc/nginx/conf.d/virtual.conf
Add the following content.
server {
   server_name server.itzgeek.local;
   root /usr/share/nginx/html/server.itzgeek.local;

   location / {
       index index.html index.htm index.php;
   }

   location ~ \.php$ {
      include        /etc/nginx/fastcgi_params;
      fastcgi_pass   127.0.0.1:9000;
      fastcgi_index  index.php;
      fastcgi_param SCRIPT_FILENAME $document_root$fastcgi_script_name;
   }
}
Create the document root directory.
sudo mkdir -p /usr/share/nginx/html/server.itzgeek.local
For testing the PHP, place a PHP file on to the document root of the created virtual host.
In the terminal copy/paste the following line:
echo "<?php phpinfo(); ?>" | sudo tee /usr/share/nginx/html/server.itzgeek.local/index.php
Restart the services.
sudo systemctl restart nginx

sudo systemctl restart php7.3-fpm
One your client system, create a host entry for your domain (server.itzgeek.local) in /etc/hosts file in case your environment doesn’t have a DNS server.
sudo nano /etc/hosts
Host entry will like below
192.168.1.10 server.itzgeek.local
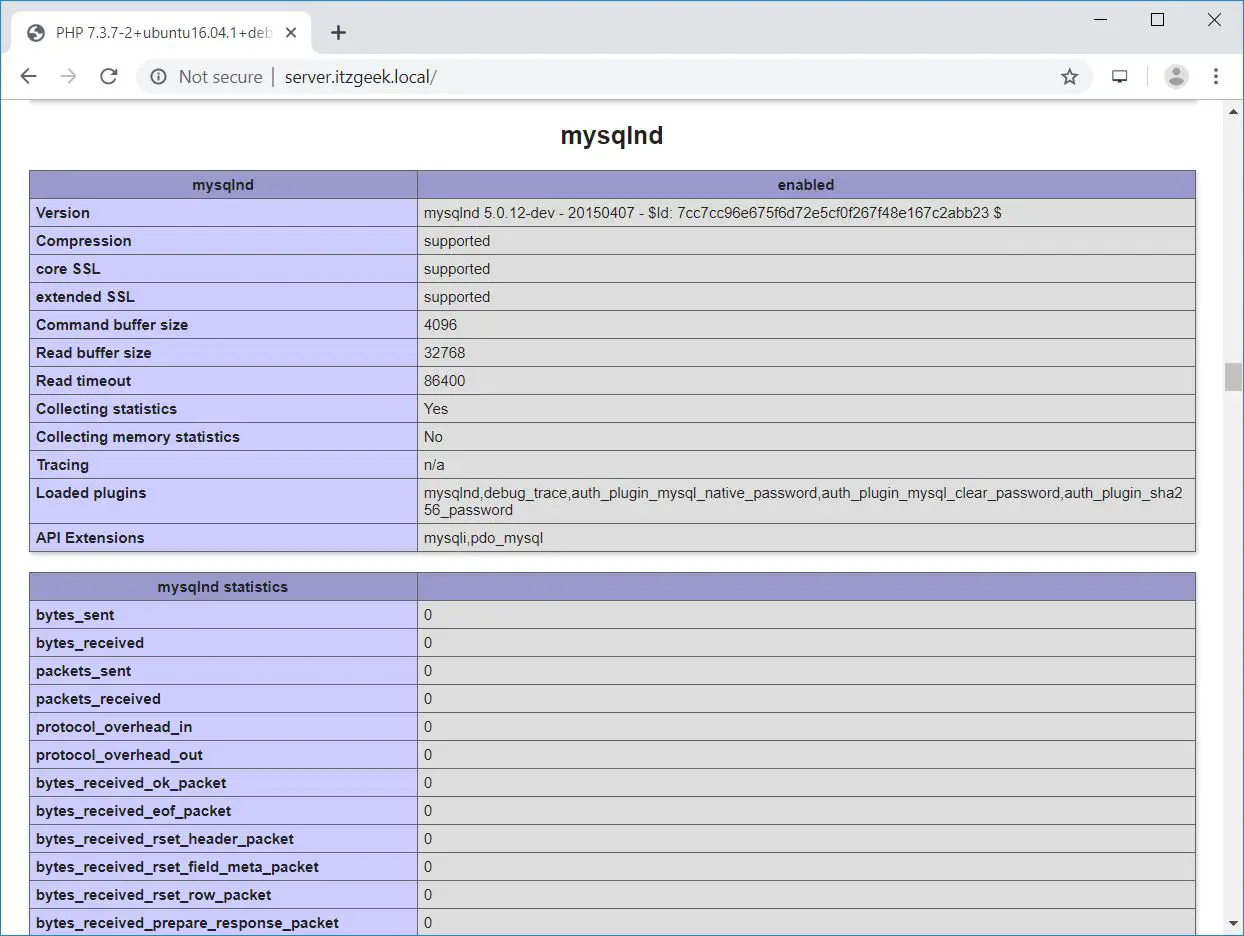
Now open up your web browser and type your domain in the web address:
The page will look like below:
From the above screenshot, PHP is working, and it’s working through FPM/FastCGI, as shown in the Server API line.

If you scroll further down, you will see all modules that are enabled in PHP. Below screenshot shows MySQL module information.
Conclusion
That’s All. I hope you have learned how to Install LEMP Stack on Ubuntu 16.04. Consider setting up Let’s Encrypt certificate for your domain to improve the security. Please share your feedback in the comments section.