How to install and configure Xen® Virtualization in Linux/Centos/Redhat – Graphical Mode Step by Step
 I think every body knows What is Xen®?. Now i am directly going to the topic of the installation and configuring the Xen Virtualization in Centos. CentOS is a free operating system based on Red Hat Enterprise Linux (RHEL). It exists to provide a free enterprise class computing platform and strives to maintain 100% binary compatibility with its upstream distribution.
So no worry about getting the CentOS for the installation.
Requirements:
- Xen 3.0 rpm for Installation.
- Xen – Kernel for booting
- Virt-Manager for Managing the Xen Virtualization
- Virt-Viewer for getting the console of the Guest opertating system.
This guide only for the person that who didn’t installed the Xen and Xen – Kernel during installation of CentOS. If you have installed the CentOS with Xen already, you scan skip to Step 5.
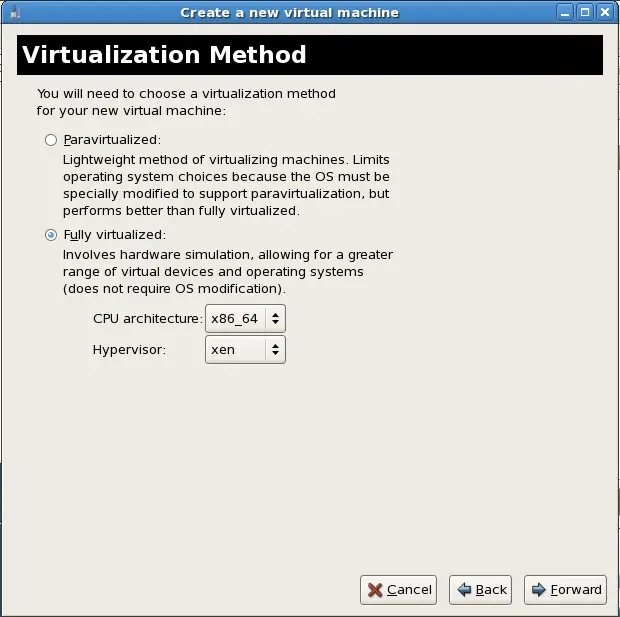
PS: Here i am showing the fully virtualized platform. I used Win XP as Guest Operating System.
Step 1: First need to check, in which kernel you have logged or booted.
[root@node01 ~]# uname -r
2.6.18-238.el5
Step 2: From the above you can find that the system not booted with Xen kernel, check whether Xen and Xen – kernel installed on the CentOS or not.
[root@node01 ~]# rpm -qa | grep kernel ———-> For Checking Xen – Kernel Installed
kernel – 2.6.18-238.el5
[root@node01 ~]# rpm -qa | grep xen ———–> For Checking Xen installed
Step 3: From the above, confirmed that the Xen and Xen – kernel haven’t installed on the machine, So you can install it using the following command, i used the YUM Repo for installing RPM’s. Include the Virt-Manager and Virt-Viewer also.
centos | 1.3 kB 00:00
Setting up Install Process
Resolving Dependencies
–> Running transaction check
—> Package xen.x86_64 0:3.0.3-120.el5 set to be updated
–> Processing Dependency: xen-hypervisor-abi = 3.1 for package: xen
–> Processing Dependency: libxenstore.so.3.0()(64bit) for package: xen
–> Running transaction check
—> Package kernel-xen.x86_64 0:2.6.18-238.el5 set to be installed
—> Package python-virtinst.noarch 0:0.400.3-11.el5 set to be updated
–> Processing Dependency: libvirt-python >= 0.2.1 for package: python-virtinst
—> Package xen-libs.x86_64 0:3.0.3-120.el5 set to be updated
–> Running transaction check
—> Package libvirt-python.x86_64 0:0.8.2-15.el5 set to be updated
–> Processing Dependency: libvirt = 0.8.2-15.el5 for package: libvirt-python
–> Processing Dependency: libvirt.so.0(LIBVIRT_0.8.0)(64bit) for package: libvirt-python
–> Processing Dependency: libvirt.so.0()(64bit) for package: libvirt-python
–> Running transaction check
—> Package libvirt.x86_64 0:0.8.2-15.el5 set to be updated
—> Package virt-manager.x86_64 0:0.6.1-13.el5 set to be updated
—> Package virt-viewer.x86_64 0:0.0.2-3.el5 set to be updated
–> Finished Dependency ResolutionDependencies Resolved===============================================================
Package Arch Version Repository Size
===============================================================
Installing:
xen x86_64 3.0.3-120.el5 centos 1.9 M
Installing for dependencies:
kernel-xen x86_64 2.6.18-238.el5 centos 20 M
libvirt x86_64 0.8.2-15.el5 centos 3.2 M
libvirt-python x86_64 0.8.2-15.el5 centos 235 k
python-virtinst noarch 0.400.3-11.el5 centos 380 k
xen-libs x86_64 3.0.3-120.el5 centos 163 k
virt-manager x86_64 0.6.1-13.el5 centos 1.6 M
virt-viewer x86_64 0.0.2-3.el5 centos 25 k
Transaction Summary
===============================================================
Install 6 Package(s)
Upgrade 0 Package(s)Total download size: 26 M
Is this ok [y/N]: y
Downloading Packages:
(1/8): libvirt-python-0.8.2-15.el5.x86_64.rpm | 235 kB 00:00
(2/8): python-virtinst-0.400.3-11.el5.noarch.rpm | 380 kB 00:00
(3/8): xen-3.0.3-120.el5.x86_64.rpm | 1.9 MB 00:00
(4/8): kernel-xen-2.6.18-238.el5.x86_64.rpm | 20 MB 00:00
(5/8): libvirt-0.8.2-15.el5.x86_64.rpm | 3.2 MB 00:00
(6/8): xen-libs-3.0.3-120.el5.x86_64.rpm | 163 kB 00:00
(7/8): virt-manager-0.6.1-13.el5.x86_64.rpm | 1.6 MB 00:00
(8/8): virt-viewer-0.0.2-3.el5.x86_64.rpm | 25 kB 00:00
——————————————————————————–
Total 15 MB/s | 27.7 MB 00:01
Running rpm_check_debug
Running Transaction Test
Finished Transaction Test
Transaction Test Succeeded
Running Transaction
1/8 Installing : xen-libs
2/8 Installing : libvirt
3/8 Installing : libvirt-python
4/8 Installing : python-virtinst
5/8 Installing : kernel-xen
6/8 Installing : xen
7/8 Installing : virt-viewer
8/8 Installing : virt-manager Installed:
xen.x86_64 0:3.0.3-120.el5 virt-manager.x86_64 0:0.6.1-13.el5 virt-viewer.x86_64 0:0.0.2-3.el5 Dependency Installed:
kernel-xen.x86_64 0:2.6.18-238.el5 libvirt.x86_64 0:0.8.2-15.el5
libvirt-python.x86_64 0:0.8.2-15.el5 python-virtinst.noarch 0:0.400.3-11.el5
xen-libs.x86_64 0:3.0.3-120.el5 Complete!
Step 4: Once the Xen and Xen – Kernel installed, Make the changes in the /etc/grub.conf to boot the Xen – Kernel by default. Other wise You have to select the Menu from Splash screen during booting. So edit /etc/grub.conf.
The following one is before editing the /etc/grub.conf. You can look at the default field = 1, it means by default it will boot from the second kernel ie Normal El5 Kernel. Numbers starts from 0,1 and so on.
#boot=/dev/sda
default=1
timeout=5
splashimage=(hd0,0)/grub/splash.xpm.gz
hiddenmenu
title CentOS (2.6.18-238.el5xen)
root (hd0,0)
kernel /xen.gz-2.6.18-238.el5
module /vmlinuz-2.6.18-238.el5xen ro root=LABEL=/ rhgb quiet
module /initrd-2.6.18-238.el5xen.img
title CentOS (2.6.18-238.el5)
root (hd0,0)
kernel /vmlinuz-2.6.18-238.el5 ro root=LABEL=/ rhgb quiet
initrd /initrd-2.6.18-238.el5.img
After edit the /etc/grub.conf, Default field changed to 0 for booting Xen – kernel by default.
#boot=/dev/sda
default=0
timeout=5
splashimage=(hd0,0)/grub/splash.xpm.gz
hiddenmenu
title CentOS (2.6.18-238.el5xen)
root (hd0,0)
kernel /xen.gz-2.6.18-238.el5
module /vmlinuz-2.6.18-238.el5xen ro root=LABEL=/ rhgb quiet
module /initrd-2.6.18-238.el5xen.img
title CentOS (2.6.18-238.el5)
root (hd0,0)
kernel /vmlinuz-2.6.18-238.el5 ro root=LABEL=/ rhgb quiet
initrd /initrd-2.6.18-238.el5.img
Step 5: Reboot the Server, As from the above the server should boot with Xen – Kernel. Check it using the following command.
[root@node01 ~]# uname -r
2.6.18-238.el5xen
Step 6: Now confirmed, you can start the Virt Manager for Managing the Xen Virtualization.
[root@node01 ~]# virt-manager
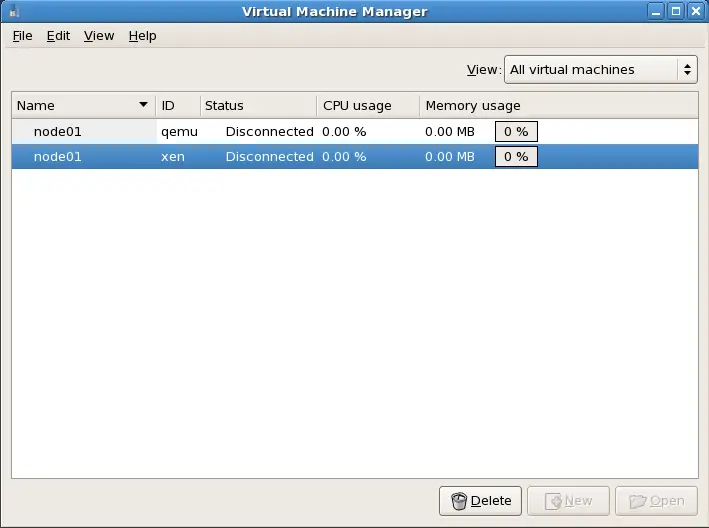
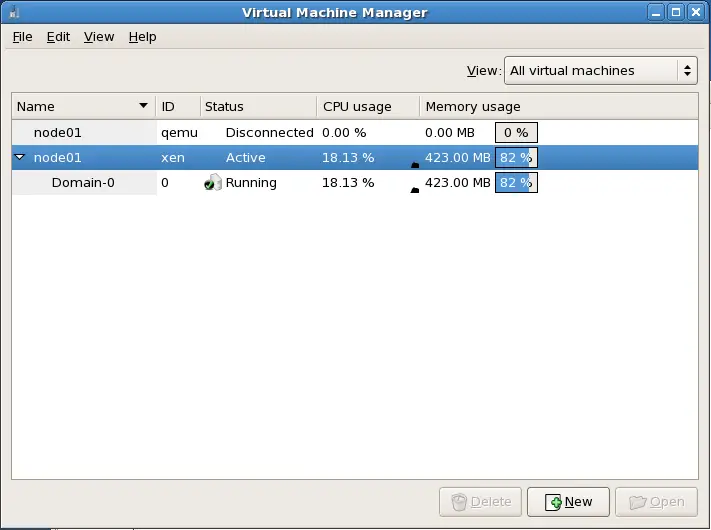
Step 7: The above picture shows the Virtual Machine Manager of CentOS Host, both qemu and Xen are in disconnected state. Now Right click on the Xen and click Connect. After clicking connect you will get the following window stating Xen is Active and Domain-0 is running.
Now the CentOS host is ready for creating the full virtualization guest,click New on the Virtual Machine Manager to start creating guest os.
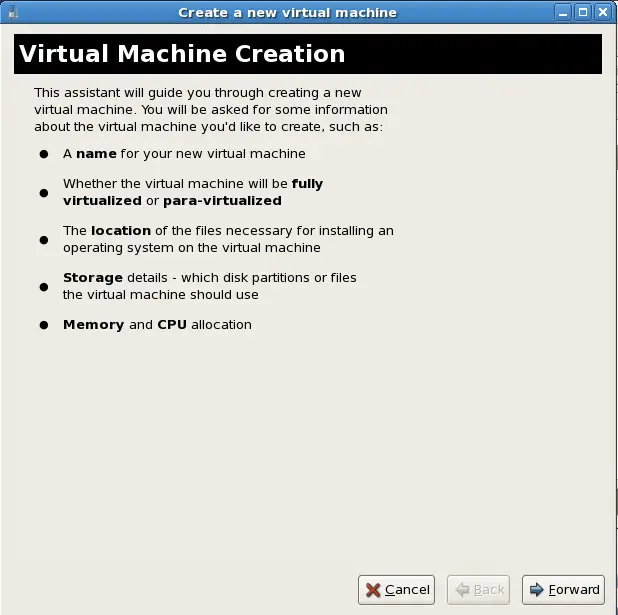
Step 8: Click Forward on the Virtual Machine Creation window.
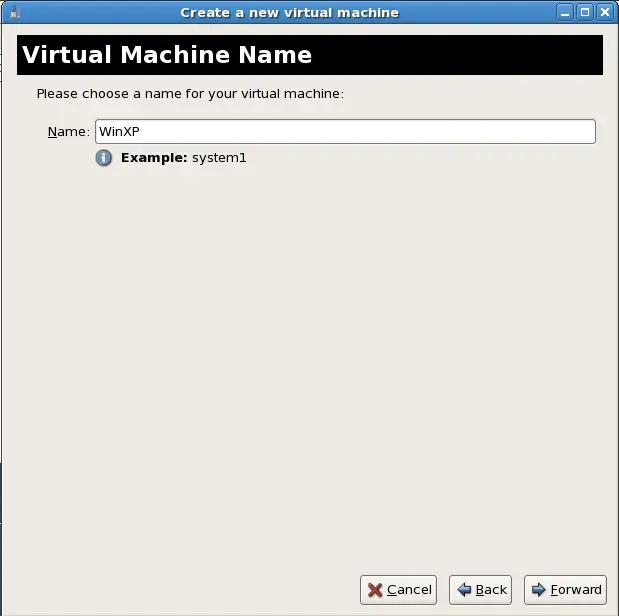
Step 9: Type your Virtual Machine Name, then click forward.
Step 10: As I already told, Select Fully Virtualized and click forward.
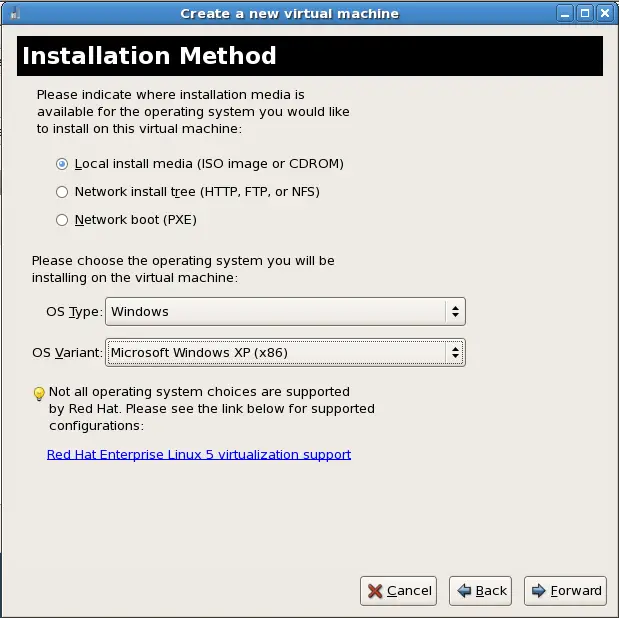
Step 11: Select the installation media like CD/DVD ROM ,ISO Image, NFS,HTTP,PXE, FTP extra…, also select the Virtual Machine OS type. I am using CD/DVD ROM for installation.
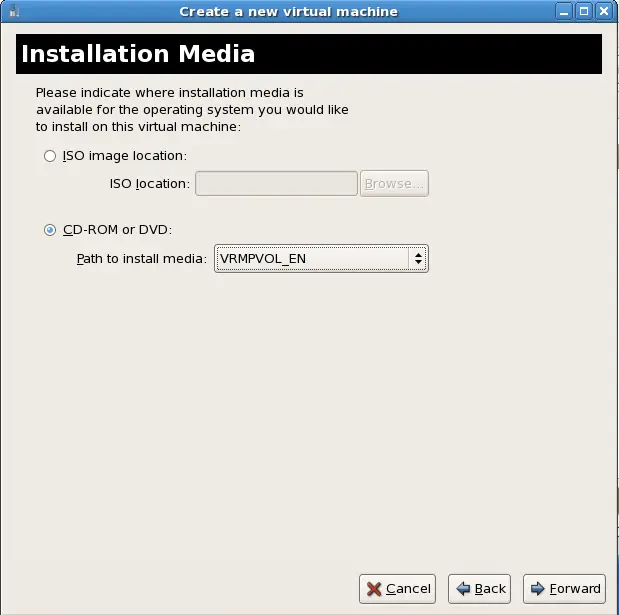
Step 12: Here i selected the CD/DVD ROM for installation.
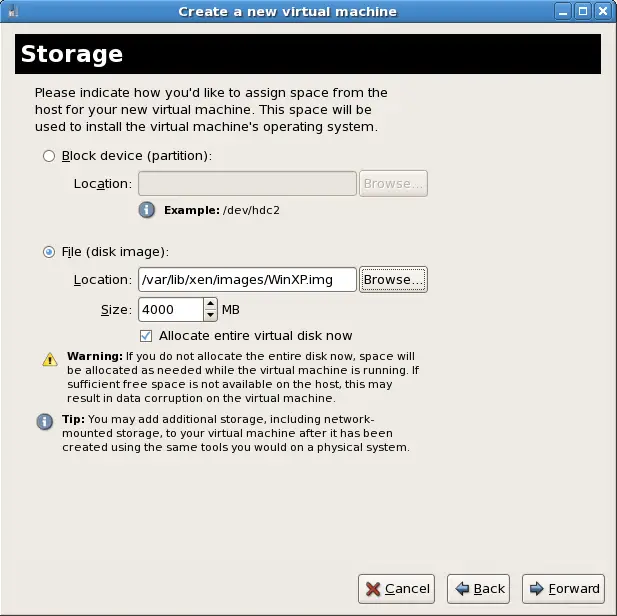
Step 13: Configure the location of the Virtual HDD image of Virtual Machine, Specify the amount of storage that required for VM.
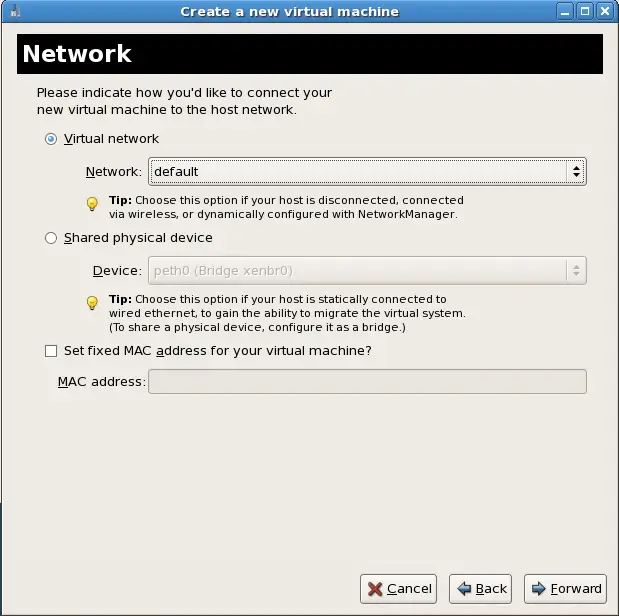
Step 14: Select the Virtual Network, then click Forward.
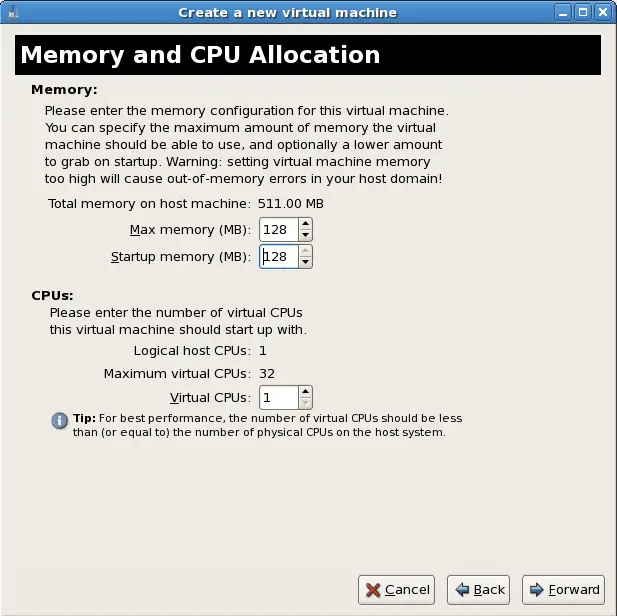
Step 15: Allocate the Memory & CPU as per your Requirement.
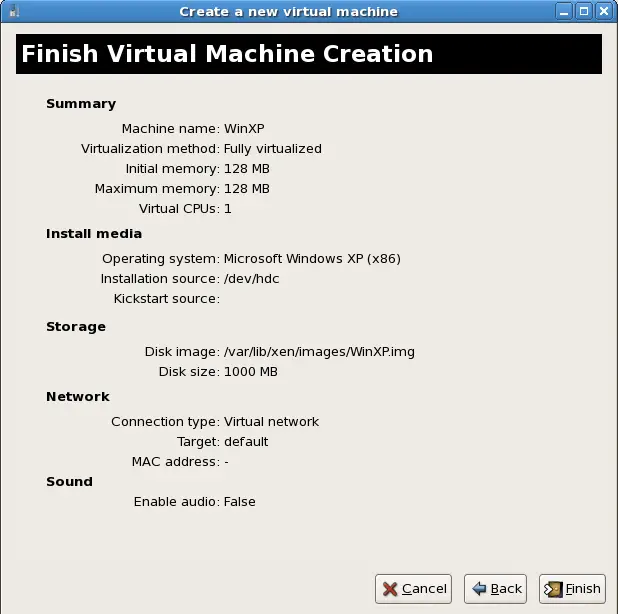
Step 16: Click Finish
Step 17: Once you click Finish it starts to creating the VM as per your specification.
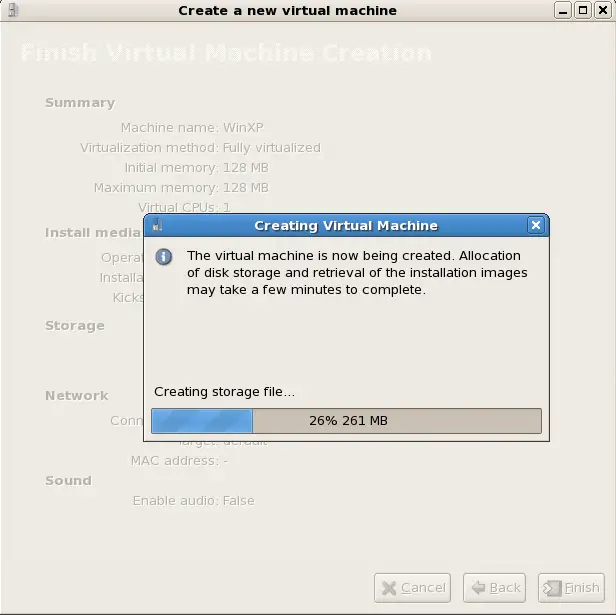
Once the VM is created the Virtual Machine will start automatically and inside the VM setup of Windows XP will begin.
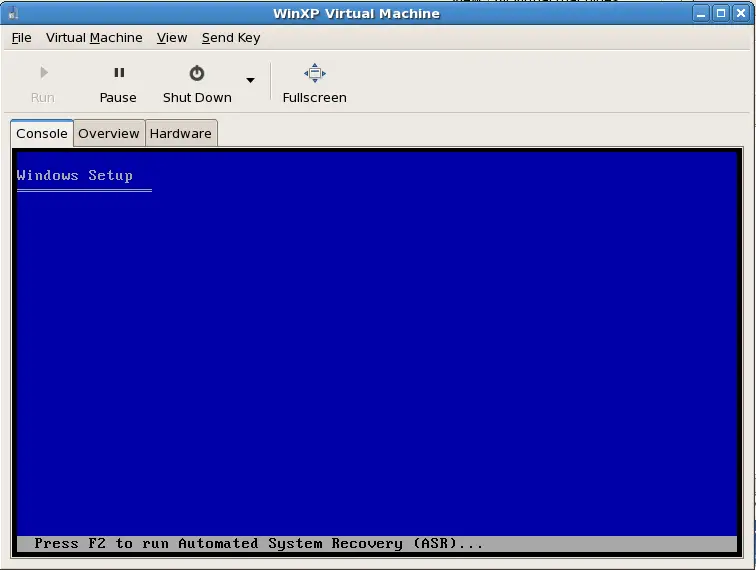
That’s All!. Now you can create the VM as much as you want, Depends of your Host Machine.
