NFS stands for Network File System, a service that helps you to share files and folders between *nix / Linux systems, developed by SUN Microsystems in 1990.
NFS lets you mount a remote share like a local disk. This post helps you setup NFS server on Debian 9 / Ubuntu 16.04.
Environment
This guide is also should work on older versions of Debian such as Debian 8 and Ubuntu versions such as Ubuntu 17.10 / 17.04 / 15.10 / 15.04 / Ubuntu 14.04.
Here are my nodes details.
NFS Server Hostname: server.itzgeek.local
NFS Server IP Address: 192.168.1.10 /24
NFS Client Hostname: client.itzgeek.local
NFS Client IP Address: 192.168.1.20/24
Use static IP Address on both NFS server and client to avoid network problems due to non-availability of DHCP server.
Important Services
rpcbind : The rpcbind is a server that converts RPC program numbers into universal addresses.
nfs : Enables the clients to access NFS shares.
nlockmgr : NFS file locking implements file lock recovery when an NFS server crashes and reboots.
mountd : Handles the access control list to determine whether the client is permitted to access a NFS share.
Important Configuration Files
You will work on below configuration files when setting up NFS server and clients.
/etc/exports : The main configuration file. In this file, you will mention the filesystem you want to export to remote hosts with specifies options.
/etc/fstab : This file contains entries to mount all file systems including NFS when system boots, automatically.
/etc/hosts.allow, and /etc/hosts.deny : These files are called TCP wrappers, used by NFS to decide whether to accept or not to accept connections coming in from external IP address
Install & Configure NFS Server
Switch to the root user.
sudo su -
OR
su -
Install NFS packages on NFS server using the following command.
apt-get install -y nfs-kernel-server
Create NFS share
Let’s create a directory we want to share with client machines. Here, we will create a new directory named nfsshare in / partition and share it over NFS.
You can also use your existing directory for NFS.
mkdir /nfsshare
Allow client machines to read and write to the created directory.
chmod 777 /nfsshare/
Export NFS share
Modify /etc/exports files for exporting NFS share.
vi /etc/exports
Make an entry of the directory /nfsshare to export as NFS share.
/nfsshare 192.168.1.20(rw,sync,no_root_squash,no_subtree_check)
Where,
/nfsshare : A shared directory
192.168.1.20 : IP address of the client machine. You can use the hostname instead of an IP address. Also, you can mention subnets like 192.168.1.0/24 in case you want to share it to multiple machines.
rw : Writable permission to a shared folder
sync : all changes to the filesystem are immediately flushed to disk; the respective write operations are being waited for.
no_root_squash : By default, any file created by the user root on the client machine is treated as “nobody” on the server. If no_root_squash is set, then root on the client machine will have the same level of access to files, as root on the server.
no_subtree_check : If only part of a volume is exported, a routine called subtree checking verifies that a file that is requested by the client is in the appropriate part of the volume. If the entire volume is exported, disable it with no_subtree_check; this will speed up transfers.
You can get to know all the option on the man page (man exports) or here.
Use the below command to export the shared directories.
exportfs -ra
Verify the exported share using below command.
showmount -e 127.0.0.1
The command showmount -e lists the available shares on your local machine (NFS Server). The out
Output:
Export list for 127.0.0.1:
/nfsshare 192.168.1.20
Configure NFS client
We need to install the nfs-common package on the client machine to mount a remote filesystem.
Make sure you are running commands as the root user.
apt-get -y install nfs-common
Mount NFS shares on client
Before mounting the NFS share, run the showmount command on the client machine to see whether the NFS share from the server is visible or not.
showmount -e 192.168.1.10
Output:
Export list for 192.168.1.10:
/nfsshare 192.168.1.20
As per the command, the /nfshare is available on 192.168.1.10 (server) for 192.168.1.20 (client).
showmount -e <server-ip or hostname> shows the available shares on the remote server
Create a directory /share on the client machine to mount the shared directory.
mkdir /mnt/share
Use mount command to mount a shared directory /nfsshare from NFS server (192.168.1.10) in /mnt/share on the client machine.
mount 192.168.1.10:/nfsshare /mnt/share
Verify the mounted share on the client machine using the mount command.
mount | grep nfs
Output:

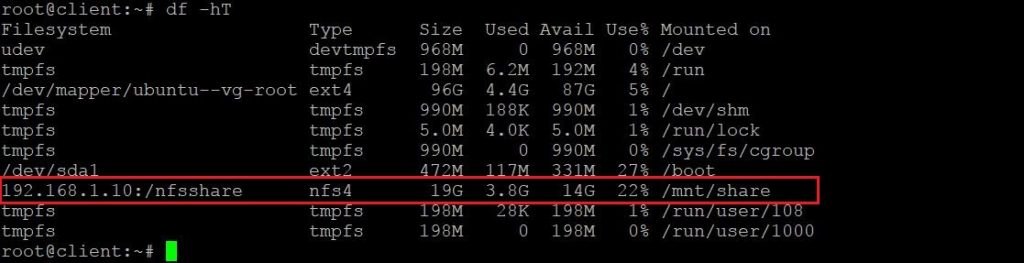
You can also use df command to check the mounted NFS shares.
df -hT
Output:
Create a file on the mounted directory to verify the read and write permission NFS share.
touch /mnt/share/test
If the above command returns no error, then you can permanently mount NFS shares.
Automount NFS Shares
To mount NFS shares automatically on every reboot, you need to edit /etc/fstab file on your client system.
vi /etc/fstab
Add the below line at the end of the file.
192.168.1.10:/nfsshare/ /mnt/share nfs rw,sync,hard,intr 0 0
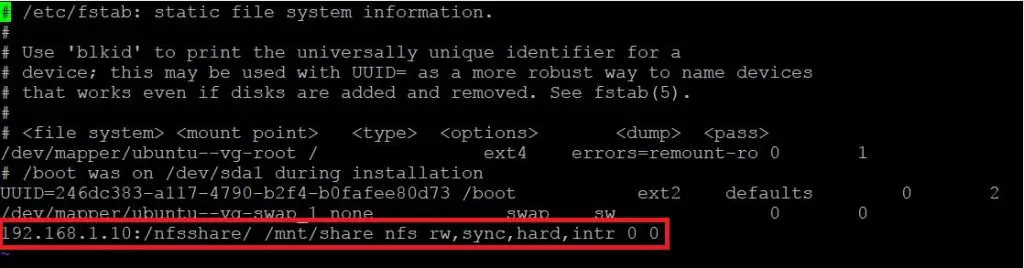
Save and close the file.
Reboot the client machine and check whether NFS share is automatically mounted or not.
reboot
Verify the mounted share on the client-server using the mount command.
mount | grep nfs
To unmount the shared directory from your client machine, use the umount command to unmount it.
umount /mnt/share
You can configure AutoFS on Debian / Ubuntu to mount NFS shares only when a user accesses them.
That’s All. You have set up NFS Server successfully on Debian 9 / Ubuntu 16.04.