Kubernetes is an open-source container orchestration tool that helps deploy, scale, and manage containerized applications. Google initially designed Kubernetes and is now maintained by the Cloud Native Computing Foundation.
Kubernetes works with Docker, Containerd, and CRI-O currently.
You can call Kubernetes is a cluster manager for Docker, and it provides almost the same functionalities as that of Docker Swarm.
We can run Kubernetes locally using the below methods,
1. MinKube – A single-node Kubernetes cluster for development and testing.
2. Kubeadm – A multi-node Kubernetes cluster
Here, we will see how to deploy a multi-node Kubernetes cluster using the kubeadm tool.
Components
Master Node
Kube API server: Runs on the master node that exposes Kubernetes API for querying cluster information.
Etcd: A key store that stores Kubernetes cluster data
Kube Scheduler: Runs on the master node, which looks for newly created pods and identifies the right nodes depending on resource availability.
Kube Controller Manager: Runs on the master node and is responsible for monitoring (nodes, pods replications, and deployments) and taking action to keep the application running.
Worker Nodes
Kubelet: Runs on all worker nodes and handles tasks like starting, managing, and destroying pods.
Kube Proxy: A network proxy that forwards TCP/UDP incoming requests to the backend pod.
Container Runtime: Runs pods on worker nodes (Docker, CRI-O, and containerd)
Environment
| Node | Hostname | IP Address | OS | CPU | RAM |
|---|---|---|---|---|---|
| Master Node | master.itzgeek.local | 192.168.0.10 | Ubuntu 22.04 / Ubuntu 20.04 | 2 | 2GB |
| Worker Node | worker.itzgeek.local | 192.168.0.20 | Ubuntu 22.04 / Ubuntu 20.04 | 2 | 2GB |
System Requirements
- 2 GB or more of RAM per node
- 2 CPU or more
- Unique hostname, MAC address, product_uuid for every node
- Disable Swap
Prerequisites
Set Hostname
Set a unique hostname for all your nodes. Example:
sudo hostnamectl set-hostname master.itzgeek.local
DNS Entry
Ensure the master and worker nodes can resolve the hostname for all nodes in the cluster.
sudo nano /etc/hosts
Entry:
192.168.0.10 master.itzgeek.local master
192.168.0.20 worker.itzgeek.local worker
Product UUID
Ensure hosts have unique product_uuid by running the below command. If two nodes have the same product_uuid, the Kubernetes cluster installation will fail.
sudo cat /sys/class/dmi/id/product_uuid
Firewall
You may need to allow the below ports on the iptables for Kubernetes to work correctly.
On Master Node
sudo ufw allow 6443/tcp
ufw allow 2379/tcp
sudo ufw allow 2380/tcp
sudo ufw allow 10250/tcp
sudo ufw allow 10257/tcp
sudo ufw allow 10259/tcp
sudo ufw reload
On Worker Nodes
sudo ufw allow 10250/tcp
sudo ufw allow 30000:32767/tcp
sudo ufw reload
Load Modules for Bridged Traffic
Load the br_netfilter module to enable traffic communication between Kubernetes pods across the cluster nodes.
cat <<EOF | sudo tee /etc/modules-load.d/k8s.conf
br_netfilter
EOF
Add below entries to let iptables see the bridged traffic.
cat <<EOF | sudo tee /etc/sysctl.d/k8s.conf
net.bridge.bridge-nf-call-ip6tables = 1
net.bridge.bridge-nf-call-iptables = 1
net.ipv4.ip_forward = 1
EOF
Run the below command to apply the setting without rebooting the system.
sudo sysctl --system
Disable Swap
Ensure you disable swap by deleting the swap partition or removing the swap partition entry from the /etc/fstab file.
Install Container Runtime
You will need to install container runtime into each node in the cluster to run and manage pods. Kubernetes works with several container runtimes,
- Containerd (Install ONLY containerd, NOT CNI Plugins)
- CRI-O (Install CRI-O ONLY, Not CNI plugins)
- Docker Engine (For Kubernetes v1.24 and newer, you need to install
cri-docker) - Mirantis Container Runtime
Here, I am using the CRI-O runtime for running pods. If you plan to use any other runtime, follow the links above and move to set up the cluster.
CRI-O has built-in CNI (can be used with Kubernetes), and you can remove it for installing the Pod Network Add-on.
sudo rm -rf /etc/cni/net.d/*
Setup Kubernetes Cluster
Configure Kubernetes Repository
First, set up the Kubernetes on all your nodes.
sudo apt update

sudo apt install -y apt-transport-https ca-certificates curl

sudo curl -fsSLo /usr/share/keyrings/kubernetes-archive-keyring.gpg https://packages.cloud.google.com/apt/doc/apt-key.gpg

echo "deb [signed-by=/usr/share/keyrings/kubernetes-archive-keyring.gpg] https://apt.kubernetes.io/ kubernetes-xenial main" | sudo tee /etc/apt/sources.list.d/kubernetes.list
Install kubeadm, kubelet and kubectl
Then, install the below packages on all of your nodes.
sudo apt update

sudo apt install -y kubelet kubeadm kubectl

sudo apt-mark hold kubelet kubeadm kubectl
Initialize Kubernetes Cluster
On the Master node, execute the kubeadm init command in the terminal to initialize the cluster.
--pod-network-cidr. Here, I will use the flannel pod network.sudo kubeadm init --pod-network-cidr=10.244.0.0/16
Output:
[init] Using Kubernetes version: v1.23.6
[preflight] Running pre-flight checks
[preflight] Pulling images required for setting up a Kubernetes cluster
[preflight] This might take a minute or two, depending on the speed of your internet connection
[preflight] You can also perform this action in beforehand using 'kubeadm config images pull'
[certs] Using certificateDir folder "/etc/kubernetes/pki"
.      .      .
.      .      .
.      .      .

Your Kubernetes control-plane has initialized successfully!

To start using your cluster, you need to run the following as a regular user:

  mkdir -p $HOME/.kube
  sudo cp -i /etc/kubernetes/admin.conf $HOME/.kube/config
  sudo chown $(id -u):$(id -g) $HOME/.kube/config

Alternatively, if you are the root user, you can run:

  export KUBECONFIG=/etc/kubernetes/admin.conf

You should now deploy a pod network to the cluster.
Run "kubectl apply -f [podnetwork].yaml" with one of the options listed at:
  https://kubernetes.io/docs/concepts/cluster-administration/addons/

Then you can join any number of worker nodes by running the following on each as root:

kubeadm join 192.168.0.10:6443 --token nzy73q.3s2ig8r2ue09wrjy \
        --discovery-token-ca-cert-hash sha256:0866420e1833c5a0710c92712d56468b4576b8bd8f00c381232dd993d89a0246
Then, run the below commands in the terminal to start using the Kubernetes cluster.
mkdir -p $HOME/.kube
sudo cp -i /etc/kubernetes/admin.conf $HOME/.kube/config
sudo chown $(id -u):$(id -g) $HOME/.kube/config
Run the below command to check the status of the cluster.
kubectl get pods -A
Output:
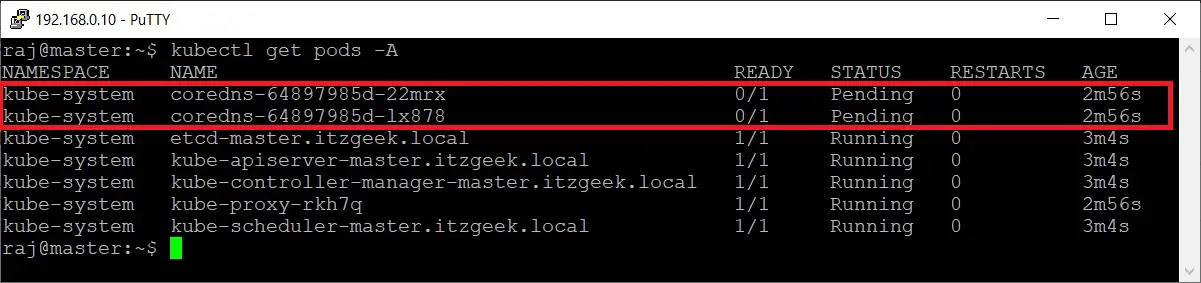
You can see that the coredns pod is pending, and the status should change once you install the pod network.
Deploy Pod Network Add-on
We need to set up a pod network add-on on the cluster so that pods can communicate with each other. Several projects provide Kubernetes pod networks, namely, Calico, Weave, Flannel, etc.
Here, I will use the Flannel pod network.
kubectl apply -f https://raw.githubusercontent.com/flannel-io/flannel/master/Documentation/kube-flannel.yml
Output:
podsecuritypolicy.policy/psp.flannel.unprivileged created
clusterrole.rbac.authorization.k8s.io/flannel created
clusterrolebinding.rbac.authorization.k8s.io/flannel created
serviceaccount/flannel created
configmap/kube-flannel-cfg created
daemonset.apps/kube-flannel-ds created
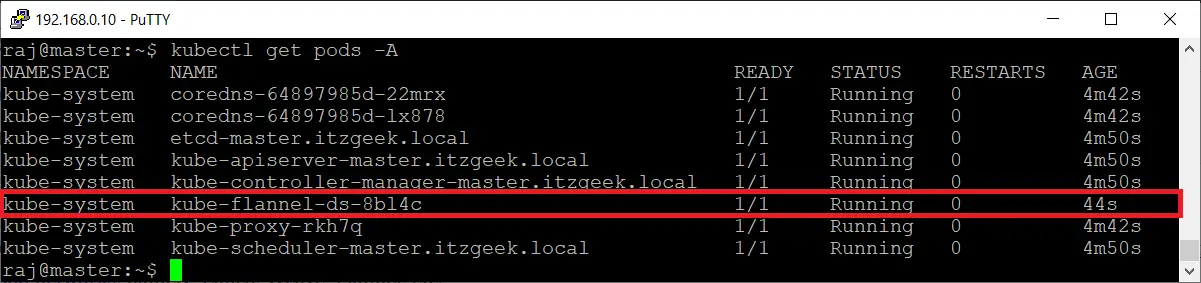
Check the cluster status once again. The coredns pod should now be running state.
kubectl get pods -A
Output:
Join Worker Nodes to Kubernetes cluster
First, ensure the worker nodes meet the system requirements.
Then, complete prerequisites and install container runtimes and Kubernetes packages.
Finally, get the joining token from the master node (output of the kubeadm init command) and run the kubeadm join command on all your nodes to join the cluster.
sudo kubeadm token list command to retrieve the token and CA certificate hash with theopenssl x509 -pubkey -in /etc/kubernetes/pki/ca.crt | openssl rsa -pubin -outform der 2>/dev/null | openssl dgst -sha256 -hex | sed 's/^.* //' command on the master node. The token is valid for 24 hours. You can generate a new token with the sudo kubeadm token create --print-join-command command.sudo kubeadm join 192.168.0.10:6443 --token nzy73q.3s2ig8r2ue09wrjy --discovery-token-ca-cert-hash sha256:0866420e1833c5a0710c92712d56468b4576b8bd8f00c381232dd993d89a0246
Output:
[preflight] Running pre-flight checks
[preflight] Reading configuration from the cluster...
[preflight] FYI: You can look at this config file with 'kubectl -n kube-system get cm kubeadm-config -o yaml'
W0430 03:59:02.069246    2862 utils.go:69] The recommended value for "resolvConf" in "KubeletConfiguration" is: /run/systemd/resolve/resolv.conf; the provided value is: /run/systemd/resolve/resolv.conf
[kubelet-start] Writing kubelet configuration to file "/var/lib/kubelet/config.yaml"
[kubelet-start] Writing kubelet environment file with flags to file "/var/lib/kubelet/kubeadm-flags.env"
[kubelet-start] Starting the kubelet
[kubelet-start] Waiting for the kubelet to perform the TLS Bootstrap...

This node has joined the cluster:
* Certificate signing request was sent to apiserver and a response was received.
* The Kubelet was informed of the new secure connection details.

Run 'kubectl get nodes' on the control-plane to see this node join the cluster
The above output confirms that the node has been successfully added to the cluster.
Now, check the worker node’s status on the master node using the following command.
kubectl get nodes
Output:
NAME                   STATUS   ROLES                  AGE   VERSION
master.itzgeek.local   Ready    control-plane,master   16m   v1.23.6
worker.itzgeek.local   Ready                           55s   v1.23.6
You should see worker nodes are in a ready state.
You can get additional information about nodes with the below command.
kubectl get nodes -o wide
Output:
NAME                   STATUS   ROLES                  AGE     VERSION   INTERNAL-IP    EXTERNAL-IP   OS-IMAGE           KERNEL-VERSION      CONTAINER-RUNTIME
master.itzgeek.local   Ready    control-plane,master   17m     v1.23.6   192.168.0.10                Ubuntu 22.04 LTS   5.15.0-27-generic   cri-o://1.23.2
worker.itzgeek.local   Ready                           2m26s   v1.23.6   192.168.0.20                Ubuntu 22.04 LTS   5.15.0-27-generic   cri-o://1.23.2
Conclusion
That’s All. I hope you have successfully set up a multi-node Kubernetes cluster on Ubuntu 22.04 / Ubuntu 20.04.