Chef is a powerful configuration management utility that turns infrastructure into code. With the Chef users can easily manage, configure and deploy the resources across the network from the centralized location irrespective of the environment (cloud, on-premises, or hybrid). This post will help you to setup a chef 12 on CentOS 7 / RHEL 7
Starting with the release of Chef server 11, the front end of Chef server is written in Erlang and client uses Ruby to handle configuration changes.
Components of Chef:
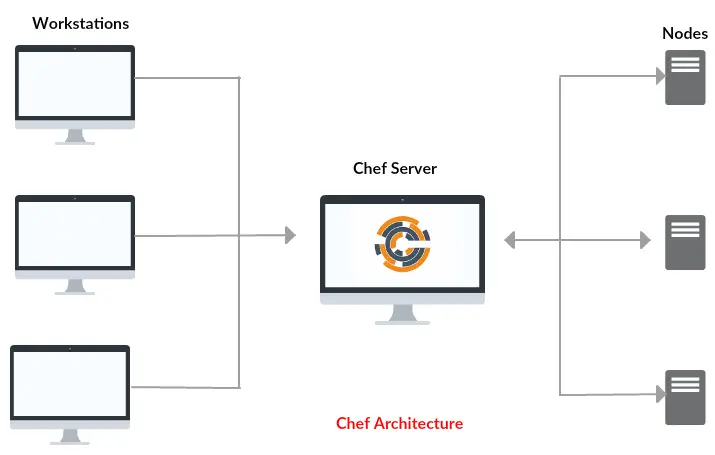
Chef is consist of a Chef server, one or more workstations, and a node where the chef-client is installed. Components name is based on the roles played by each machine in the Chef ecosystem.
Chef Server: This is the central hub server that stores the cookbooks and recipes uploaded from workstations, which is then accessed by chef-client for configuration deployment.
Chef Workstations: This where recipes, cookbooks, and other chef configuration details are created or edited. All these are then pushed to the Chef server from the workstation, where they will be available to deploy to chef-client nodes.
Chef Client: This the target node where the configurations are deployed in which the chef-client is installed. A node can be any machine (physical, virtual, cloud, network device, etc..)
Setup a Chef 12 on CentOS 7:
System Requirements / Environment:
Make sure your system meets the following resource requirements. Here I will use CentOS 7 as the base operating system for Chef installation.
| HOST NAME | IP ADDRESS | OS | CPU | MEMORY | DISK | PURPOSE |
|---|---|---|---|---|---|---|
| chefserver.itzgeek.local | 192.168.12.11 | CentOS 7 | 4 | 4 GB | 40 GB | Chef Server |
| chefdk.itzgeek.local | 192.168.12.12 | CentOS 7 | 1 | 512 MB | NA | Chef Workstation (Chef Development Kit) |
| chefclient.itzgeek.local | 192.168.12.20 | CentOS 7 | 1 | 512 MB | NA | Chef Client |
Prerequisites:
Host should have fully qualified domain name.
Should have DNS or Host entry in place.
vi /etc/hosts

192.168.12.11  chefserver.itzgeek.local  chefserver
192.168.12.12  chefdk.itzgeek.local  chefdk
192.168.12.20  chefclient.itzgeek.local chefclient
Install wget package.
yum -y install wget
Chef Server:
The Chef server acts as a central hub for configuration data. The server stores cookbooks, the policies that are applied to nodes and metadata related to a registered node. Registered node uses the chef-client to ask the Chef Server for configuration details, such as recipes, templates, and file distribution.
Install and Configure the Chef Server:
Download the latest version of Chef server core (12.10 at the time of writing).
wget https://packages.chef.io/stable/el/7/chef-server-core-12.10.0-1.el7.x86_64.rpm
Once the download is complete, install the chef server core using the following command.
rpm -ivh chef-server-core-*.rpm
If your chef server system does not meet the recommended hardware requirement, this step may fail.
Once the installation is complete, you must reconfigure the chef server components to make up the server to work together. Reconfiguring may take a little bit longer.
chef-server-ctl reconfigure
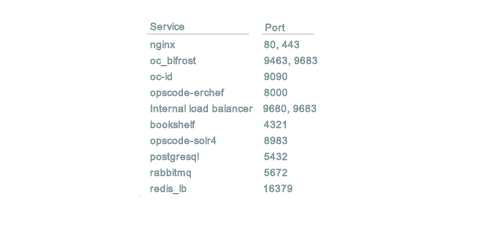
Check the status of Chef Server components by using the following command.
chef-server-ctl status
Output:
run: bookshelf: (pid 6084) 387s; run: log: (pid 6114) 385s
run: nginx: (pid 5973) 417s; run: log: (pid 6276) 359s
run: oc_bifrost: (pid 5816) 477s; run: log: (pid 5831) 476s
run: oc_id: (pid 5961) 420s; run: log: (pid 5966) 419s
run: opscode-erchef: (pid 6186) 379s; run: log: (pid 6176) 381s
run: opscode-expander: (pid 6039) 388s; run: log: (pid 6071) 388s
run: opscode-solr4: (pid 5992) 399s; run: log: (pid 5999) 398s
run: postgresql: (pid 5805) 478s; run: log: (pid 5809) 477s
run: rabbitmq: (pid 5767) 480s; run: log: (pid 5760) 481s
run: redis_lb: (pid 5377) 595s; run: log: (pid 6272) 359s
Create an Admin user and Organization:
We need to create an admin user. This user will have access to make changes to the infrastructure components in the organization we will be creating. Below command will generate the RSA private key automatically and should be saved to a safe location.
User details are below.
User Name: admin
First Name: admin
Last Name: admin
Email: [email protected]
Password: password
File Name: admin.pem
Path: /etc/chef
chef-server-ctl user-create admin admin admin [email protected] password -f /etc/chef/admin.pem
Original Command:
chef-server-ctl user-create USER_NAME FIRST_NAME LAST_NAME EMAIL 'PASSWORD' -f PATH_FILE_NAME
It is the time for us to create an organization to hold the chef configurations.
Short Name: itzgeek (Note: Name must begin with lowercase letter or digit, may contain lowercase letter, numbers, hyphens, and underscores, and must be between 1 and 255 characters)
Full Organization Name: ITzGeek Inc (Note: Must begin with non-white space character and must be between 1 and 1023 characters)
Association User: admin (Note: This option will associate the previously created user (admin) with the admins security group on the chef server)
Filename: itzgeek-validator.pem (Note: command will generate the RSA private key automatically and should be saved to a safe location)
Path: /etc/chef
chef-server-ctl org-create itzgeek "ITzGeek, Inc" --association_user admin -f /etc/chef/itzgeek-validator.pem
Original Command:
chef-server-ctl org-create short_name 'full_organization_name' --association_user user_name --filename ORGANIZATION-validator.pem
As of now, you will have two .pem keys in /etc/chef directory. In our case, they will be called admin.pem and itzgeek-validator.pem. Soon we will place these two files in Chef workstation machine.
Firewall:
The Chef server requires the following ports to be open through the firewall. But enabling only 80 and 443 would also do for us.
Run the following command to allow 80 and 443 through the firewall.
firewall-cmd --permanent --zone public --add-service http
firewall-cmd --permanent --zone public --add-service https
firewall-cmd --reload