Varnish Cache (simply called Varnish) is an open source high-performance web (HTTP) accelerator. It sits in front of a web server as a cache agent and serves web pages to visitors in a much faster way.
Varnish stores data (cache) in virtual memory for faster loading of frequent web pages when requested by a visitor. It supports load balancing with a per-backend weighing and basic health-checking of back-ends.
In this guide, we will install and configure Varnish Cache 5 as front-end to Apache web server on Debian 9 and Ubuntu 16.04.
Requirements
Make sure you have a Debian or Ubuntu system with Apache server. You can also read below articles on installing Apache2 web server.
READ: How to install Apache2 on Ubuntu 16.04
READ: How to install Apache2 on Debian 9
Switch to the root user.
su -
OR
sudo su -
Install Varnish Cache on Debian / Ubuntu
Varnish is available in Debian and Ubuntu package repositories but may be a bit out of date. To get the latest version of Varnish Cache, you would need to configure its official repository.
Setup Repository
First, install the GPG key on the machine.
curl -L https://packagecloud.io/varnishcache/varnish5/gpgkey | sudo apt-key add -
Install debian-archive-keyring (Debian only).
apt-get install -y debian-archive-keyring
Install the support for https.
apt-get install -y apt-transport-https
Add Varnish cache repository information into the source list.
### Debian 9 ###

echo "deb https://packagecloud.io/varnishcache/varnish5/debian/ stretch main" | sudo tee -a /etc/apt/sources.list.d/varnishcache5.list

### Ubuntu 16.04 ###

echo "deb https://packagecloud.io/varnishcache/varnish5/ubuntu/ xenial main" | sudo tee -a /etc/apt/sources.list.d/varnishcache5.list
Install Varnish Cache
Finally, update the cache and install Varnish.
apt-get update
apt-get install -y varnish
Check the version of Varnish using the following command.
varnishd -V
Output:
varnishd (varnish-5.1.3 revision 05c5ac6b9)
Copyright (c) 2006 Verdens Gang AS
Copyright (c) 2006-2015 Varnish Software AS
Configure Varnish Cache
Once you have Varnish cache installed, we can proceed to the configuration of Varnish so that your server can handle web requests faster than before.
Let’s configure Varnish to listen on port 80 for handling web requests. Edit the systemd service.
nano /lib/systemd/system/varnish.service
From:
ExecStart=/usr/sbin/varnishd -a :6081 -T localhost:6082 -f /etc/varnish/default.vcl -S /etc/varnish/secret -s malloc,256m
To:
ExecStart=/usr/sbin/varnishd -a :80 -T localhost:6082 -f /etc/varnish/default.vcl -S /etc/varnish/secret -s malloc,256m
Reload the systemd daemon.
systemctl daemon-reload
Now, we need to let Varnish know web servers behind it. Edit /etc/varnish/default.vcl file.
nano /etc/varnish/default.vcl
Update the backend server like below. We will soon configure the Apache server to listen on port 8080. If there is any change in Apache server port no, you need to update here.
backend default {
.host = "127.0.0.1";
.port = "8080";
}
Setup Apache server to run on 8080
We have already configured Varnish on port 80, so, you need to change the default port of Apache web server to 8080 so that it can run behind Varnish caching.
Edit the ports.conf file.
nano /etc/apache2/ports.conf
Update the below line with 8080.
Listen 8080
Also, edit the default configuration file.
nano /etc/apache2/sites-enabled/000-default.conf
Update the virtual host entry like below.
<VirtualHost *:8080>
Restart Apache2 and Varnish service.
systemctl restart apache2
systemctl restart varnish
Test Varnish Cache on Apache
Use curl command to test if the Varnish cache is enabled and working with Apache web server.
curl -I https://localhost
Output:
HTTP/1.1 200 OK
Date: Thu, 31 Aug 2017 02:14:08 GMT
Server: Apache/2.4.25 (Debian)
Last-Modified: Thu, 31 Aug 2017 01:53:24 GMT
Vary: Accept-Encoding
Content-Type: text/html
X-Varnish: 2
Age: 0
Via: 1.1 varnish (Varnish/5.1)
ETag: W/"29cd-55776180d07a7-gzip"
Accept-Ranges: bytes
Connection: keep-alive
From the output, you can see that the Varnish cache is working with Apache and web requests are flowing through Varnish cache.
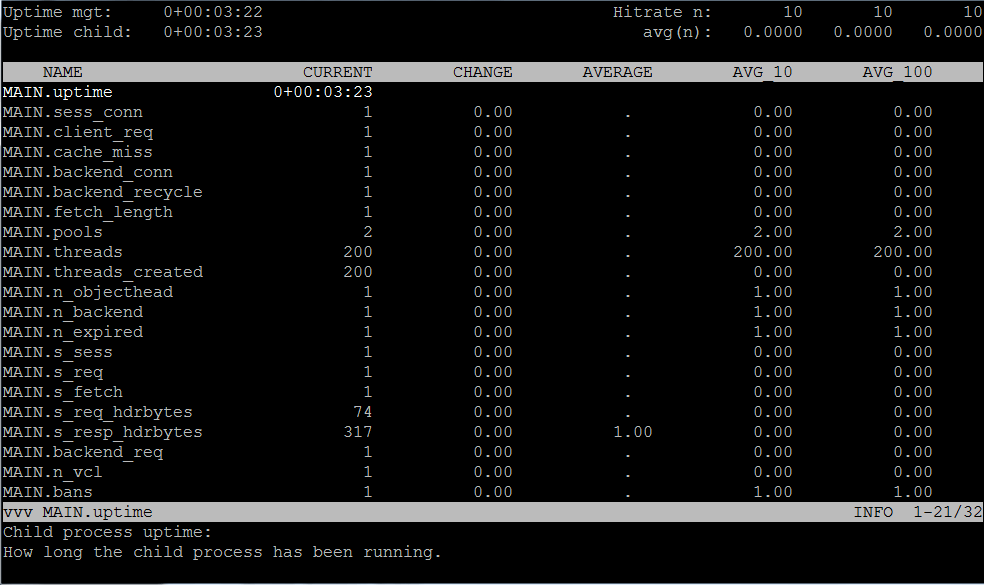
Also, you can verify the Varnish cache using below command.
varnishstat
Output:
That’s All. Want to know more about Varnish cache, visit – https://varnish-cache.org/index.html