Let’s Encrypt is a certificate authority that provides free SSL certificates for websites. In addition to offering SSL certificates, it also handles certificate installation and renewal of certificates through the Certbot client.
Let’s Encrypt is the world’s largest certificate authority and more than 250 million websites use its certificates. Currently, Let’s Encrypt supports auto installation of certificates on Apache, Nginx, Plex, and Haproxy.
Here, we will see how to install Let’s Encrypt SSL Certificate for Nginx on Ubuntu 22.04.
Prerequisites
Install LEMP Stack
Before proceeding further, set up the Nginx web server on your Ubuntu system.
READ: How to Install LEMP Stack on Ubuntu 22.04
Create Nginx Server Block
After installing Nginx, we will create an Nginx server block to serve the HTTP version of the website. Typically, a server block contains a domain name, port number, document root, log location, fast CGI, etc.
I am assuming the following,
Domain name: itzgeek.net, www.itzgeek.net
Port No: 80
Document root: /usr/share/nginx/www.itzgeek.net/html
Logs: /usr/share/nginx/www.itzgeek.net/logs
Server Block File: /etc/nginx/conf.d/www.itzgeek.net.conf
/etc/nginx/sites-available directory and place HTML files under the /var/www/html directorysudo nano /etc/nginx/conf.d/www.itzgeek.net.conf
Use the below configuration for your website. Do remember to change server_name , root, and fastcgi_pass based on your requirement.
server {
   server_name itzgeek.net www.itzgeek.net;
   root /usr/share/nginx/www.itzgeek.net/html;

   location / {
       index index.html index.htm index.php;
   }

   access_log /var/log/nginx/www.itzgeek.net/logs/access.log;
   error_log /var/log/nginx/www.itzgeek.net/logs/error.log;

   # Remove this section if the site hosts only plain HTML files
   location ~ \.php$ {
      include fastcgi_params;
      fastcgi_intercept_errors on;
      fastcgi_pass unix:/run/php/php8.1-fpm.sock;
      fastcgi_param SCRIPT_FILENAME $document_root$fastcgi_script_name;
   }
}
Once you have created the server block, create a root and logs directory for the website.
sudo mkdir -p /usr/share/nginx/www.itzgeek.net/html/

sudo mkdir -p /usr/share/nginx/www.itzgeek.net/logs/
Then, change the ownership and group of the root directory.
sudo chown -R www-data:www-data /usr/share/nginx/www.itzgeek.net/
Finally, place the test HTML file on your domain’s document root.
echo "This is a Test HTML Page @ www.itzgeek.net" | sudo tee /usr/share/nginx/www.itzgeek.net/html/index.html
Then, restart the Nginx service to re-read the configurations.
sudo systemctl restart nginx
Install Let’s Encrypt SSL Certificate For Nginx
Create / Update DNS Record
Before generating Let’s Encrypt SSL certificate, you must point your domain to your server IP. So, visit your domain registrar and create an A/CNAME record for the domains you want to generate an SSL certificate. For example, the below image shows the A/CNAME record for the domain itzgeek.net.
Making changes in DNS records will take time to propagate. So, wait for a few minutes to hours, depending on the TTL you set for the record.

Install Certbot Client
In addition to pointing a domain to your server IP, you need to install the Certbot ACME client that handles certificate generation and installation.
Certbot is available as a snap package on Ubuntu 22.04. So, first, install the Snapd package.
sudo apt update

sudo apt install -y snapd
Then, update the snapd to the latest version.
sudo snap install core; sudo snap refresh core
Finally, install the Certbot client using the snap command.
sudo snap install --classic certbot

sudo ln -s /snap/bin/certbot /usr/bin/certbot
Install Let’s Encrypt SSL Certificate
Use the certbot command to generate and install the Let’s Encrypt certificate in Nginx.
sudo certbot --nginx
Follow the interactive prompt to generate and install SSL certificates.
Saving debug log to /var/log/letsencrypt/letsencrypt.log
Enter email address (used for urgent renewal and security notices)
 (Enter 'c' to cancel): [email protected] << Enter Email ID

- - - - - - - - - - - - - - - - - - - - - - - - - - - - - - - - - - - - - - - -
Please read the Terms of Service at
https://letsencrypt.org/documents/LE-SA-v1.2-November-15-2017.pdf. You must
agree in order to register with the ACME server. Do you agree?
- - - - - - - - - - - - - - - - - - - - - - - - - - - - - - - - - - - - - - - -
(Y)es/(N)o: Y  << Agree to Terms and Conditions

- - - - - - - - - - - - - - - - - - - - - - - - - - - - - - - - - - - - - - - -
Would you be willing, once your first certificate is successfully issued, to
share your email address with the Electronic Frontier Foundation, a founding
partner of the Let's Encrypt project and the non-profit organization that
develops Certbot? We'd like to send you email about our work encrypting the web,
EFF news, campaigns, and ways to support digital freedom.
- - - - - - - - - - - - - - - - - - - - - - - - - - - - - - - - - - - - - - - -
(Y)es/(N)o: N << Subscriber to Newsletter
Account registered.

Which names would you like to activate HTTPS for?
- - - - - - - - - - - - - - - - - - - - - - - - - - - - - - - - - - - - - - - -
1: itzgeek.net
2. www.itzgeek.net
- - - - - - - - - - - - - - - - - - - - - - - - - - - - - - - - - - - - - - - -
Select the appropriate numbers separated by commas and/or spaces, or leave input
blank to select all options shown (Enter 'c' to cancel): 1,2 << Choose Site to Install Let's Encrypt SSL Certificate
Requesting a certificate for www.itzgeek.net

Successfully received certificate.
Certificate is saved at: /etc/letsencrypt/live/www.itzgeek.net/fullchain.pem
Key is saved at:         /etc/letsencrypt/live/www.itzgeek.net/privkey.pem
This certificate expires on 2022-08-10.
These files will be updated when the certificate renews.
Certbot has set up a scheduled task to automatically renew this certificate in the background.

Deploying certificate
Successfully deployed certificate for www.itzgeek.net to /etc/nginx/conf.d/www.itzgeek.net.conf
Congratulations! You have successfully enabled HTTPS on https://www.itzgeek.net

- - - - - - - - - - - - - - - - - - - - - - - - - - - - - - - - - - - - - - - -
If you like Certbot, please consider supporting our work by:
 * Donating to ISRG / Let's Encrypt:   https://letsencrypt.org/donate
 * Donating to EFF:                    https://eff.org/donate-le
- - - - - - - - - - - - - - - - - - - - - - - - - - - - - - - - - - - - - - - -
Once you activate HTTPS for the domain, the Certbot client will place redirection rules to redirect traffic from HTTP to the HTTPS site.
By default, it places two rules for below redirections.
- https://itzgeek.net >> https://itzgeek.net
- https://www.itzgeek.net >> https://www.itzgeek.net
As you can see, the first redirection has not reached the www HTTPS version of the website. So, you may need to follow the below section to set it up. If you do not use the www domain, you can skip the next section.
Redirect non-www HTTP requests to www HTTPS with Nginx (optional)
You may like to configure the Nginx server to redirect the traffic from the non-www HTTP site to the WWW HTTPS site, I.e., https://itzgeek.net >> https://www.itzgeek.net.
So, edit the server block file.
sudo nano /etc/nginx/conf.d/www.itzgeek.net.conf
Then, add the highlighted redirection in the SSL block.
    listen 443 ssl; # managed by Certbot
 .    .    .
 .    .    .
    ssl_dhparam /etc/letsencrypt/ssl-dhparams.pem; # managed by Certbot

    if ($host = itzgeek.net) {
        return 301 https://www.itzgeek.net$request_uri;
    }
Finally, restart the Nginx service.
sudo systemctl restart nginx
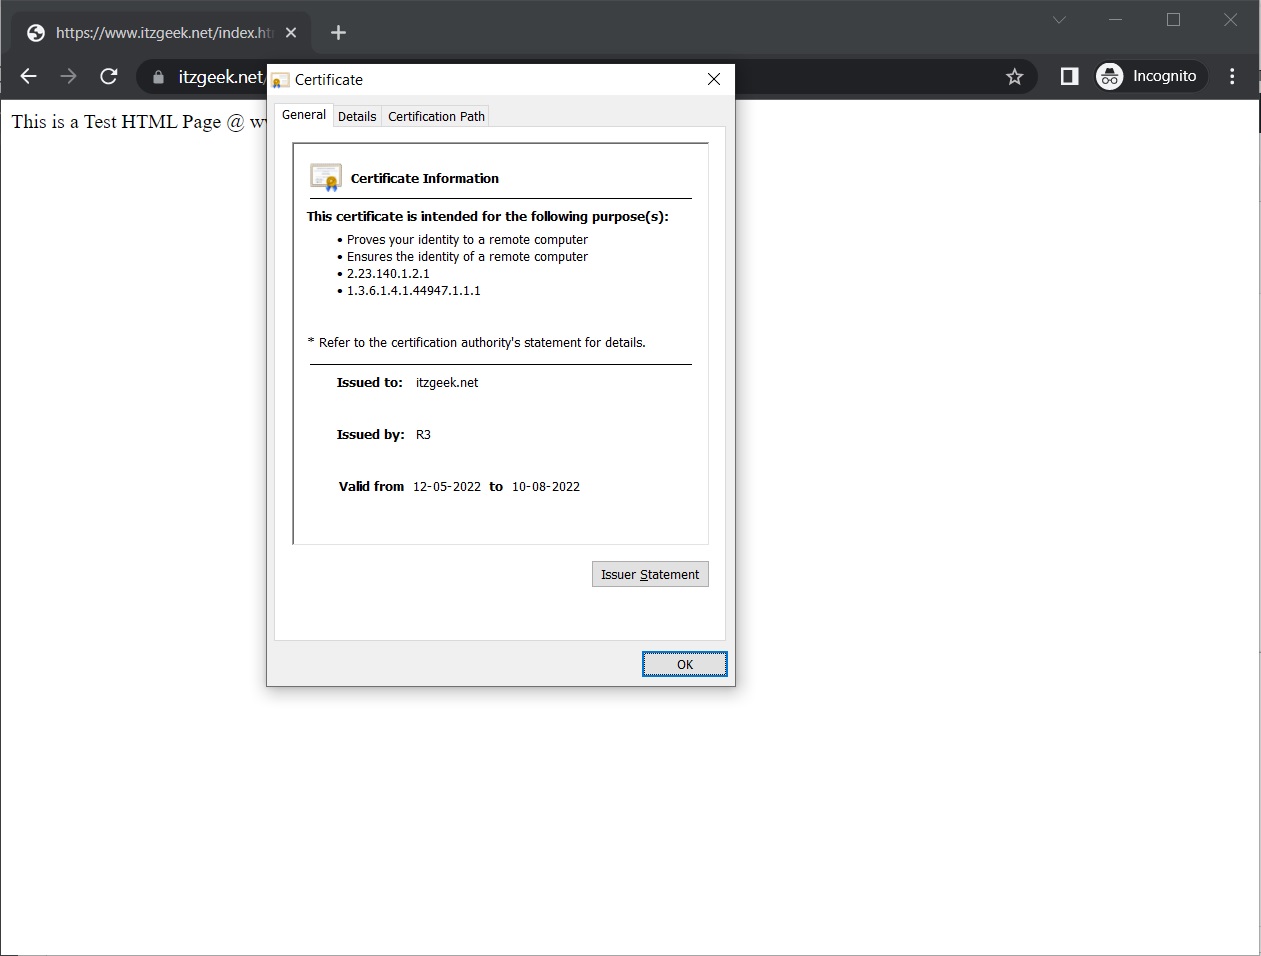
Verify Let’s Encrypt Certificate
You can verify the Let’s Encrypt certificate details by visiting your website.
OR
You should get the HTTPS version of your site now.
Test SSL Certificate
Also, you can test the Let’s Encrypt SSL certificate for any issues and its security ratings by going to the below URL.
Renew Let’s Encrypt Certificate
Let’s Encrypt certificates have 90 days of validity, and it is highly advisable to renew the certificates before they expire. Thanks to the systemd service that runs twice a day which handles automatic renewal of certificates.
However, I recommend you simulate the automatic renewal by running the below command.
sudo certbot renew --dry-run
Output:
Saving debug log to /var/log/letsencrypt/letsencrypt.log

- - - - - - - - - - - - - - - - - - - - - - - - - - - - - - - - - - - - - - - -
Processing /etc/letsencrypt/renewal/itzgeek.net.conf
- - - - - - - - - - - - - - - - - - - - - - - - - - - - - - - - - - - - - - - -
Account registered.
Simulating renewal of an existing certificate for itzgeek.net and www.itzgeek.net

- - - - - - - - - - - - - - - - - - - - - - - - - - - - - - - - - - - - - - - -
Congratulations, all simulated renewals succeeded:
  /etc/letsencrypt/live/itzgeek.net/fullchain.pem (success)
- - - - - - - - - - - - - - - - - - - - - - - - - - - - - - - - - - - - - - - -
If you get output like above, the renewal is working correctly and the automatic renewal will happen as expected.
Conclusion
That’s All. I hope you learned how to install Let’s Encrypt SSL Certificate for Nginx on Ubuntu 22.04.