 OpenVAS known as Open Vulnerability Assessment System is the open source vulnerability suite to run the test against servers for known vulnerabilities using the database (Network Vulnerability Tests), OpenVAS is a free software, its components are licensed under GNU General Public License (GNU GPL). Here is the small guide to setup the OpenVAS on CentOS 6 / RHEL 6.
Setup Repository:
Issue the following command in the terminal to install atomic repo.
wget -q -O - https://www.atomicorp.com/installers/atomic |sh
Accept the license Agreement.
ln: `/etc/system-release’ and `/etc/redhat-release’ are the same file
Atomic Free Unsupported Archive installer, version 2.0.11
BY INSTALLING THIS SOFTWARE AND BY USING ANY AND ALL SOFTWARE
PROVIDED BY ATOMICORP LIMITED YOU ACKNOWLEDGE AND AGREE:
THIS SOFTWARE AND ALL SOFTWARE PROVIDED IN THIS REPOSITORY IS
PROVIDED BY ATOMICORP LIMITED AS IS, IS UNSUPPORTED AND ANY
EXPRESS OR IMPLIED WARRANTIES, INCLUDING, BUT NOT LIMITED TO, THE
IMPLIED WARRANTIES OF MERCHANTABILITY AND FITNESS FOR A PARTICULAR
PURPOSE ARE DISCLAIMED. IN NO EVENT SHALL ATOMICORP LIMITED, THE
COPYRIGHT OWNER OR ANY CONTRIBUTOR TO ANY AND ALL SOFTWARE PROVIDED
BY OR PUBLISHED IN THIS REPOSITORY BE LIABLE FOR ANY DIRECT,
INDIRECT, INCIDENTAL, SPECIAL, EXEMPLARY, OR CONSEQUENTIAL DAMAGES
(INCLUDING, BUT NOT LIMITED TO, PROCUREMENT OF SUBSTITUTE GOODS
OR SERVICES; LOSS OF USE, DATA, OR PROFITS; OR BUSINESS INTERRUPTION)
HOWEVER CAUSED AND ON ANY THEORY OF LIABILITY, WHETHER IN CONTRACT,
STRICT LIABILITY, OR TORT (INCLUDING NEGLIGENCE OR OTHERWISE)
ARISING IN ANY WAY OUT OF THE USE OF THIS SOFTWARE, EVEN IF ADVISED
OF THE POSSIBILITY OF SUCH DAMAGE.
====================================================================
THIS SOFTWARE IS UNSUPPORTED. IF YOU REQUIRE SUPPORTED SOFWARE
PLEASE SEE THE URL BELOW TO PURCHASE A NUCLEUS LICENSE AND DO NOT
PROCEED WITH INSTALLING THIS PACKAGE.
====================================================================
For supported software packages please purchase a Nucleus license:
https://www.atomicorp.com/products/nucleus.html
All atomic repository rpms are UNSUPPORTED.
Do you agree to these terms? (yes/no) [Default: yes] yes
Configuring the [atomic] yum archive for this system
Installing the Atomic GPG key: OK
Downloading atomic-release-1.0-18.el6.art.noarch.rpm: OK
The Atomic Rocket Turtle archive has now been installed and configured for your system
The following channels are available:
atomic – [ACTIVATED] – contains the stable tree of ART packages
atomic-testing – [DISABLED] – contains the testing tree of ART packages
atomic-bleeding – [DISABLED] – contains the development tree of ART packages
System Repo (Only for RHEL):
OpenVAS installation requires additional packages to be downloaded from internet, if your system does not have Redhat subscription you need to setup the CentOS repository.
vi /etc/yum.repos.d/centos.repo
Add the following lines.
###32 bit ###
[CentOS]
name=centos
baseurl=https://mirror.centos.org/centos/6/os/i386/
enabled=1
gpgcheck=0
### 64 bit ###
[CentOS]
name=centos
baseurl=https://mirror.centos.org/centos/6/os/x86_64/
enabled=1
gpgcheck=0
PS: CentOS machines does not requires the above repo setup, system automatically creates it during the installation.
Install & Setup OpenVAS:
Issue the following command to install OpenVAS.
yum -y install openvas
It will do the package installation.
texlive-texmf                                       noarch                        2007-38.el6                                      rhel                          2.8 M
texlive-texmf-dvips                                 noarch                        2007-38.el6                                      rhel                          237 k
texlive-texmf-errata                                noarch                        2007-7.1.el6                                     rhel                          5.2 k
texlive-texmf-errata-dvips                          noarch                        2007-7.1.el6                                     rhel                          5.2 k
texlive-texmf-errata-fonts                          noarch                        2007-7.1.el6                                     rhel                          5.4 k
texlive-texmf-errata-latex                          noarch                        2007-7.1.el6                                     rhel                          5.3 k
texlive-texmf-fonts                                 noarch                        2007-38.el6                                      rhel                           48 M
texlive-texmf-latex                                 noarch                        2007-38.el6                                      rhel                          5.3 M
texlive-utils                                       x86_64                        2007-57.el6_2                                    rhel                          253 k
tix                                                 x86_64                        1:8.4.3-5.el6                                    rhel                          252 k
tkinter                                             x86_64                        2.6.6-29.el6_2.2                                 rhel                          252 k
w3af                                                x86_64                        1.1-2.2.el6.art                                  atomic                         14 M
wapiti                                              noarch                        2.3.0-5.el6.art                                  atomic                        294 k
wmi                                                 x86_64                        1.3.14-4.el6.art                                 atomic                        7.7 M

Transaction Summary
========================================================================================================================================================================
Install      65 Package(s)

Total download size: 112 M
Installed size: 368 M
Downloading Packages:
(1/65): PyYAML-3.10-7.el6.art.x86_64.rpm                                                                                                         | 157 kB     00:09
(5/65): dirb-221-2.el6.art.x86_64.rpm                                                                                                            |  42 kB     00:04
(7/65): greenbone-security-assistant-4.0.2-6.el6.art.x86_64.rpm                                                                                  | 530 kB     00:25
(8/65): haveged-1.3-2.el6.art.x86_64.rpm                                                                                                         |  50 kB     00:00
(10/65): libmicrohttpd-0.9.7-1.el6.art.x86_64.rpm                                                                                                |  45 kB     00:00
(11/65): libyaml-0.1.3-2.el6.art.x86_64.rpm                                                                                                      |  50 kB     00:00
(12/65): mingw32-nsis-2.46-2.el6.x86_64.rpm                        (6%) 56% [================================                         ]  33 kB/s | 651 kB     00:15 ETA

texlive-dvips.x86_64 0:2007-57.el6_2                      texlive-latex.x86_64 0:2007-57.el6_2                  texlive-texmf.noarch 0:2007-38.el6
texlive-texmf-dvips.noarch 0:2007-38.el6                  texlive-texmf-errata.noarch 0:2007-7.1.el6            texlive-texmf-errata-dvips.noarch 0:2007-7.1.el6
texlive-texmf-errata-fonts.noarch 0:2007-7.1.el6          texlive-texmf-errata-latex.noarch 0:2007-7.1.el6      texlive-texmf-fonts.noarch 0:2007-38.el6
texlive-texmf-latex.noarch 0:2007-38.el6                  texlive-utils.x86_64 0:2007-57.el6_2                  tix.x86_64 1:8.4.3-5.el6
tkinter.x86_64 0:2.6.6-29.el6_2.2                         w3af.x86_64 0:1.1-2.2.el6.art                         wapiti.noarch 0:2.3.0-5.el6.art
wmi.x86_64 0:1.3.14-4.el6.art

Complete!
Once the installation completes, start the OpenVAS setup.
openvas-setup
Setup will start to download the latest database from internet.
Please note this step could take some time.
Once completed, NVT’s and SCAP data will be updated automatically every 24 hoursUpdating NVTs….
[i] This script synchronizes an NVT collection with the ‘OpenVAS NVT Feed’.
[i] The ‘OpenVAS NVT Feed’ is provided by ‘The OpenVAS Project’.
[i] Online information about this feed: ‘https://www.openvas.org/openvas-nvt-feed.html’.
[i] NVT dir: /var/lib/openvas/plugins
[i] rsync is not recommended for the initial sync. Falling back on http.
[i] Will use wget
[i] Using GNU wget: /usr/bin/wget
[i] Configured NVT http feed: https://www.openvas.org/openvas-nvt-feed-current.tar.bz2
[i] Downloading to: /tmp/openvas-nvt-sync.bGs0D1AtF0/openvas-feed-2014-04-15-5804.tar.bz2
–2014-04-15 13:08:09– https://www.openvas.org/openvas-nvt-feed-current.tar.bz2
Resolving www.openvas.org… 5.9.98.186
Connecting to www.openvas.org|5.9.98.186|:80… connected.
HTTP request sent, awaiting response… 200 OK
Length: 14741386 (14M) [application/x-bzip2]
Saving to: “/tmp/openvas-nvt-sync.bGs0D1AtF0/openvas-feed-2014-04-15-5804.tar.bz2”12% [===============>[i] Updating /var/lib/openvas/scap-data/oval/5.10/org.mitre.oval/v/family/pixos.xml
[i] Updating /var/lib/openvas/scap-data/oval/5.10/org.mitre.oval/v/family/unix.xml
[i] Updating /var/lib/openvas/scap-data/oval/5.10/org.mitre.oval/v/family/windows.xml
[i] No user data directory ‘/var/lib/openvas/scap-data/private’ found.
Updating OpenVAS Manager database….
Upon completion, setup would ask you to configure listening ip address.
Step 2: Configure GSAD
The Greenbone Security Assistant is a Web Based front end
for managing scans. By default it is configured to only allow
connections from localhost.Allow connections from any IP? [Default: yes] yes
Stopping greenbone-security-assistant:                     [  OK  ]
Starting greenbone-security-assistant:                     [  OK  ]
Configure admin user.
Step 3: Choose the GSAD admin users password.
The admin user is used to configure accounts,
Update NVT's manually, and manage roles.
Enter administrator username [Default: admin] : admin
Enter Administrator Password:
Verify Administrator Password:
main:MESSAGE:19950:2014-04-21 23h12.39 PDT: No rules file provided, the new user will have no restrictions.
main:MESSAGE:19950:2014-04-21 23h12.39 PDT: User admin has been successfully created.
Create a new user, after entering the password, just press Ctrl+D.
Step 4: Create a user

Using /var/tmp as a temporary file holder.

Add a new openvassd user
---------------------------------

Login : openvas
Authentication (pass/cert) [pass] :
Login password :
Login password (again) :

User rules
---------------
openvassd has a rules system which allows you to restrict the hosts that openvas has the right to test.
For instance, you may want him to be able to scan his own host only.

Please see the openvas-adduser(8) man page for the rules syntax.

Enter the rules for this user, and hit ctrl-D once you are done:
(the user can have an empty rules set)
Login             : openvas
Password          : ***********

Rules             :

Is that ok? (y/n) [y] y
user added.

Starting openvas-administrator...
Starting openvas-administrator:
[  OK  ]
Once completed, you would see the following message.
https://<IP>:9392
Disable Iptables:
iptables -F
/etc/init.d/iptables save
Create Certificate for OpenVAS manager.
openvas-mkcert-client -n om -i
You do not require to enter any information, it will automatically creates for you.
………………………….++++++
……++++++
e is 65537 (0x10001)
You are about to be asked to enter information that will be incorporated
into your certificate request.
What you are about to enter is what is called a Distinguished Name or a DN.
There are quite a few fields but you can leave some blank
For some fields there will be a default value,
If you enter ‘.’, the field will be left blank.
—–
Country Name (2 letter code) [DE]:State or Province Name (full name) [Some-State]:Locality Name (eg, city) []:Organization Name (eg, company) [Internet Widgits Pty Ltd]:Organizational Unit Name (eg, section) []:Common Name (eg, your name or your server’s hostname) []:Email Address []:Using configuration from /tmp/openvas-mkcert-client.20470/stdC.cnf
Check that the request matches the signature
Signature ok
The Subject’s Distinguished Name is as follows
countryName :PRINTABLE:’DE’
localityName :PRINTABLE:’Berlin’
commonName :PRINTABLE:’om’
Certificate is to be certified until Apr 22 06:28:04 2015 GMT (365 days)Write out database with 1 new entries
Data Base Updated
User om added to OpenVAS.
Start the OpenVAS scanner, it will load all the downloaded plugins.
openvassd
Now Rebuild the OpenVAS database.
Once Completed, Start the OpenVAS manager.
openvasmd
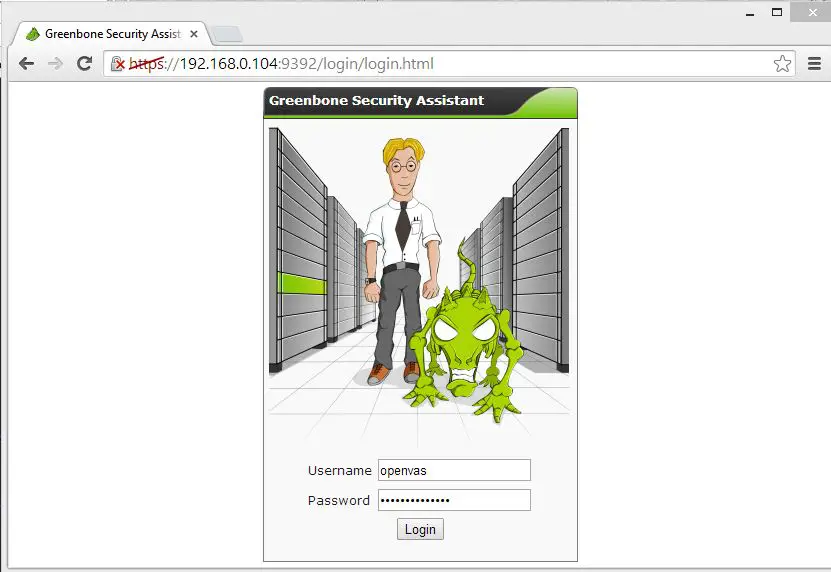
Open your browser and point to https://your-ip-address:9392. Login with username and password created by you.
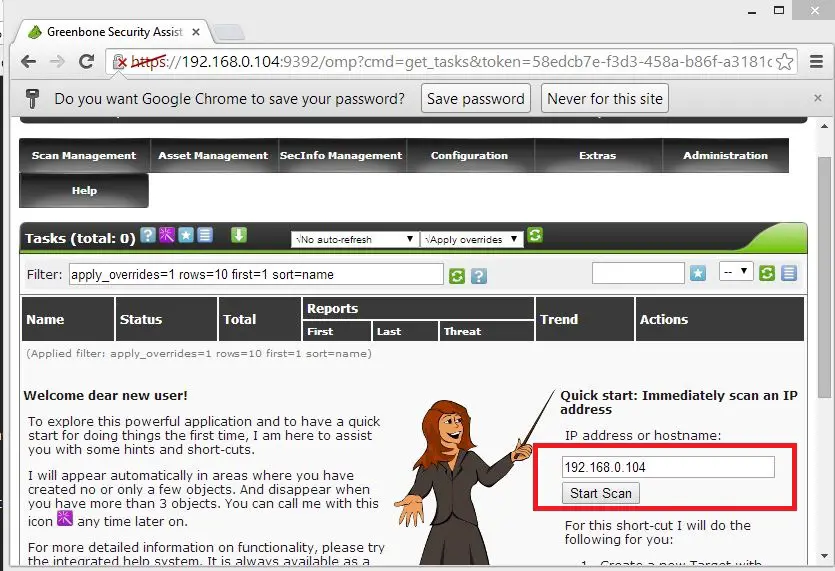
You can start the quick scan by entering ip address in the quick scan field.
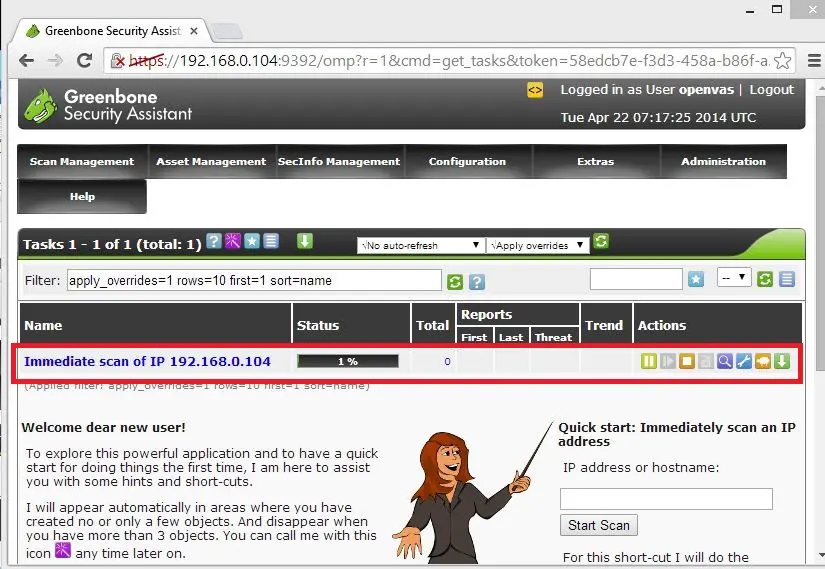
After that you would the see immediate task like below.
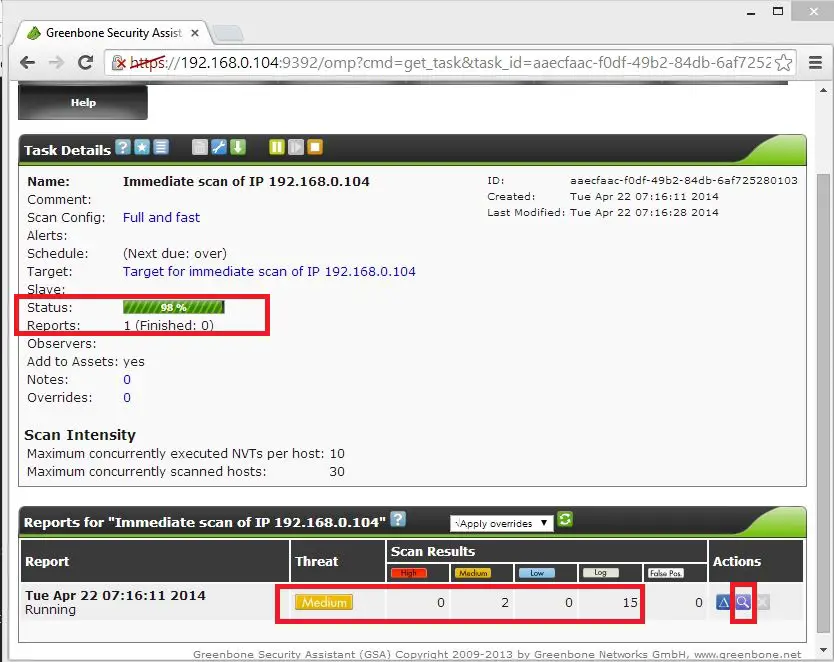
Click on the task to view the details of the scan, details will be like below; currently 60% scanning completed and also you can see vulnerability details in the report area. You can click on the details for the report.
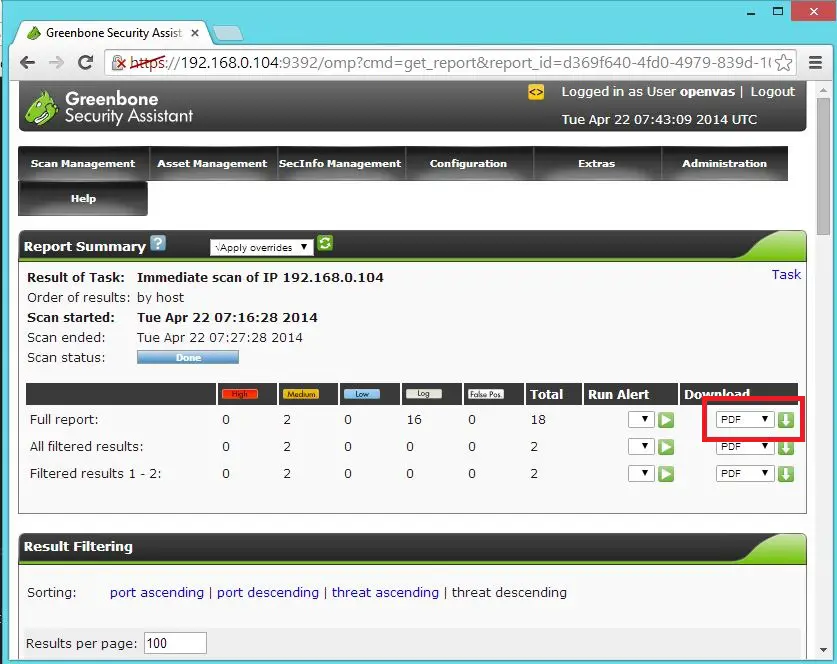
In report page you have option to download the report in multiple format like pdf, html,xml, etc,..
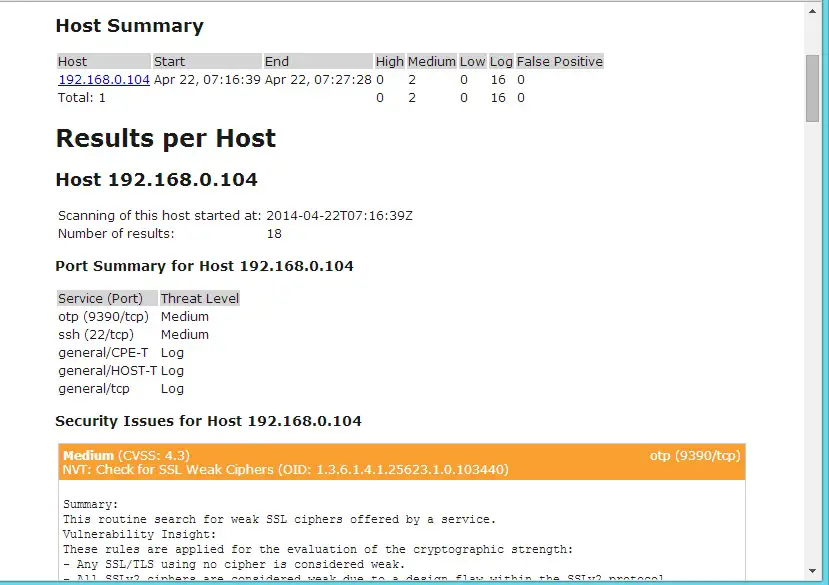
Actual report will look like below.
That’s All, Place your valuable comments below.