Image by foto76 at FreeDigitalPhotos.net
PXE, stands for Pre-Boot Execution Environment, will help you to install a system over network without having a DVD / CD-ROM. In this method, client will boot using only its network interface card, will be very helpful to the system administrators to install OS on the system in which DVD / CD devices are not present.
PXE environment needs the DHCP server, that provides the client with an IP address, other network information such as name server, the IP address or hostname of the tftp server (which provides the files necessary to start the installation program), and the location of the files on the tftp server.
The following steps must be performed to prepare for a PXE installation:
- Configure HTTP server
- Configure the files on the tftp server
- Configure DHCP.
- Start all the services
- Firewall Configurations
- Boot the client, and start the installation.
1. Install PXE Server:
Install the following packages for setting up PXE environment,
# yum -y install httpd xinetd syslinux tftp-server
2. Configure PXE Server:
Configure HTTP server:
Here we will use apache server as a network server to export the entire installation tree for the version
Now, mount CentOS 7 image onto /mnt. I already have CentOS 7 ISO image on /tmp directory.
# mount -o loop /tmp/CentOS-7-x86_64-DVD-1503-01.iso /mnt
Next, create a directory to store CentOS packages.
# mkdir /var/www/centos7
Copy all the files contents from /mnt to /var/www/centos7.
# cp -a /mnt/* /var/www/centos7/
Set the proper permissions to the above directory.
# chmod -R 755 /var/www/centos7/
Create a apache configuration file for PXE server under /etc/httpd/conf.d/ directory:
# vi /etc/httpd/conf.d/pxe.conf
Add the following lines:
Alias /centos7 /var/www/centos7/

<Directory /var/www/centos7/>
Options Indexes FollowSymLinks
Order Deny,Allow
Allow from all
</Directory>
Save and close the file.
Configure the files on the tftp server:
The next step is to copy the files necessary to start the installation to the tftp server so they can be found when the client requests them.
Copy all the boot loaders files provided by syslinux packages to /var/lib/tftpboot by using following command.
# cp -a /usr/share/syslinux/* /var/lib/tftpboot/
Create the centos7 directory and copy CentOS 7 bootable kernel and initrd images from the DVD mounted location to centos7 folder structure.
# mkdir /var/lib/tftpboot/centos7
# cp /mnt/images/pxeboot/vmlinuz  /var/lib/tftpboot/centos7
# cp /mnt/images/pxeboot/initrd.img  /var/lib/tftpboot/centos7
PXE Server normally reads its configuration from a Default file hosted in a folder called pxelinux.cfg, create a configuration directory for PXE server:
# mkdir /var/lib/tftpboot/pxelinux.cfg
Now, create PXE server configuration file under the pxelinux.cfg:
# vi /var/lib/tftpboot/pxelinux.cfg/default
Add the following lines:
default menu.c32
prompt 0
timeout 300
ONTIMEOUT 1

menu title ########## CentOS 7 PXE Boot Menu ##########

label 1
menu label ^1) Install CentOS 7
menu default
kernel centos7/vmlinuz
append initrd=centos7/initrd.img method=https://192.168.12.10/centos7 devfs=nomount

label 2
menu label ^2) Boot from local drive
localboot 0
Edit file /etc/xinetd.d/tftp,
vi /etc/xinetd.d/tftp
Enable TFTP server. To do that, change “disable=yes” to “no”.
 service tftp
{
        socket_type             = dgram
        protocol                = udp
        wait                    = yes
        user                    = root
        server                  = /usr/sbin/in.tftpd
        server_args             = -s /var/lib/tftpboot
        disable                 = no
        per_source              = 11
        cps                     = 100 2
        flags                   = IPv4
}
Configure DHCP Server
Now, we have to configure the DHCP server to work with PXE server.
Edit file /etc/dhcp/dhcpd.conf,
# vi /etc/dhcp/dhcpd.conf
Add the green line at the end of your subnet. You can also copy and paste below content into dhcpd.conf and modify it as per your network environment. More detailed tutorial can be found here.
subnet 192.168.12.0 netmask 255.255.255.0 {
 range 192.168.12.100 192.168.12.200;
 option domain-name-servers 8.8.8.8, 8.8.4.4;
 option domain-name "itzgeek.local";
 option routers 192.168.12.2;
 option broadcast-address 192.168.12.255;
 default-lease-time 600;
 max-lease-time 7200;
 filename "pxelinux.0";
}
Start all services:
Once configuration is done, restart all the services.
# systemctl restart xinetd
# systemctl restart httpd
# systemctl restart dhcpd
Enable all services to start automatically on system boot.
# systemctl enable xinetd
# systemctl enable httpd
# systemctl enable dhcpd
Firewall Configurations:
We need to allow apache, dhcp and tftp service in firewall. To do that, run the following commands.
# firewall-cmd --permanent --add-service=http      ## Port 80
# firewall-cmd --permanent --add-service=dhcp     ## Port 67
# firewall-cmd --permanent --add-port=69/udp     ## Port for TFTP
# firewall-cmd --permanent --add-port=69/tcp    ## Port for TFTP
# firewall-cmd --reload  ## Apply rules
3. Boot the client, and start the installation:
The client may be any system that has network boot enabled option (PXE boot). You can enable this option in your Bios settings by hitting a specified key during BIOS POST operations as specified in motherboard manual.
Machine will start to boot from network interface.
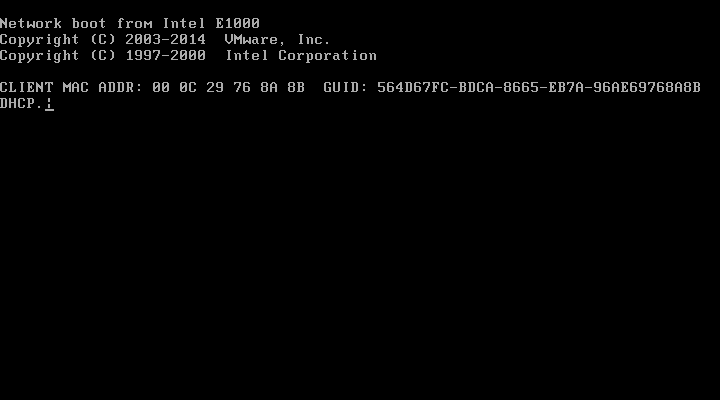
Now, the system will try to get an IP address automatically from DHCP server.
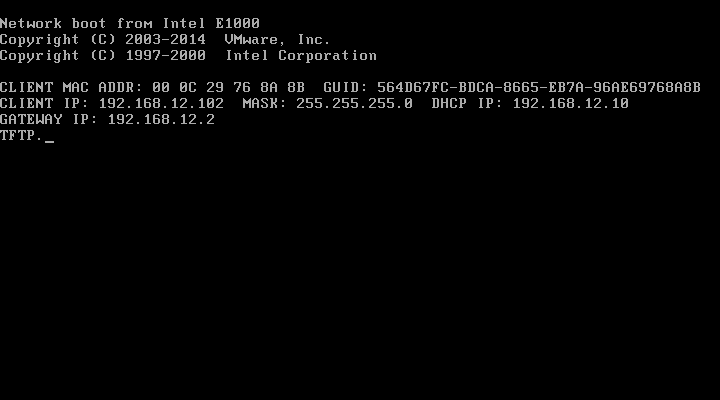
Once system gets IP address, system will take you to PXE menu.
Note: As per our configuration, Install CentOS 7 is selected default, and the installation will start automatically if no key is pressed with in 30 seconds.
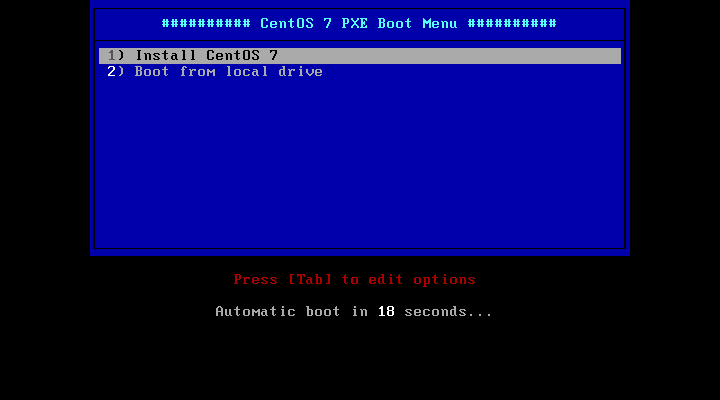
Now you can proceed with the installation of CentOS 7.
That’s All.