
Monit is an open source proactive monitoring tool for Linux operating system which helps you to monitor system process using the web browser and also whenever requires it automatically do the maintenance or repair of a particular process (i.e., restarting the service) in such a way that it can be brought back online.
Monit can also be used for proactively managing and monitoring of programs, files, directories, and devices for permission changes, timestamps changes, size changes, and checksum changes; not limited to perform various protocol checks, TCP/IP network checks, and can utilize SSL for such checks.
It logs to its log file and notifies the user via customizable messages, this guide will help you to set up Monit on Debian 9 / Ubuntu 16.04.
This guide should also work on previous versions of Debian and Ubuntu such as Debian 8, Ubuntu 14.04, and also on current version of Ubuntu i.e., Ubuntu 17.04
Install Monit:
Monit is available on Debian and Ubuntu repositories, so you can simply use “apt-get” to install it.
$ sudo apt-get -y install monit
Output:
Reading package lists... Done
Building dependency tree
Reading state information... Done
Suggested packages:
  sysvinit-core
The following NEW packages will be installed:
  monit
0 upgraded, 1 newly installed, 0 to remove and 0 not upgraded.
Need to get 309 kB of archives.
After this operation, 915 kB of additional disk space will be used.
Get:1 https://deb.debian.org/debian stretch/main amd64 monit amd64 1:5.20.0-6 [30                                                                                                             9 kB]
Fetched 309 kB in 2s (150 kB/s)
Selecting previously unselected package monit.
(Reading database ... 124586 files and directories currently installed.)
Preparing to unpack .../monit_1%3a5.20.0-6_amd64.deb ...
Unpacking monit (1:5.20.0-6) ...
Setting up monit (1:5.20.0-6) ...
Processing triggers for systemd (232-25) ...
Processing triggers for man-db (2.7.6.1-2) ...
Control Monit service:
To start Monit service, run:
$ sudo systemctl start monit
To stop Monit, run:
$ sudo systemctl stop monit
To restart Monit, run:
$ sudo systemctl restart monit
To check the status of Monit, run:
$ sudo systemctl status monit
Output:
● monit.service - LSB: service and resource monitoring daemon
   Loaded: loaded (/etc/init.d/monit; generated; vendor preset: enabled)
   Active: active (running) since Tue 2017-06-27 22:36:53 EDT; 9min ago
     Docs: man:systemd-sysv-generator(8)
   CGroup: /system.slice/monit.service
           └─1094 /usr/bin/monit -c /etc/monit/monitrc

Jun 27 22:36:53 server systemd[1]: Starting LSB: service and resource monitoring daemon...
Jun 27 22:36:53 server monit[1087]: Starting daemon monitor: monit.
Jun 27 22:36:53 server systemd[1]: Started LSB: service and resource monitoring daemon.
To enable Monit service at boot time, run:
$ sudo systemctl enable monit
Configure Monit:
“/etc/monit/monitrc” is the main configuration file of Monit and additional configuration files for process/service are usually placed in “/etc/monit/conf-available” and “/etc/monit/conf-enabled”
Edit the main configuration file to configure important parameters of Monit’s to meet our requirements.
$ sudo nano /etc/monit/monitrc
If you want to change the time intervals between service check, edit the below value.
set daemon 120
Set the mail server information for relaying the alerts generated by Monit.
set mailserver mx.itzgeek.local port 25
Specify an email address on which you want to be alerted in case of any failures/events.
set alert [email protected]
If you only want alert emails for certain events, then:
Ex: Alert only on “Timeout” and “Ping failed” events.
set alert [email protected] only on { timeout, icmp }
Check out How to filter an event.
Monit by default sends just only one notification if a service failed and another one when it recovers. If you want to be alerted on each “N” cycle if a service remains in failed state. Ex, Fourth cycle.
alert [email protected] with reminder on 4 cycles
Enable Monit Web Interface:
Monit also comes with an embedded web interface to view the status services and manage them through a web browser. By default, Monit web interface is disabled. To enable, edit the Monit configuration file “/etc/monit/monitrc“.
$ sudo nano /etc/monit/monitrc
Look for “set httpd port 2812” line and change the following entries.
FROM
# set httpd port 2812 and
# use address localhost # only accept connection from localhost
# allow localhost # allow localhost to connect to the server and
# allow admin:monit # require user 'admin' with password 'monit'
TO
set httpd port 2812 and
allow admin:monit # require user 'admin' with password 'monit'
Restart the Monit service.
$ sudo systemctl restart monit
Check whether the Monit service is listening correctly on all interfaces or not.
$ sudo netstat -antup | grep -i monit
Output:
tcp 0 0 0.0.0.0:2812 0.0.0.0:* LISTEN 1615/monit
tcp6 0 0 :::2812 :::* LISTEN 1615/monit
The above will set Monit to listen on “port 2812” on all interfaces.
Access Monit Web Interface:
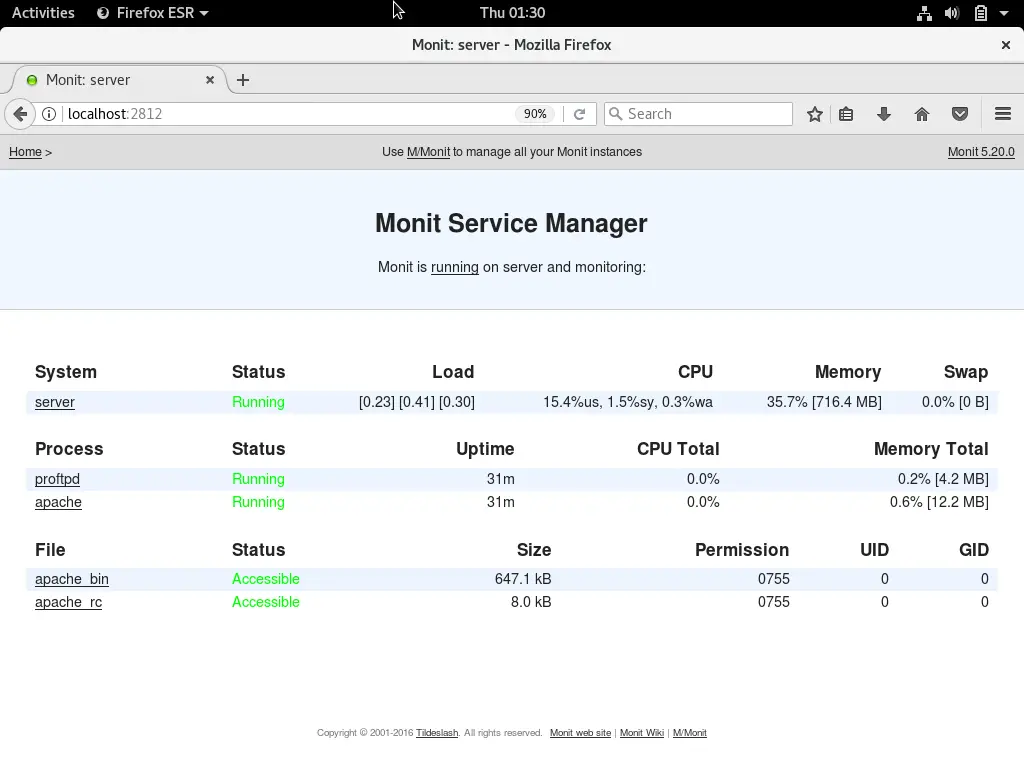
Access the web interface by using below URL, and You need to use the username as “admin” and password as “monit” to access the Monit’s web interface. Monit’s home page will look like this.
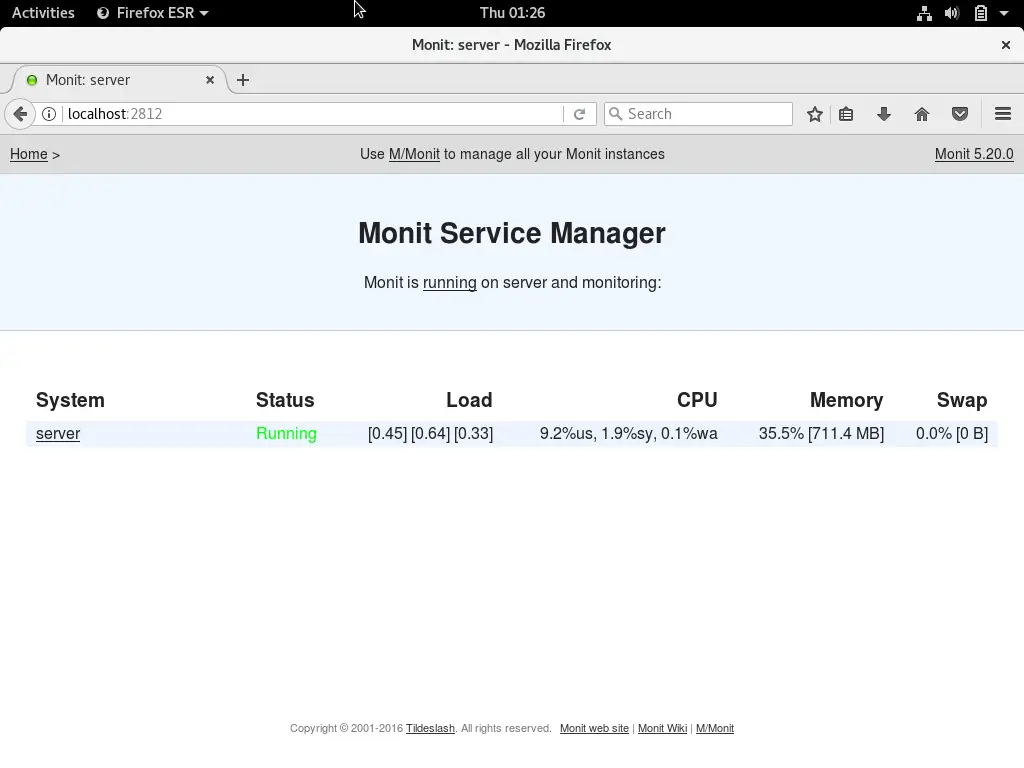
Click on “server” to see the detailed information of Monit.
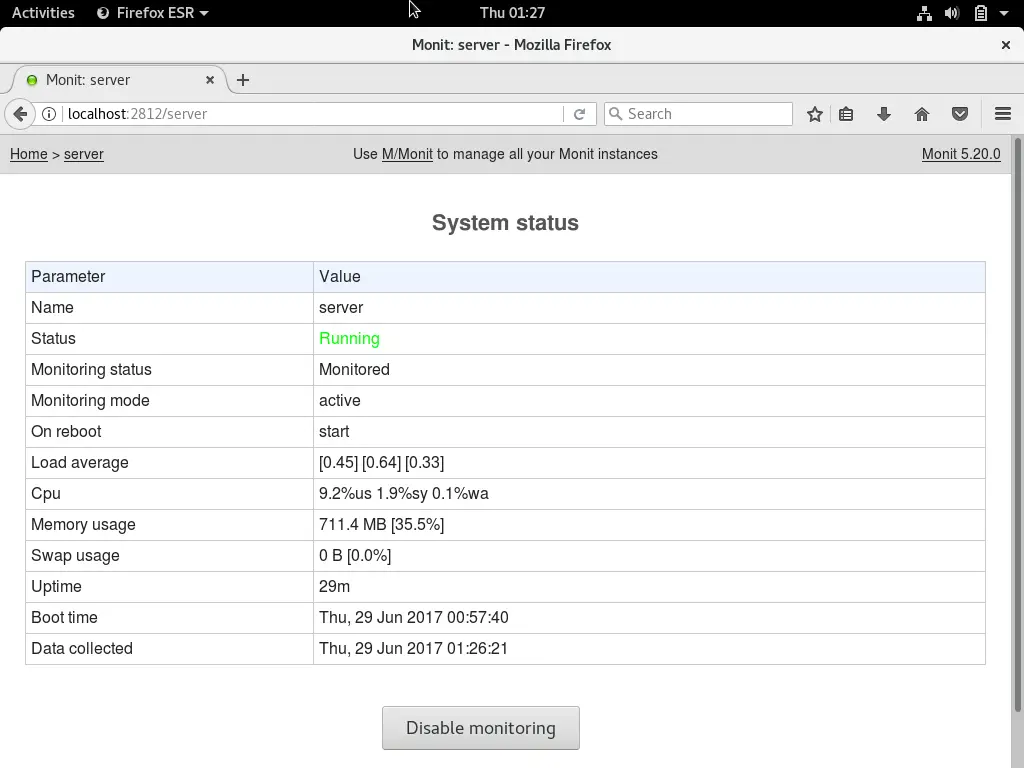
You can also use the Monit’s command line to see the status of the Monit.
$ sudo monit status
Output:
Monit 5.20.0 uptime: 6m

System 'server'
 status Running
 monitoring status Monitored
 monitoring mode active
 on reboot start
 load average [0.16] [0.12] [0.17]
 cpu 1.4%us 0.1%sy 0.1%wa
 memory usage 509.4 MB [25.4%]
 swap usage 0 B [0.0%]
 uptime 15m
 boot time Wed, 28 Jun 2017 07:46:33
 data collected Wed, 28 Jun 2017 08:00:45
Configure services for monitoring:
Now, you are ready to go and configure Monit to monitor other services you want to monitor. You can place the config files under “/etc/monit/conf-enabled/” directory.
Configure Monit for FTP service:
Configure Monit to start when the FTP dies for any reason. Create the config file called “proftpd“.
$ sudo nano /etc/monit/conf-available/proftpd
Append the following config to the above file.
check process proftpd with pidfile /var/run/proftpd.pid
   start program = "/etc/init.d/proftpd start"
   stop  program = "/etc/init.d/proftpd stop"
if failed port 21 protocol ftp then restart
Enable the configuration file symlinking to “/etc/monit/conf-enabled/” directory.
$ sudo ln -s /etc/monit/conf-available/proftpd /etc/monit/conf-enabled/
Verify the Monit syntax.
$ sudo monit -t
Output:
Control file syntax OK
Reload Monit service to take effect of changes.
$ sudo systemctl reload monit
Check out whether you can see the new service on the web interface.
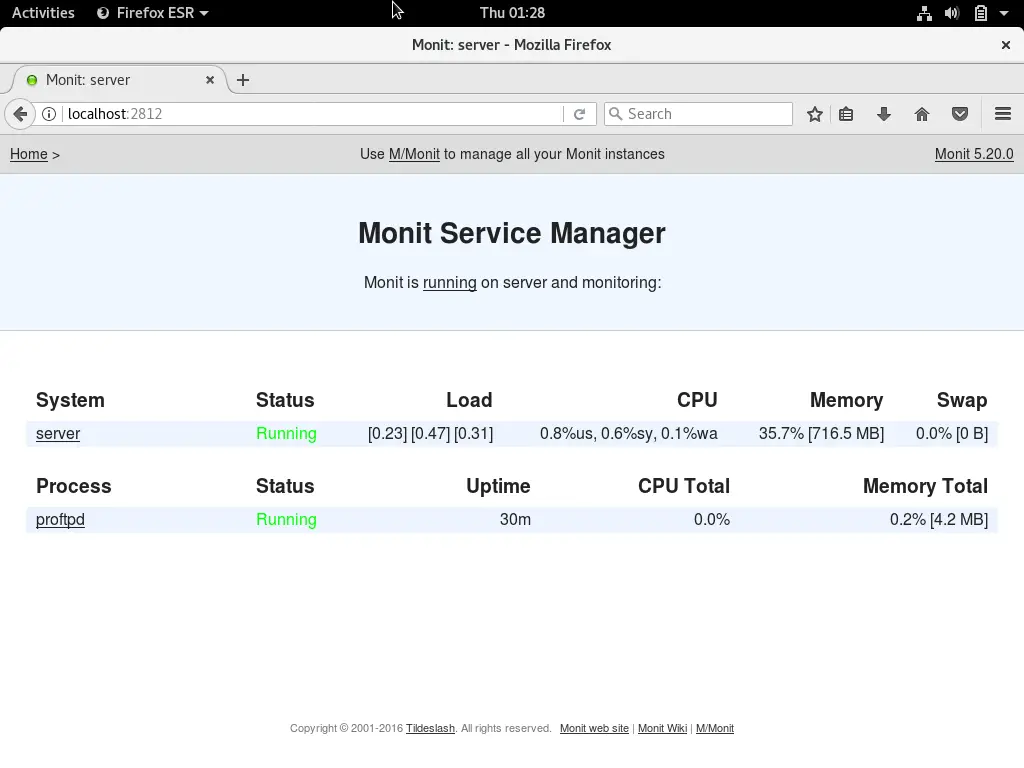
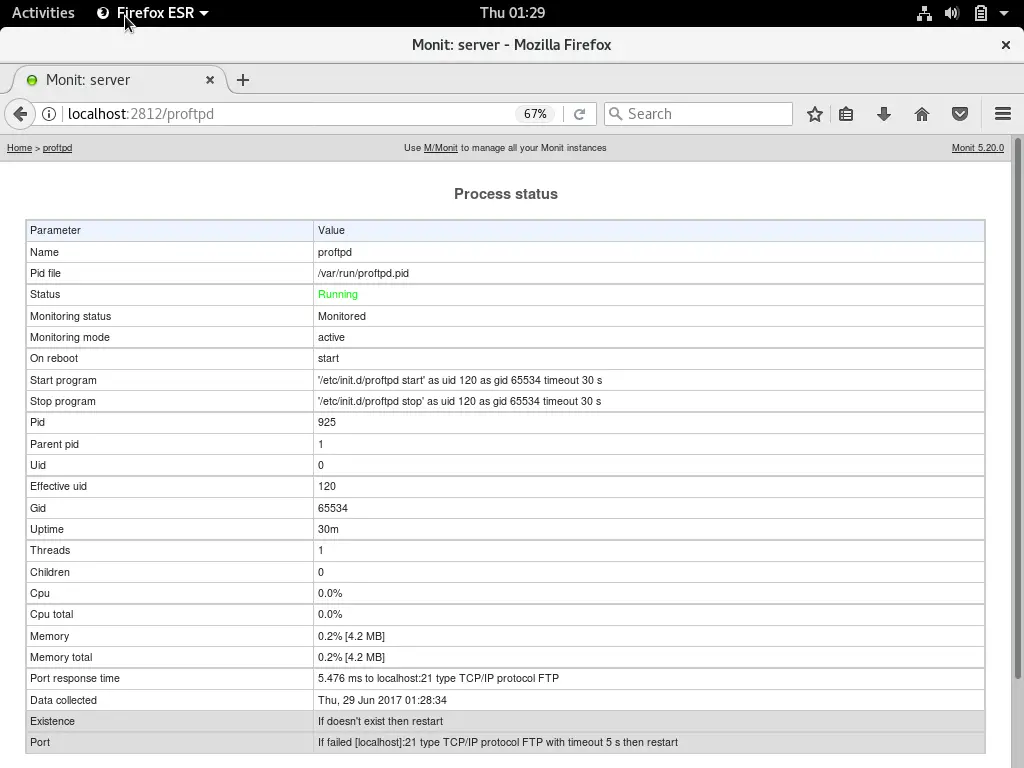
Click on the service name “proftpd” to see detailed information about the service.
Pre-defined Templates:
Monit also comes with a pre-defined configuration template for some of process and services. The templates are found in “/etc/monit/conf-available/“, and you can enable them by simply symlinking to “/etc/monit/conf-enabled/” directory.
$ sudo ls -al /etc/monit/conf-available/
Output: (List of pre-defined templates)
drwxr-xr-x 2 root root 4096 Jun 27 22:36 .
drwxr-xr-x 6 root root 4096 Jun 28 07:54 ..
-rw-r--r-- 1 root root 481 Jan 11 08:48 acpid
-rw-r--r-- 1 root root 640 Jan 11 08:48 apache2
-rw-r--r-- 1 root root 455 Jan 11 08:48 at
-rw-r--r-- 1 root root 691 Jan 11 08:48 cron
-rw-r--r-- 1 root root 602 Jan 11 08:48 mdadm
-rw-r--r-- 1 root root 669 Jan 11 08:48 memcached
-rw-r--r-- 1 root root 703 Jan 11 08:48 mysql
-rw-r--r-- 1 root root 521 Jan 11 08:48 nginx
-rw-r--r-- 1 root root 471 Jan 11 08:48 openntpd
-rw-r--r-- 1 root root 950 Jan 11 08:48 openssh-server
-rw-r--r-- 1 root root 683 Jan 11 08:48 pdns-recursor
-rw-r--r-- 1 root root 1421 Jan 11 08:48 postfix
-rw-r--r-- 1 root root 869 Jan 11 08:48 rsyslog
-rw-r--r-- 1 root root 501 Jan 11 08:48 smartmontools
-rw-r--r-- 1 root root 306 Jan 11 08:48 snmpd
Configure Monit for rsyslog using template:
For example, let’s monitor apache2 service using the pre-defined template provided by Monit. Symlink the templates to “/etc/monit/conf-enabled/” directory.
$ sudo ln -s /etc/monit/conf-available/apache2 /etc/monit/conf-enabled/
Reload Monit service to take effect of changes.
$ sudo systemctl reload monit
Access the web interface; you would find the new services that we configured using template.
Test the Monitoring:
Let’s test the action of Monit when the service or process dies for no reason. Ex, stop the “proftpd” daemon.
$ sudo systemctl stop proftpd
Wait for 60 seconds, Monit will start the “proftpd” service automatically. You can find the same in the Monit log.
$ sudo tailf /var/log/monit.log
Output:
[EDT Jun 29 01:35:43] error    : 'proftpd' process is not running
[EDT Jun 29 01:35:43] info     : 'proftpd' trying to restart
[EDT Jun 29 01:35:43] info     : 'proftpd' start: '/etc/init.d/proftpd start'
That’s All. We have successfully configured Monit on Debian 9 / Ubuntu 16.04. We welcome your feedback, please post your valuable comments below.