
In the technology world, it is always crucial to keep the data highly available to ensure it is accessible to the application/user. High availability is achieved here by distributing the data across the multiple volumes/nodes.
Client machines/users can access the storage as like local storage. Whenever the user creates data on the Gluster storage, the data will be mirrored/distributed to other storage nodes.
What is GlusterFS?
GlusterFS is an open-source, scalable network filesystem suitable for high data-intensive workloads such as media streaming, cloud storage, and CDN (Content Delivery Network). GlusterFS was developed initially by Gluster Inc, and then by Redhat, as a result of the acquisition.
Terminologies:
Below are the important terminologies we use throughout this article.
Brick – is basic storage (directory) on a server in the trusted storage pool.
Volume – is a logical collection of bricks.
Cluster – is a group of linked computers, working together as a single computer.
Distributed File System – A filesystem in which the data is spread across the multiple storage nodes and allows the clients to access it over a network.
Client – is a machine which mounts the volume.
Server – is a machine where the actual file system is hosted in which the data will be stored.
Replicate – Making multiple copies of data to achieve high redundancy.
Fuse – is a loadable kernel module that lets non-privileged users create their own file systems without editing kernel code.
glusterd – is a daemon that runs on all servers in the trusted storage pool.
RAID – Redundant Array of Inexpensive Disks (RAID) is a technology that provides increased storage reliability through redundancy.
Volumes:
As said earlier, the volume is the collection of bricks, and most of the gluster operations such as reading and writing happen on the volume. GlusterFS supports different types of volumes based on the requirements; suitable for scaling the storage size or improving the performance or for both.
In this article, we will configure replicated GlusterFS volume on Ubuntu 16.04 / Debian 8. This guide should also work on previous versions of Ubuntu such as Ubuntu 14.04 / Ubuntu 12.04.
Replicated Glusterfs Volume is like a RAID 1, and volume maintains exact copies of the data on all bricks. You can decide the number of replicas while creating the volume, so you would need to have atleast two bricks to create a volume with two replicas or three bricks to create a volume of 3 replicas.
Why not read about remaining types of GlusterFS volumes.
Requirements:
Here, we are going to configure GlusterFS volume with two replicas. Make sure you have two 64bit systems (either virtual or physical) with 1GB of memory, and one spare hard disk on each system.
| Host Name | IP Address | OS | Memory | Disk | Purpose |
|---|---|---|---|---|---|
| gluster1.itzgeek.local | 192.168.12.16 | Ubuntu 16.04 LTS | 1GB | /dev/sdb (5GB) | Storage Node 1 |
| gluster2.itzgeek.local | 192.168.12.17 | Debian 8 | 1GB | /dev/sdb (5GB) | Storage Node 2 |
| client.itzgeek.local | 192.168.12.8 | CentOS 7 / Debian | NA | NA | Client Machine |
Configure DNS:
GlusterFS components use DNS for name resolutions, so configure either DNS or set up a hosts entry. If you do not have a DNS on your environment, modify /etc/hosts file and update it accordingly.
sudo vi /etc/hosts

192.168.12.16  gluster1.itzgeek.local  gluster1
192.168.12.17  gluster2.itzgeek.local  gluster2
192.168.12.20 client.itzgeek.local client
Add GlusterFS Repository:
Before proceeding to the installation, we need to configure GlusterFS repository on both storage nodes. Follow the instruction to add the repository to your system.
Debian:
Install support package for https transactions.
sudo apt-get install -y lsb-release
sudo apt-get install -y apt-transport-https
Add the public key for GlusterFS repository.
wget -O - https://download.gluster.org/pub/gluster/glusterfs/LATEST/rsa.pub | sudo apt-key add -
echo deb https://download.gluster.org/pub/gluster/glusterfs/LATEST/Debian/$(lsb_release -sc)/apt $(lsb_release -sc) main | sudo tee /etc/apt/sources.list.d/gluster.list
Ubuntu 16.04 / 14.04:
sudo apt-get install -y software-properties-common
sudo add-apt-repository ppa:gluster/glusterfs-3.8
Install GlusterFS:
Once you have added the repository on your systems, we are good to go for the installation of GlusterFS.
Update the repository cache.
sudo apt-get update
Install GlusterFS package using the following command.
sudo apt-get install -y glusterfs-server
Start the glusterfs-server service on all gluster nodes.
sudo service glusterfs-server start
Verify that the glusterfs service is running fine.
raj@gluster1:~$ sudo service glusterfs-server status

● glusterfs-server.service - LSB: GlusterFS server
   Loaded: loaded (/etc/init.d/glusterfs-server; bad; vendor preset: enabled)
   Active: active (running) since Sat 2016-09-24 21:47:20 IST; 1min 6s ago
     Docs: man:systemd-sysv-generator(8)
  Process: 1570 ExecStop=/etc/init.d/glusterfs-server stop (code=exited, status=0/SUCCESS)
  Process: 1664 ExecStart=/etc/init.d/glusterfs-server start (code=exited, status=0/SUCCESS)
    Tasks: 7 (limit: 512)
   Memory: 25.5M
      CPU: 3.552s
   CGroup: /system.slice/glusterfs-server.service
           └─1673 /usr/sbin/glusterd -p /var/run/glusterd.pid

Sep 24 21:47:16 gluster1.itzgeek.local systemd[1]: Starting LSB: GlusterFS server...
Sep 24 21:47:16 gluster1.itzgeek.local glusterfs-server[1664]:  * Starting glusterd service glusterd
Sep 24 21:47:20 gluster1.itzgeek.local glusterfs-server[1664]:    ...done.
Sep 24 21:47:20 gluster1.itzgeek.local systemd[1]: Started LSB: GlusterFS server.
Configure Firewall:
You would need to either disable the firewall or configure the firewall to allow all connections within a cluster.
sudo iptables -I INPUT -p all -s <ip-address> -j ACCEPT
Add Storage:
Assuming that you have one spare hard disk on your machine, /dev/sdb is the one I will use here for a brick. Create a single partition on the spare hard disk shown like below.
You would need to perform the below steps on both nodes.
sudo fdisk /dev/sdb
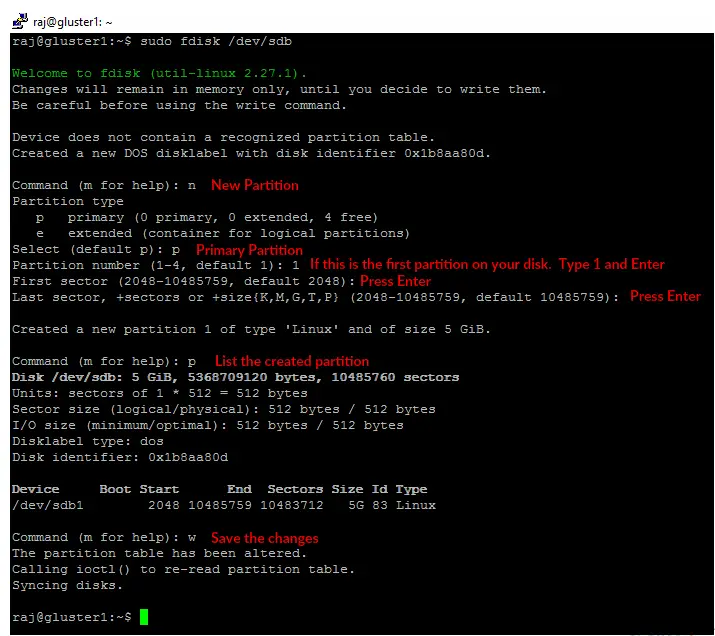
Format the created partition with the filesystem of your choice.
sudo mkfs.ext4 /dev/sdb1
Mount the disk on a directory called /data/gluster.
sudo mkdir -p /data/gluster
sudo mount /dev/sdb1 /data/gluster
Add an entry to /etc/fstab for keeping the mount persistent across reboot.
echo "/dev/sdb1 /data/gluster ext4 defaults 0 0" | sudo tee --append /etc/fstab
Configure GlusterFS on Ubuntu 16.04:
Before creating a volume, we need to create trusted storage pool by adding gluster2.itzgeek.local. You can run GlusterFS configuration commands on any one server in the cluster will execute the same command on all other servers.
Here I will run all GlusterFS commands in gluster1.itzgeek.local node.
raj@gluster1:~$ sudo gluster peer probe gluster2.itzgeek.local
peer probe: success.
Verify the status of the trusted storage pool.
raj@gluster1:~$ sudo gluster peer status

Number of Peers: 1

Hostname: gluster2.itzgeek.local
Uuid: 51470928-dfa8-42e1-a221-d7bbcb8c13bd
State: Peer in Cluster (Connected)
List the storage pool.
raj@gluster1:~$ sudo gluster pool list

UUID                                    Hostname                State
51470928-dfa8-42e1-a221-d7bbcb8c13bd    gluster2.itzgeek.local  Connected
dc7c1639-d21c-4adf-b28f-5150229e6980    localhost               Connected
Setup GlusterFS Volume:
Create a brick (directory) called “gvol0” in the mounted file system on both nodes.
sudo mkdir -p /data/gluster/gvol0
Since we are going to use replicated volume, so create the volume named “gvol0” with two replicas.
raj@gluster1:~$ sudo gluster volume create gvol0 replica 2 gluster1.itzgeek.local:/data/gluster/gvol0 gluster2.itzgeek.local:/data/gluster/gvol0
volume create: gvol0: success: please start the volume to access data
Start the volume.
raj@gluster1:~$ sudo gluster volume start gvol0
volume start: gvol0: success
Check the status of the created volume.
raj@gluster1:~$ sudo gluster volume info gvol0

Volume Name: gvol0
Type: Replicate
Volume ID: ca102e4b-6cd1-4d9d-9c5a-03b882c76da0
Status: Started
Snapshot Count: 0
Number of Bricks: 1 x 2 = 2
Transport-type: tcp
Bricks:
Brick1: gluster1.itzgeek.local:/data/gluster/gvol0
Brick2: gluster2.itzgeek.local:/data/gluster/gvol0
Options Reconfigured:
transport.address-family: inet
performance.readdir-ahead: on
nfs.disable: on
Setup GlusterFS Client:
Install glusterfs-client package to support the mounting of GlusterFS filesystems. Run all commands as root user.
$ su -

### CentOS / RHEL ###
yum install -y glusterfs-client

### Ubuntu / Debian ###
apt-get install -y glusterfs-client
Create a directory to mount the GlusterFS filesystem.
mkdir -p /mnt/glusterfs
Now, mount the GlusterFS filesystem to /mnt/glusterfs using the following command.
mount -t glusterfs gluster1.itzgeek.local:/gvol0 /mnt/glusterfs
You can also use gluster2.itzgeek.local instead of gluster1.itzgeek.com in the above command.
Verify the mounted GlusterFS filesystem.
[root@client ~]# df -hP /mnt/glusterfs
Filesystem                     Size  Used Avail Use% Mounted on
gluster1.itzgeek.local:/gvol0  4.8G   11M  4.6G   1% /mnt/glusterfs
You can also use below command to verify the GlusterFS filesystem.
[root@client ~]# cat /proc/mounts
rootfs / rootfs rw 0 0
sysfs /sys sysfs rw,seclabel,nosuid,nodev,noexec,relatime 0 0
proc /proc proc rw,nosuid,nodev,noexec,relatime 0 0
devtmpfs /dev devtmpfs rw,seclabel,nosuid,size=490448k,nr_inodes=122612,mode=755 0 0
securityfs /sys/kernel/security securityfs rw,nosuid,nodev,noexec,relatime 0 0
tmpfs /dev/shm tmpfs rw,seclabel,nosuid,nodev 0 0
devpts /dev/pts devpts rw,seclabel,nosuid,noexec,relatime,gid=5,mode=620,ptmxmode=000 0 0
tmpfs /run tmpfs rw,seclabel,nosuid,nodev,mode=755 0 0
tmpfs /sys/fs/cgroup tmpfs ro,seclabel,nosuid,nodev,noexec,mode=755 0 0
cgroup /sys/fs/cgroup/systemd cgroup rw,nosuid,nodev,noexec,relatime,xattr,release_agent=/usr/lib/systemd/systemd-cgroups-agent,name=systemd 0 0
pstore /sys/fs/pstore pstore rw,nosuid,nodev,noexec,relatime 0 0
cgroup /sys/fs/cgroup/memory cgroup rw,nosuid,nodev,noexec,relatime,memory 0 0
cgroup /sys/fs/cgroup/perf_event cgroup rw,nosuid,nodev,noexec,relatime,perf_event 0 0
cgroup /sys/fs/cgroup/cpuset cgroup rw,nosuid,nodev,noexec,relatime,cpuset 0 0
cgroup /sys/fs/cgroup/devices cgroup rw,nosuid,nodev,noexec,relatime,devices 0 0
cgroup /sys/fs/cgroup/freezer cgroup rw,nosuid,nodev,noexec,relatime,freezer 0 0
cgroup /sys/fs/cgroup/cpu,cpuacct cgroup rw,nosuid,nodev,noexec,relatime,cpuacct,cpu 0 0
cgroup /sys/fs/cgroup/blkio cgroup rw,nosuid,nodev,noexec,relatime,blkio 0 0
cgroup /sys/fs/cgroup/hugetlb cgroup rw,nosuid,nodev,noexec,relatime,hugetlb 0 0
cgroup /sys/fs/cgroup/net_cls cgroup rw,nosuid,nodev,noexec,relatime,net_cls 0 0
configfs /sys/kernel/config configfs rw,relatime 0 0
/dev/mapper/centos-root / xfs rw,seclabel,relatime,attr2,inode64,noquota 0 0
selinuxfs /sys/fs/selinux selinuxfs rw,relatime 0 0
systemd-1 /proc/sys/fs/binfmt_misc autofs rw,relatime,fd=25,pgrp=1,timeout=300,minproto=5,maxproto=5,direct 0 0
hugetlbfs /dev/hugepages hugetlbfs rw,seclabel,relatime 0 0
debugfs /sys/kernel/debug debugfs rw,relatime 0 0
mqueue /dev/mqueue mqueue rw,seclabel,relatime 0 0
/dev/mapper/centos-home /home xfs rw,seclabel,relatime,attr2,inode64,noquota 0 0
/dev/sda1 /boot xfs rw,seclabel,relatime,attr2,inode64,noquota 0 0
tmpfs /run/user/0 tmpfs rw,seclabel,nosuid,nodev,relatime,size=100136k,mode=700 0 0
gluster1.itzgeek.local:/gvol0 /mnt/glusterfs fuse.glusterfs rw,relatime,user_id=0,group_id=0,default_permissions,allow_other,max_read=131072 0 0
fusectl /sys/fs/fuse/connections fusectl rw,relatime 0 0
Add below entry to /etc/fstab for automatically mounting during system boot.
gluster1.itzgeek.local:/gvol0 /mnt/glusterfs glusterfs defaults,_netdev 0 0
Test GlusterFS Replication and High-Availability:
GlusterFS Server Side:
To check the replication, mount the created GlusterFS volume on the same storage node.
raj@gluster1:~$ sudo mount -t glusterfs gluster1.itzgeek.local:/gvol0 /mnt
raj@gluster2:~$ sudo mount -t glusterfs gluster2.itzgeek.local:/gvol0 /mnt
Data inside the /mnt directory of both nodes will always be same (replication).
GlusterFS Client Side:
Let’s create some files on the mounted filesystem on the client.itzgeek.local.
touch /mnt/glusterfs/file1
touch /mnt/glusterfs/file2
Verify the created files.
[root@client ~]# ll /mnt/glusterfs/
total 0
-rw-r--r--. 1 root root 0 Sep 26 11:22 file1
-rw-r--r--. 1 root root 0 Sep 26 11:22 file2
Test the both GlusterFS nodes whether they have same data inside /mnt.
raj@gluster1:~$ ll /mnt/
total 12
drwxr-xr-x  4 root root 4096 Sep 26 20:52 ./
drwxr-xr-x 24 root root 4096 Sep 25 21:57 ../
-rw-r--r--  1 root root    0 Sep 26 20:52 file1
-rw-r--r--  1 root root    0 Sep 26 20:52 file2


raj@gluster2:~$ ls -al /mnt/
total 12
drwxr-xr-x  4 root root 4096 Sep 26 06:30 .
drwxr-xr-x 23 root root 4096 Sep 24 08:39 ..
-rw-r--r--  1 root root    0 Sep 26  2016 file1
-rw-r--r--  1 root root    0 Sep 26  2016 file2
As you know, we have mounted GlusterFS volume from gluster1.itzgeek.local on client.itzgeek.local, now it is the time to test the high-availability of the volume by shutting down the node.
raj@gluster1:~$ sudo poweroff
Now test the availability of the files, you would see files that we created recently even though the node is down.
[root@client ~]# ll /mnt/glusterfs/
total 0
-rw-r--r--. 1 root root 0 Sep 26 11:22 file1
-rw-r--r--. 1 root root 0 Sep 26 11:22 file2
Create some more files on the GlusterFS filesystem to check the replication.
touch /mnt/glusterfs/file3
touch /mnt/glusterfs/file4
Verify the files count.
[root@client ~]# ll /mnt/glusterfs/
total 0
-rw-r--r--. 1 root root 0 Sep 26 11:22 file1
-rw-r--r--. 1 root root 0 Sep 26 11:22 file2
-rw-r--r--. 1 root root 0 Sep 26 11:26 file3
-rw-r--r--. 1 root root 0 Sep 26 11:26 file4
Since the gluster1 is down, all your data’s are now written on gluster2.itzgeek.local due to High-Availability. Now power on the node1 (gluster1.itzgeek.local).
Check the /mnt of the gluster1.itzgeekk.local; you should see all four files in the directory, this confirms the replication is working as expected.
raj@gluster1:~$ sudo mount -t glusterfs gluster1.itzgeek.local:/gvol0 /mnt
[sudo] password for raj:

raj@gluster1:~$ ll /mnt/
total 12
drwxr-xr-x  4 root root 4096 Sep 26 20:59 ./
drwxr-xr-x 24 root root 4096 Sep 25 21:57 ../
-rw-r--r--  1 root root    0 Sep 26 20:52 file1
-rw-r--r--  1 root root    0 Sep 26 20:52 file2
-rw-r--r--  1 root root    0 Sep 26 20:56 file3
-rw-r--r--  1 root root    0 Sep 26 20:56 file4
That’s All.