Icinga 2 is an open source monitoring tool. With Icinga2, you will be able to monitor your network resources, get an alert on the outage, also able to generate the performance data.
Icinga 2 is very scalable, and you can monitor small to larger, complex environments across multiple locations. Icinga 2 supports all major distributions such as Debian, Ubuntu, CentOS / RHEL, Fedora, openSUSE, SLES, Gentoo, FreeBSD, and ArchLinux.
This document covers basic installation and configuration of Icinga 2 on Ubuntu 18.04 / Ubuntu 16.04 & Debian 9.
Add Icinga 2 Repository
First, switch to the root user.
$ su -
OR
$ sudo su -
Install the below package for https support.
apt-get update
apt-get install -y apt-transport-https curl
Add the Icinga public signing key to the system.
curl https://packages.icinga.com/icinga.key | apt-key add -
Add the Icinga repository using the following commands.
## Ubuntu 18.04 / Ubuntu 16.04 ###

echo "deb https://packages.icinga.com/ubuntu icinga-$(lsb_release -sc) main" | sudo tee /etc/apt/sources.list.d/icinga2.list
echo "deb-src https://packages.icinga.com/ubuntu icinga-$(lsb_release -sc) main" | sudo tee -a /etc/apt/sources.list.d/icinga2.list

## Debian 9 ###

echo "deb https://packages.icinga.com/debian icinga-$(lsb_release -sc) main" | sudo tee /etc/apt/sources.list.d/icinga2.list
echo "deb-src https://packages.icinga.com/debian icinga-$(lsb_release -sc) main" | sudo tee -a /etc/apt/sources.list.d/icinga2.list
Install Icinga 2
Update the repository cache.
apt-get update
Install Icinga 2 package.
apt-get install -y icinga2
As part of the installation, Icinga 2 service should start automatically; if not, then start the Icinga 2 service using the following command.
systemctl start icinga2
Set Icinga 2 service to start automatically on the system startup.
systemctl enable icinga2
Install Nagios Plugins
Without the plugins, Icinga 2 does not know how to monitor the external services. So install Nagios plugins on top of Icinga 2.
apt-get install -y monitoring-plugins
Create IDO MySQL Database
The DB IDO module for Icinga 2 takes care of exporting all the configuration and status information to the database. At present, MySQL, MariaDB, Oracle, and PostgreSQL are supported.
Here, we will use MariaDB as a database server. If you already have MariaDB server installed, you can skip the below step.
apt-get install -y mariadb-server mariadb-client
Now, install IDO modules for MySQL using the following command. You can find the icinga2-ido-mysql package in Icinga 2 repository.
apt-get install -y icinga2-ido-mysql
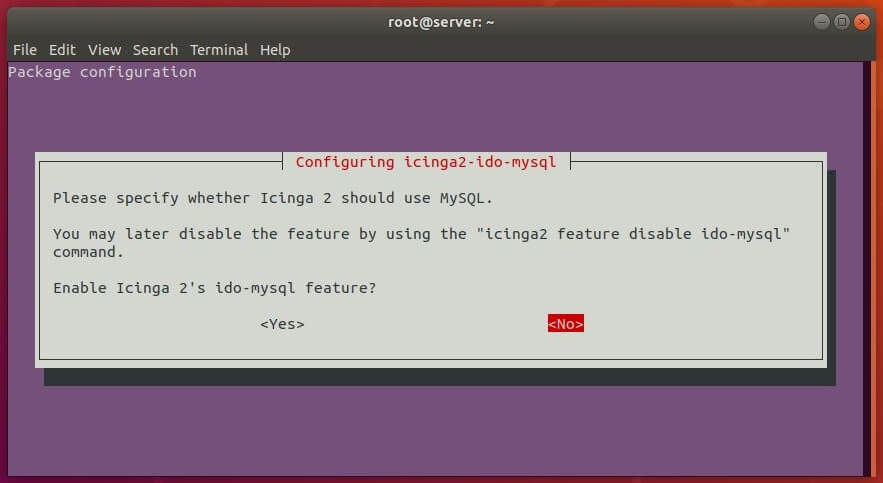
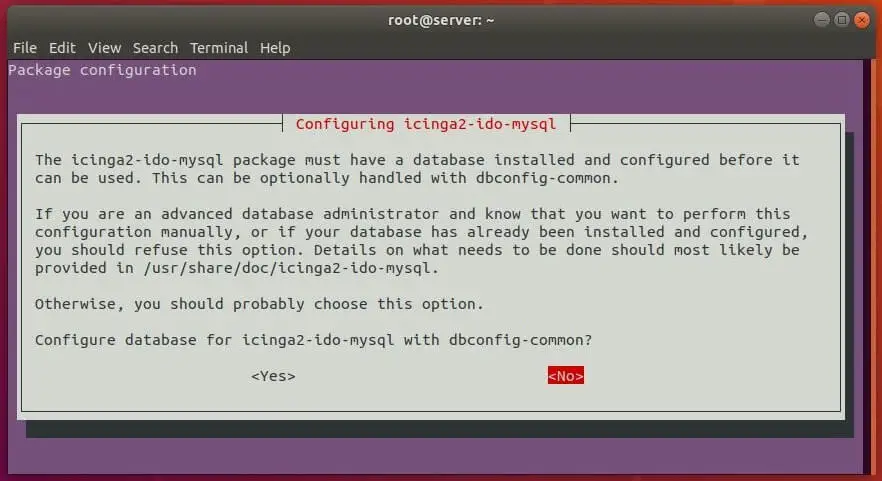
During the installation of IDO modules, the installer will prompt you regarding the module installation. Here is how you should answer them.
- Select No for Enabling IDO Modules feature on Icinga 2
- Select No on Configuring IDO modules with Icinga 2 ( We will manually setup database for IDO)
Login to MySQL.
sudo mysql -u root -p or mysql -u root -p command as root.mysql -u root -p
Create a database for Icinga 2.
CREATE DATABASE icinga2;
grant all privileges on icinga2.* to icinga2@localhost identified by 'icinga123';
quit
After creating the database, you shall import the Icinga 2 IDO schema using the following command.
mysql -u root -p icinga2 < /usr/share/icinga2-ido-mysql/schema/mysql.sql
Enable IDO MySQL Module
We would need to enable the ido-mysql in Icinga 2. Enable the ido-mysql feature using the below command.
icinga2 feature enable ido-mysql
Also, enable the command feature which helps Icinga web interface and other Icinga add-ons to send commands to Icinga 2 via the external command pipe.
icinga2 feature enable command
Configure IDO DB MySQL
Once you enabled the IDO modules, Icinga 2 places the new configuration file at /etc/icinga2/features-enabled/ido-mysql.conf in which we need to update the database credentials manually.
nano /etc/icinga2/features-enabled/ido-mysql.conf
Update the above file shown like below.
user = "icinga2",
password = "icinga123",
host = "localhost",
database = "icinga2"
Restart the Icinga 2 instance to have this enabled features take effect.
systemctl restart icinga2
In our next tutorial, we will configure the Icinga 2 web interface to provide a centralized web console for monitoring servers.
That’s All