Icinga Web 2 is the web interface for Icinga where you can monitor your infrastructure for issues. This guide explains you to setup Icinga Web 2 for Icinga monitoring tool.
Article Series
1: How To Install Icinga 2 on Ubuntu 18.04 / Ubuntu 16.04 & Debian 9
2: How To Setup Icinga Web 2 on Ubuntu 18.04 / Ubuntu 16.04 & Debian 9
3: How To Add Remote Linux Machines into Icinga 2 Monitoring Tool
Requirements
- A web server, e.g., Apache / Nginx
- Icinga 2 with the IDO database backend (MySQL or PostgreSQL)
- PHP 5.6 and above with gettextt, intl, and OpenSSL support
- PHP LDAP library when using LDAP or Active Directory authentication
- MySQL or PostgreSQL PHP libraries
- Default time zone configured for PHP in the php.ini file
First, switch to the root user.
$ su -
OR
$ sudo su -
Install the below package for apt https support.
apt-get update
apt-get install -y apt-transport-https curl
Add Icinga Web 2 Repository
Add the Icinga public signing key to the system.
curl https://packages.icinga.com/icinga.key | apt-key add -
Let’s add Icinga repository to your package manager for installing Icinga Web 2.
## Ubuntu 18.04 / Ubuntu 16.04 ###

echo "deb https://packages.icinga.com/ubuntu icinga-$(lsb_release -sc) main" | sudo tee /etc/apt/sources.list.d/icinga2.list
echo "deb-src https://packages.icinga.com/ubuntu icinga-$(lsb_release -sc) main" | sudo tee -a /etc/apt/sources.list.d/icinga2.list

## Debian 9 ###

echo "deb https://packages.icinga.com/debian icinga-$(lsb_release -sc) main" | sudo tee /etc/apt/sources.list.d/icinga2.list
echo "deb-src https://packages.icinga.com/debian icinga-$(lsb_release -sc) main" | sudo tee -a /etc/apt/sources.list.d/icinga2.list
Update the repository cache.
apt-get update
Install PHP Packages
Now, install the PHP extensions using the following command.
apt-get install -y php-gd php-json php-dba php-intl php-ldap php-pdo-mysql php-pgsql php-imagick php-dom
Install Icinga Web 2
You can install Icinga Web 2 by installing the icingaweb2 package. Run the following command on the terminal to begin installing Icinga Web 2.
apt-get install -y icingaweb2
Prepare for Icinga Web 2 Setup
By default, Icinga CLI is installed along with Icinga Web 2 which is used for performing administration tasks in the command line.
Both Icinga Web 2 and CLI must have access to logs and configurations. Add web server user (www-data) to the system group (icingaweb2)
addgroup --system icingaweb2
usermod -a -G icingaweb2 www-data
Also, set the timezone in the php.ini file.
nano /etc/php/7.*/apache2/php.ini
Set timezone according to your locale.
date.timezone = Asia/Kolkata
Restart the Apache server.
systemctl restart apache2
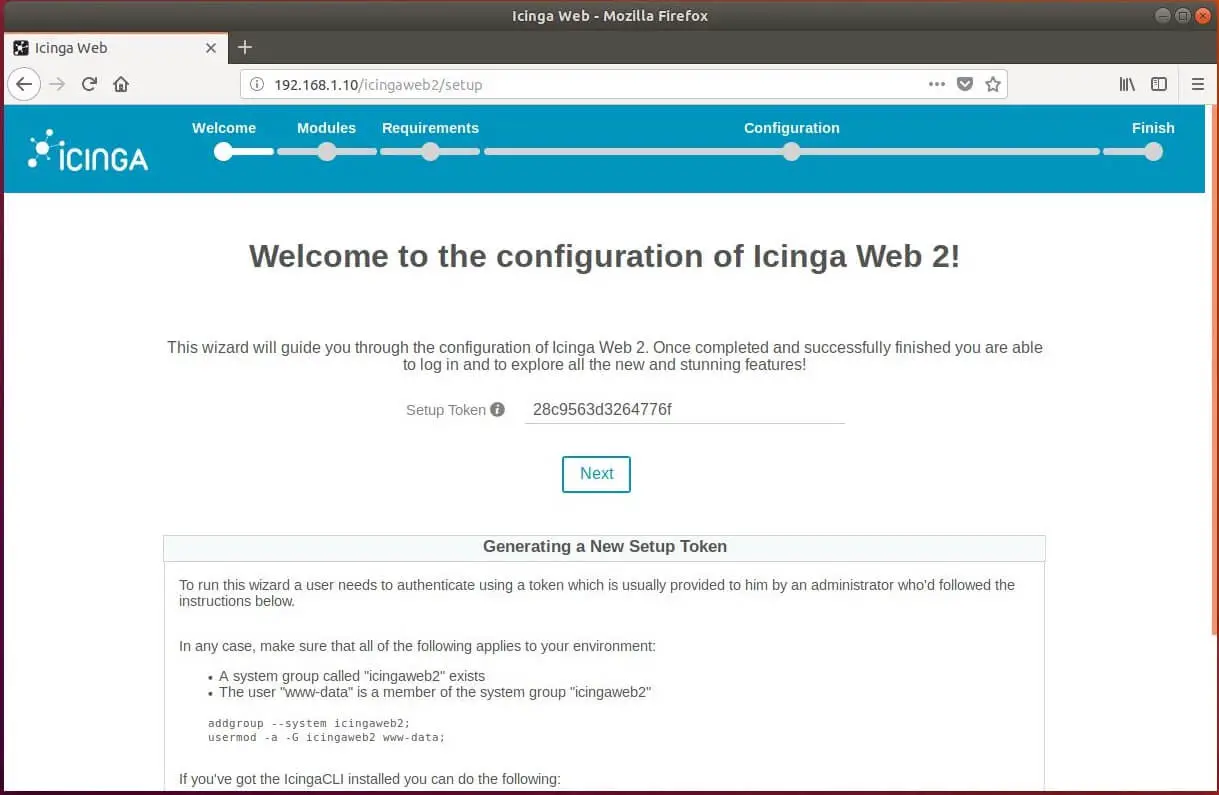
Setup Icinga Web 2
Visit the following link to begin setting up the Icinga Web 2. Icinga setup wizard will guide you through all the steps for successful completion of Icinga Web 2 installation.
For security reason, you would require to generate the token and paste it on the first step of the wizard.
Generate the token using the following command.
icingacli setup token create
Output:
The newly generated setup token is: 28c9563d3264776f
Copy and paste the above token on the following page and then click Next.