Microsoft New Technology File System (NTFS) has been the default file system in Windows platforms since it replaced the FAT file system in 1993. It has been optimized for over two decades and proved to be a well-performed file system. Nowadays, NTFS is not only the primary file system in Windows desktops and laptops, but many external drives available in the market come in NTFS file system too.
Unfortunately, macOS doesn’t have full NTFS support. NTFS drives are read-only on Mac. It means users can view the files and move the files out of the NTFS drives to another place, but they cannot edit the stored files or save any files to the NTFS drives on Mac. Using an NTFS drive for file transferring between PCs and Macs is very inconvenient.
NTFS write support can be added through third-party NTFS for Mac drivers like iBoysoft Drive Manager. Users can write to NTFS partitions or drives easily.
About iBoysoft Drive Manager
iBoysoft Drive Manager is a drive management tool. It can help users have full read-write access to NTFS drives on Mac desktops or laptops running macOS 10.14/10.13/10.12 and Mac OS X 10.11/10.10/10.9/10.8/10.7. Also, it can manage USB flash drives, SD cards, memory sticks, external hard drives, and network drives with one click.
NTFS write support on Mac
All storage media, including USB flash drives, SD cards, memory sticks, and external hard drives can be formatted with NTFS. As soon as an NTFS-formatted drive is detected by iBoysoft Drive Manager, it will be mounted in read-write mode automatically and opened in the Finder automatically as well. Writing to NTFS drives on Mac should not be any issue. You can rename, delete, and modify the existing files as well as create new files to the NTFS drives. It seems that NTFS write support exists natively in macOS.
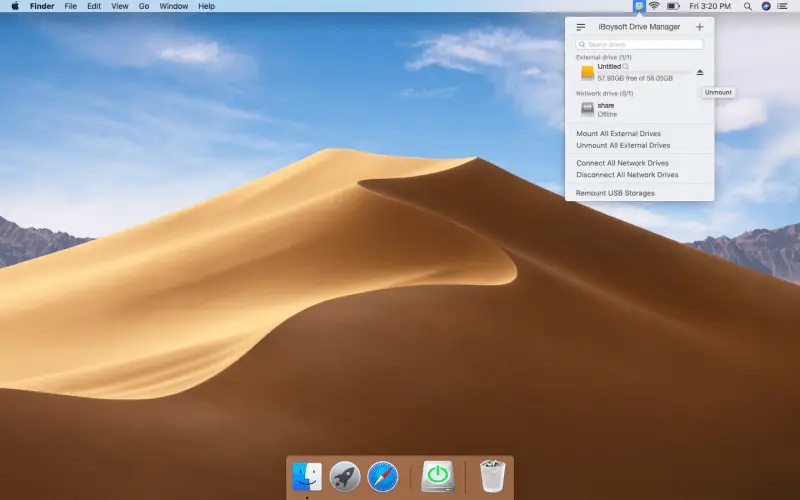
Manage External Drives
Besides NTFS, all widely-used file systems, including APFS, HFS, HFS+, FAT, FAT32, exFAT, etc. are supported by the software. That’s to say; you can manage all portable drives with any file systems with the help of iBoysoft Drive Manager. All connected portable drives will be listed in the top-down interface for convenience. You can mount or unmount by clicking the button beside the drive. Also, you can mount or unmount all of them with one click.
Manage Network Drives
Many people will set up network drives for extra storage space without taking up the storage space of their computer’s internal hard drive. In order to help you access network drives more easily, iBoysoft Drive Manager allows you to map them as local drives in the Finder.
You can connect or disconnect the network drives by clicking the button beside the network drive one at a time or in a batch mode in the top-down interface. Network drives will be automatically connected if they have been connected before using iBoysoft Drive Manager.
Effective and Safe
Mounting/unmounting external drives or connecting/disconnecting network drives almost takes no time using iBoysoft Drive Manager. Moreover, the write and file transferring speed to NTFS drives and other drives are fast.
iBoysoft Drive Manager will never cause damages to your operating system nor to your removable drives. What’s more, when the Mac is going to sleep, the program will safely eject external drives and disconnect network drives, which can protect the drives from corruption and unauthorized access.
How to use iBoysoft Drive Manager
Write to NTFS drives on Mac
Instructions about how to write to NTFS drives on Mac with iBoysoft Drive Manager:
Step 1: Download and install iBoysoft Drive Manager on Mac.
Step 2: Connect NTFS drives to the Mac.
Step 3: Read-write NTFS drives on Mac after you get a notification that your drives are mounted successfully.
Step 4: Unmount the drives by clicking the button beside the drive in the top-down interface when you finish using them.
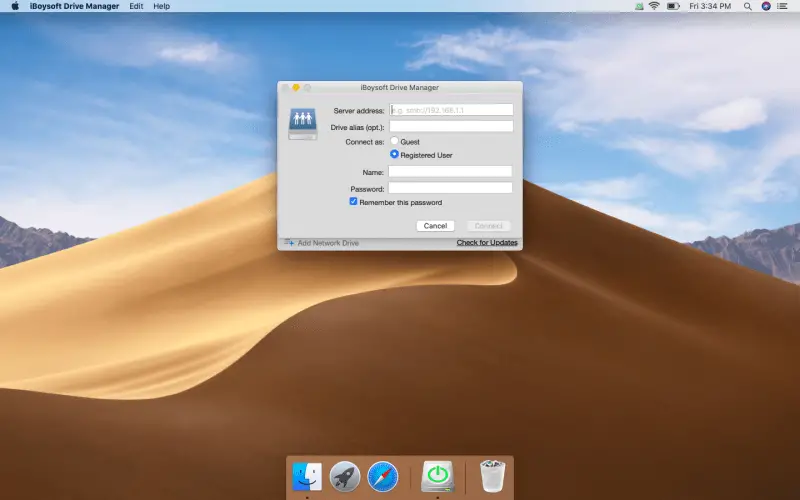
Add Network Drives
Here are the instructions about how to add new network drives using iBoysoft Drive Manager:
Step 1: Click iBoysoft Drive Manager icon at the top right menu bar.
Step 2: Click on the + button at the top right corner.
Step 3: Type in server address, user name and password.
Step 4: Click on “Connect” button.
Conclusion
There is no need to worry when you find that you cannot write to NTFS drives on Mac. This incompatibility problem can be easily solved by third-party NTFS for Mac software – iBoysoft Drive Manager. With it, NTFS write support is only a few steps away.
iBoysoft Drive Manager is also equipped with an external drive and network drive management features for your convenience. It is a nice utility to install to improve efficiency for Mac users.