Arch Linux is an open-source Linux distribution for x86-64 computers and is very popular among intermediate and advanced Linux users. It is developed with the KISS principle (“keep it short and simple”) driven by the community and core development circle.
Arch Linux uses a rolling release model, i.e., packages are provided throughout the day, and no major releases.
Here, we will see how to install the latest version of Arch Linux (v2022).
Requirements
You can install Arch Linux if your system meets the following criteria.
- x86_64 (64 bit) processor
- 512 MB of RAM
- 2 GB of free disk space
- An Internet Connectivity
- USB flash drive or Blank CD for burning the installation image.
Try Arch Linux 2022 VM Images
If you do not have time to install Arch Linux 2022, use the below link to download ready-to-run Arch Linux 2022 VirtualBox and VMware images.
Install Arch Linux
Download Arch Linux ISO
First, click the below link to download the latest version of Arch Linux from the official website.
Create a Live USB / Write a Bootable CD
Then, create a live USB / write a bootable CD from the downloaded ISO image.
Create a live USB
Replace /path/to/archlinux.iso with the path to the downloaded ISO file and /dev/sdx with your USB drive name.
dd bs=4M if=/path/to/archlinux.iso of=/dev/sdx status=progress oflag=sync
Write a bootable CD/DVD
Replace /path/to/archlinux.iso with the path to the downloaded ISO file.
# CD

cdrecord -v -sao dev=/dev/sr0 /path/to/archlinux.iso

# DVD or Blu-Ray Disc

growisofs -dvd-compat -Z /dev/sr0=/path/to/archlinux.iso
Boot from Live USB or CD/DVD/BD
Power on your system. Then, press F2, F10, or F12 to change/select the boot order.
USB: To boot from Live USB, you need to select boot from USB or removable drive.
CD / DVD: To boot from CD, you need to select boot from CD/DVD ROM drive.
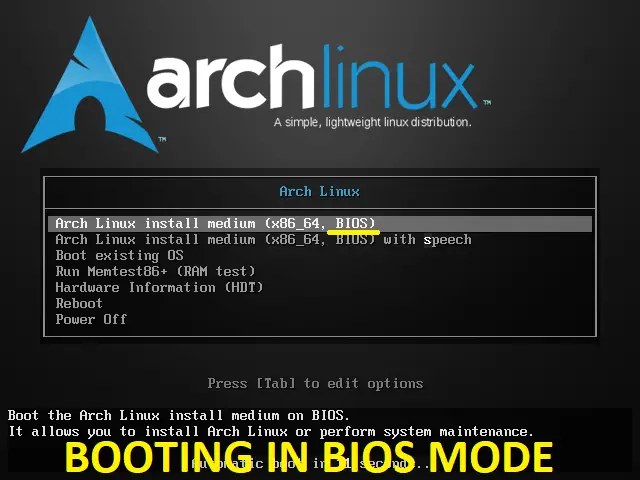
You will get the Arch Linux menu screen once the system boots from Live USB or CD, like below.
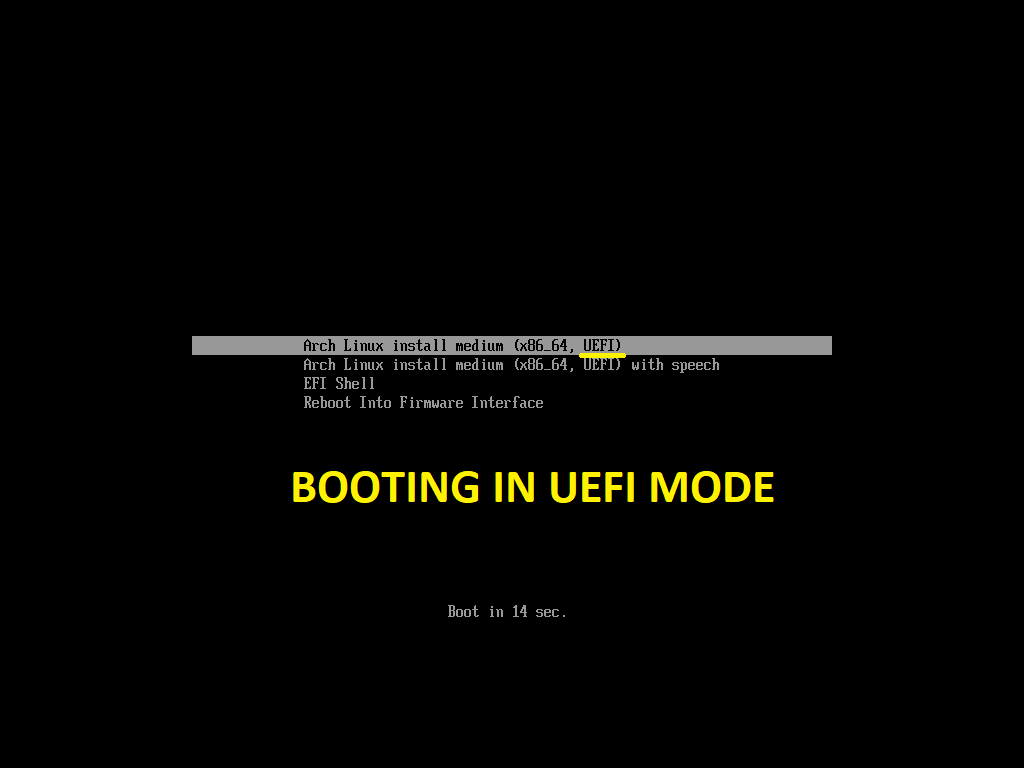
Choose Arch Linux install medium (x86_64) and then press enter button.
BIOS
UEFI
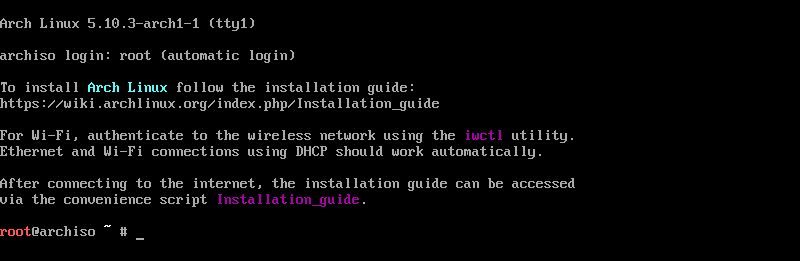
Finally, after various checks, you will get the root prompt.
Boot Mode (BIOS or UEFI)
Booting into the right mode helps us create the required partitions for the system. You can easily determine whether the system is booted in BIOS or UEFI from the Arch Linux installer screen.
ls /sys/firmware/efi/efivars

If the above command lists the directory contents without an error, the system is booted in UEFI mode.
The system booted in BIOS mode if the directory does not exist.

If the system did not boot into the mode you desired, refer to the system manual to boot the system correctly.
Setup Network
In the case of a wired network interface, your system will automatically get an IP address from a DHCP server or a router. Else, use the iwctl utility to authenticate your system WIFI to the wireless network.
Check the internet connectivity to see if you need to configure the IP address manually.
ifconfig

ping -c 2 google.com
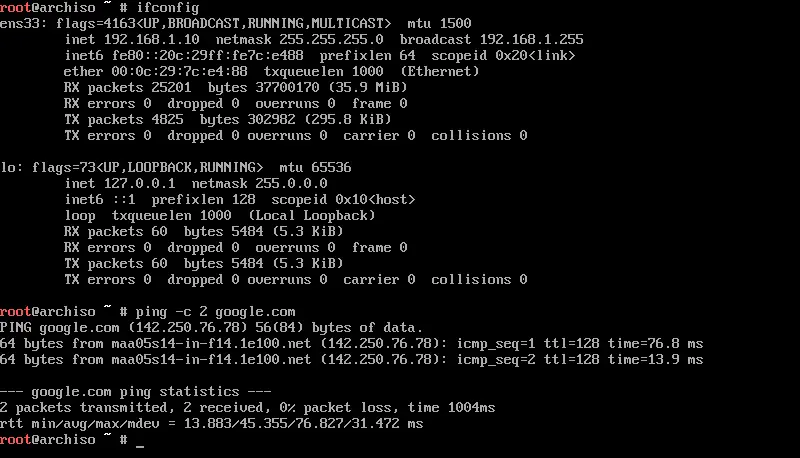
If your system does not get a reply, then configure the IP address so that your system can connect to the internet to download the necessary packages for Arch Linux installation.
ip addr flush dev ens33

ifconfig ens33 192.168.1.100 netmask 255.255.255.0

route add default gw 192.168.1.2

echo "nameserver 192.168.1.2" >> /etc/resolv.conf

echo "nameserver 8.8.8.8" >> /etc/resolv.conf
Replace the network card ane and IP address according to your requirements.
Partition Disk
We will now create partitions for Arch Linux installation. But, first, list the available disks using the fdisk command.
fdisk -l
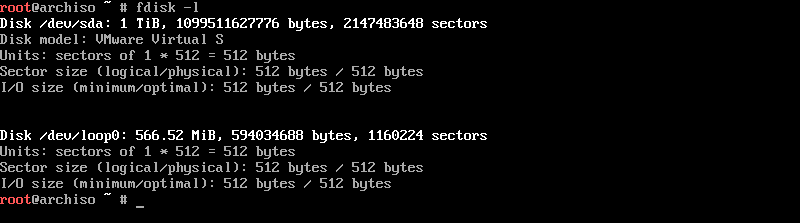
The system has a 1 TB disk (/dev/sda) and will use that disk for OS installation. The name of the disk varies depending upon the system. The disks can have other names such as vda, hda, etc.
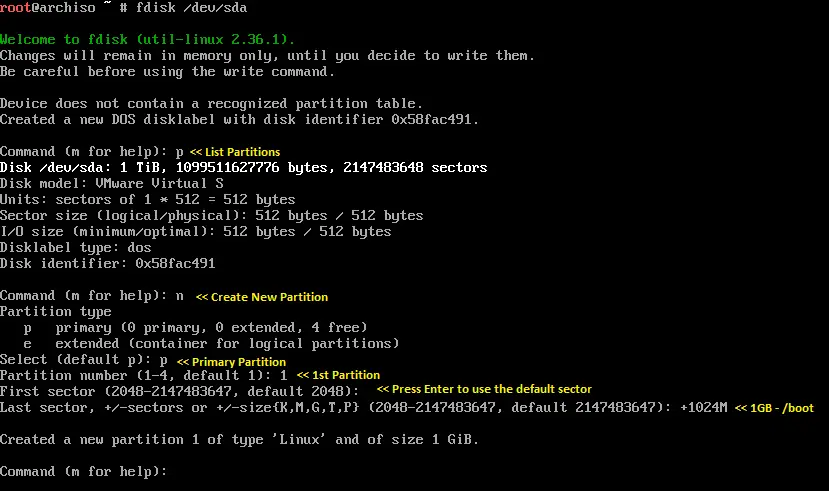
We will use the fdisk command to create partitions as per the requirement.
Partition details are shown below.
BIOS
/boot – 1024 MB
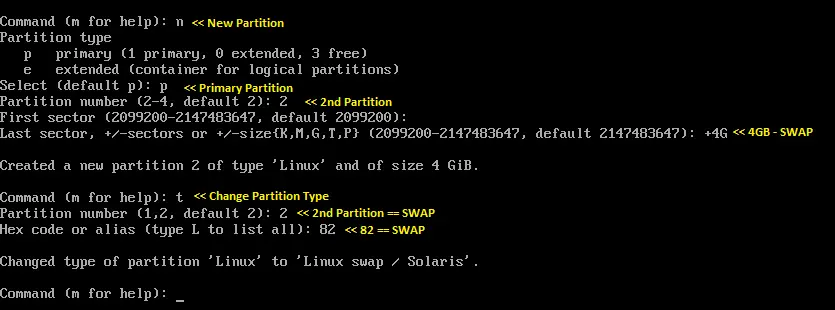
swap – 4 GB (min 512 MB)
/ – ~ 1000 GB (remaining space)
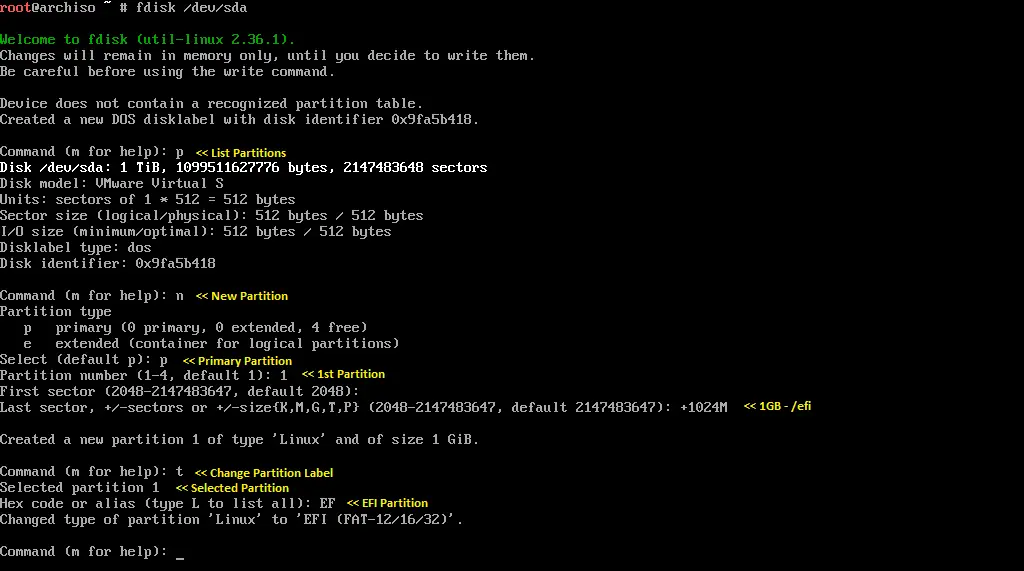
UEFI
/efi – 1024 MB
swap – 4 GB (min 512 MB)
/ – ~ 1000 GB (remaining space)
fdisk /dev/sda
/boot:
/efi:
SWAP:
/ (root):
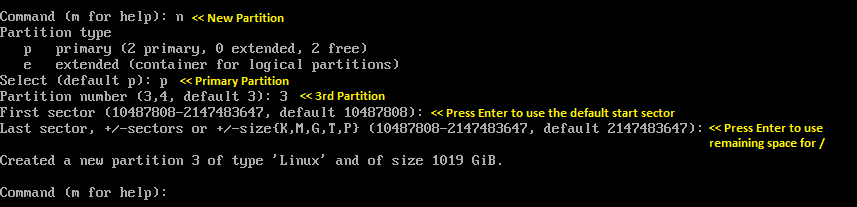
Once you have created partitions, use p to confirm the creation of partitions and then w to save the changes.
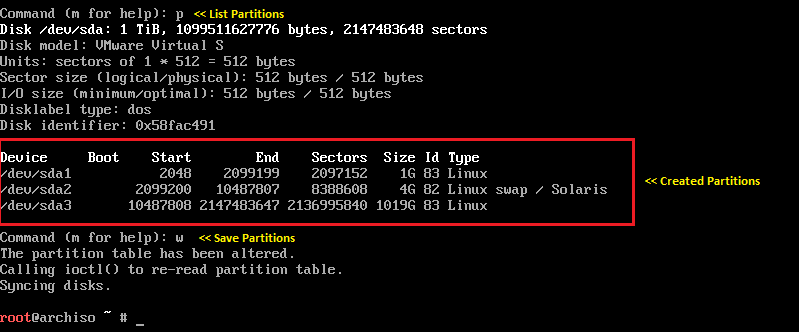
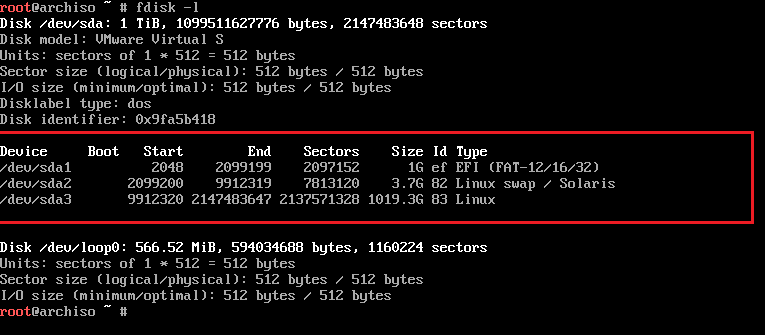
Verify parttions using the fdisk -l command. We now have three partitions.
/dev/sda1 – /boot or /efi
/dev/sda2 – swap
/dev/sda3 – / (root)
Create Filesystem
Now, its time format the created partitions with the required file systems. You can format /boot or /efi (/dev/sda1) as EXT2 or EXT3 for BIOS and Fat32 for UEFI, Swap (/dev/sda2) as swap and / (/dev/sda3) as EXT4 filesystem.
BIOS
mkfs.ext2 /dev/sda1

mkfs.ext4 /dev/sda3

mkswp /dev/sda2
UEFI
mkfs.fat -F32 /dev/sda1

mkfs.ext4 /dev/sda3

mkswp /dev/sda2
Step 7: Mount Partitions
Once formatted the partitions, use the mount command to mount them. / (root) partition must be mounted on /mnt directory.
Then, additional partitions need to be mounted on the respective directories on /mnt. For Ex: /boot partition needs to be mounted on /mnt/boot.
Also, you would need to initialize the swap partition.
BIOS
mount /dev/sda3 /mnt

mkdir /mnt/boot

mount /dev/sda1 /mnt/boot

swapon /dev/sda2
UEFI
mount /dev/sda3 /mnt

mkdir /mnt/efi

mount /dev/sda1 /mnt/efi

swapon /dev/sda2
Select Arch Linux Package Mirrors
Arch Linux’s packages are downloaded from internet mirrors defined in /etc/pacman.d/mirrorlist file. The mirror that tops in the file is prioritized for downloading packages, which may not be ideal for all situations considering geographical, availability, and out-of-sync issues.
Use the reflector command to retrieve the latest mirror from the Arch Linux mirror status, filter the up-to-date mirrors, sort them by speed and update the mirror list file.
First, back up the existing mirror list.
cp /etc/pacman.d/mirrorlist /etc/pacman.d/mirrorlist.backup
Then, update the mirror list file with ten mirrors by download speed.
reflector --verbose --latest 10 --sort rate --save /etc/pacman.d/mirrorlist
Install Arch Linux Base System
Now, it’s time to install the Arch Linux base system.
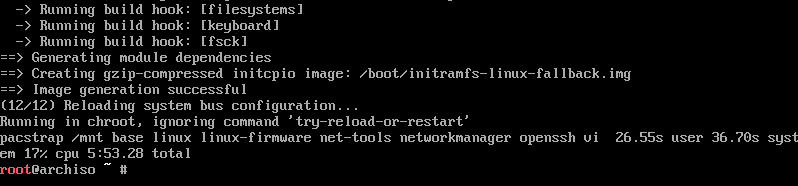
pacstrap /mnt/ base linux linux-firmware net-tools networkmanager openssh vi
The installation will take at least 15 to 30 minutes to complete depending upon your internet speed.
The below message confirms that the Arch Linux Installation has been completed successfully.
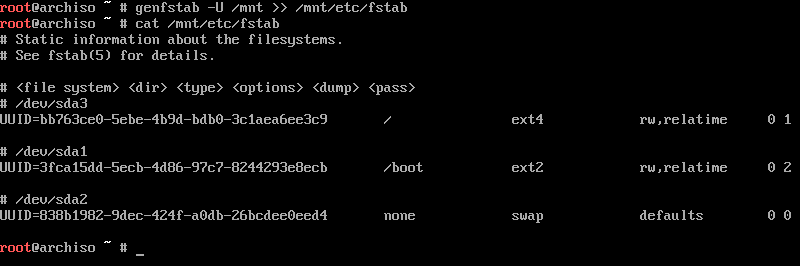
Create fstab
After the base installation, generate the fstab file for the system using the genfstab command.
genfstab -U /mnt >> /mnt/etc/fstab
Verify the fstab entries using the below command.
cat /mnt/etc/fstab
Arch Linux System Configuration
To configure Arch Linux further, you must chroot to the new system.
arch-chroot /mnt
Set System Language
You can configure the system language by uncommenting the required languages in the /etc/locale.gen file.
vi /etc/locale.gen
Uncomment en_US.UTF-8 UTF-8 for American-English and then generate locales by running.
locale-gen
Set the LANG variable in /etc/locale.conf file.
echo "LANG=en_US.UTF-8" > /etc/locale.conf
Set Timezone
Now, configure the system time zone by creating a symlink of your timezone to the /etc/localtime file.
ln -sf /usr/share/zoneinfo/US/Central /etc/localtime
All the available timezones are found under the /usr/share/zoneinfo directory.
Also, set the hardware clock to UTC.
hwclock --systohc --utc
Set Hostname
Place the system hostname in the /etc/hostname file.
echo "archlinux-2022.itzgeek.local" > /etc/hostname
Set root password
Use the passwd command in the terminal to set the root password.
passwd
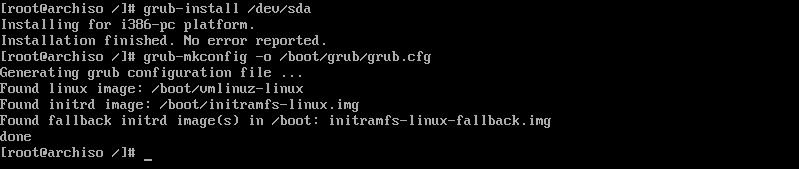
Install GRUB Boot Loader
Arch Linux requires a boot loader to boot the system. You can install the grub boot loader using the below commands.
BIOS
pacman -S grub

grub-install /dev/sda

grub-mkconfig -o /boot/grub/grub.cfg
UEFI
pacman -S grub efibootmgr

grub-install --efi--directory=/efi

grub-mkconfig -o /boot/grub/grub.cfg
Reboot
Exit from the chroot system and then reboot.
exit

reboot
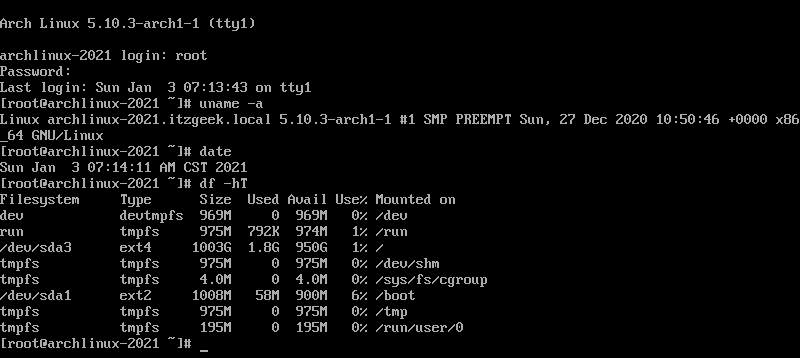
Log in to Arch Linux
Once the reboot is complete, you will get the Arch Linux login prompt. Log in as the root user and the password you set during the OS installation. To have a graphical desktop, you can install GNOME or KDE desktop environment on Arch Linux.
Conclusion
That’s All. You have learned how to install Arch Linux 2022. Follow the post-installation recommendations to get the most out of the installation.