Apache Hadoop is a free, open-source software framework written in Java for distributed storage and processing of big data using the MapReduce. It handles the very large size of data sets by splitting them into large blocks and distributes them across computers in a cluster.
Rather than relying on standard OS clusters, Hadoop modules are designed to detect and manage the failure at the application layer and gives you high-available service at the software level.
The base Hadoop framework consists of following modules,
- Hadoop Common – Contains common set of libraries and utilities to support other Hadoop modules
- Hadoop Distributed File System (HDFS) – Java-based distributed file system that stores data on standard hardware, providing very high-throughput to the application.
- Hadoop YARN – Manages resources on compute clusters and using them scheduling user’s applications.
- Hadoop MapReduce – Framework for large-scale data processing based on the MapReduce programming model.
In this post, we will see how to install Apache Hadoop on RHEL 8.
Prerequisites
Switch to the root user.
su -
OR
sudo su -
Apache Hadoop v3.1.2 supports only Java version 8. So, install either OpenJDK 8 or Oracle JDK 8.
In this demo, I will use OpenJDK 8.
yum -y install java-1.8.0-openjdk wget
Check the Java version.
java -version
Output:
openjdk version "1.8.0_201"
OpenJDK Runtime Environment (build 1.8.0_201-b09)
OpenJDK 64-Bit Server VM (build 25.201-b09, mixed mode)
Install Apache Hadoop on RHEL 8
Create Hadoop user
It is recommended to run Apache Hadoop by a regular user. So, here, we will create a user named hadoop and set a password for the user.
useradd -m -d /home/hadoop -s /bin/bash hadoop

passwd hadoop
Now, configure passwordless ssh to the local system by following the below steps.
# su - hadoop

$ ssh-keygen

$ cat ~/.ssh/id_rsa.pub >> ~/.ssh/authorized_keys

$ chmod 600 ~/.ssh/authorized_keys
Verify the passwordless communication to your local system.
$ ssh 127.0.0.1
Output:
If you are connecting through ssh for the first time, you would need to type yes to add RSA keys to known hosts.
[hadoop@rhel8 ~]$ ssh 127.0.0.1
The authenticity of host '127.0.0.1 (127.0.0.1)' can't be established.
ECDSA key fingerprint is SHA256:85jUAgtJg8RLOqs8T2egxF7U7IWIiYF+CRspO8yatAk.
Are you sure you want to continue connecting (yes/no)? Yes
Warning: Permanently added '127.0.0.1' (ECDSA) to the list of known hosts.
Activate the web console with: systemctl enable --now cockpit.socket

Last login: Wed May 8 12:15:04 2019 from 127.0.0.1
[hadoop@rhel8 ~]$
Download Hadoop
Visit Apache Hadoop page to download the latest version of Apache Hadoop (Always choose the version which is production ready by checking the documentation), or you can use the following command in terminal to download Hadoop v3.1.2.
$ wget https://www-us.apache.org/dist/hadoop/common/hadoop-3.1.2/hadoop-3.1.2.tar.gz

$ tar -zxvf hadoop-3.1.2.tar.gz

$ mv hadoop-3.1.2 hadoop
Hadoop Cluster Types
There are three types of Hadoop clusters:
- Local (Standalone) Mode – It runs as a single java process.
- Pseudo-Distributed Mode – Each Hadoop daemon runs as a separate process.
- Fully Distributed Mode – a multinode cluster. Ranging from few nodes to an extremely large cluster.
Setup environmental variables
Here, we will configure Hadoop in Pseudo-Distributed mode. First, we will set environmental variables in the ~/.bashrc file.
export JAVA_HOME=/usr/lib/jvm/jre-1.8.0-openjdk-1.8.0.201.b09-2.el8.x86_64/
export HADOOP_HOME=/home/hadoop/hadoop
export HADOOP_INSTALL=$HADOOP_HOME
export HADOOP_MAPRED_HOME=$HADOOP_HOME
export HADOOP_COMMON_HOME=$HADOOP_HOME
export HADOOP_HDFS_HOME=$HADOOP_HOME
export HADOOP_YARN_HOME=$HADOOP_HOME
export HADOOP_COMMON_LIB_NATIVE_DIR=$HADOOP_HOME/lib/native
export PATH=$PATH:$HADOOP_HOME/sbin:$HADOOP_HOME/bin
Apply environmental variables to your current terminal session.
$ source ~/.bashrc
Configure Hadoop
Edit the Hadoop environmental file and update the variable as shown below.
$ vi $HADOOP_HOME/etc/hadoop/hadoop-env.sh
Update JAVA_HOME variable as per your environment.
export JAVA_HOME=/usr/lib/jvm/jre-1.8.0-openjdk-1.8.0.201.b09-2.el8.x86_64/
We will now edit Hadoop’s configuration files depending upon the cluster mode we set up (Pseudo-Distributed).
$ cd $HADOOP_HOME/etc/hadoop
Edit core-site.xml and update the file with HDFS hostname.
<configuration>
        <property>
                <name>fs.defaultFS</name>
                <value>hdfs://rhel8.itzgeek.local:9000</value>
        </property>
</configuration>
Create the namenode and datanode directories under hadoop user home /home/hadoop directory.
$ mkdir -p ~/hadoopdata/hdfs/{namenode,datanode}
Edit hdfs-site.xml and update the file with NameNode and DataNode directory information.
<configuration>
        <property>
                <name>dfs.replication</name>
                <value>1</value>
        </property>

        <property>
                <name>dfs.name.dir</name>
                <value>file:///home/hadoop/hadoopdata/hdfs/namenode</value>
        </property>

        <property>
                <name>dfs.data.dir</name>
                <value>file:///home/hadoop/hadoopdata/hdfs/datanode</value>
        </property>
</configuration>
Edit mapred-site.xml.
<configuration>
        <property>
                <name>mapreduce.framework.name</name>
                <value>yarn</value>
        </property>
</configuration>
Edit yarn-site.xml.
<configuration>
        <property>
                <name>yarn.nodemanager.aux-services</name>
                <value>mapreduce_shuffle</value>
        </property>
</configuration>
Format the NameNode using the following command.
$ hdfs namenode -format
Output:
.    .    .
.    .    .

2019-05-13 19:33:14,720 INFO namenode.FSImage: Allocated new BlockPoolId: BP-1601223288-192.168.1.10-1557756194643
2019-05-13 19:33:15,100 INFO common.Storage: Storage directory /home/hadoop/hadoopdata/hdfs/namenode has been successfully formatted.
2019-05-13 19:33:15,436 INFO namenode.FSImageFormatProtobuf: Saving image file /home/hadoop/hadoopdata/hdfs/namenode/current/fsimage.ckpt_0000000000000000000 using no compression
2019-05-13 19:33:16,804 INFO namenode.FSImageFormatProtobuf: Image file /home/hadoop/hadoopdata/hdfs/namenode/current/fsimage.ckpt_0000000000000000000 of size 393 bytes saved in 1 seconds .
2019-05-13 19:33:17,106 INFO namenode.NNStorageRetentionManager: Going to retain 1 images with txid >= 0
2019-05-13 19:33:17,150 INFO namenode.NameNode: SHUTDOWN_MSG:
/************************************************************
SHUTDOWN_MSG: Shutting down NameNode at rhel8.itzgeek.local/192.168.1.10
************************************************************/
Firewall
Run below commands to allow Apache Hadoop connections through the firewall. Run these commands as the root user.
firewall-cmd --permanent --add-port=9870/tcp
firewall-cmd --permanent --add-port=8088/tcp
firewall-cmd --reload
Start Hadoop & Yarn
Start both NameNode and DataNode daemons by using the scripts provided by Hadoop.
$ start-dfs.sh
Output:
Starting namenodes on [rhel8.itzgeek.local]
rhel8.itzgeek.local: Warning: Permanently added 'rhel8.itzgeek.local,fe80::4480:83a5:c52:ea80%enp0s3' (ECDSA) to the list of known hosts.
Starting datanodes
localhost: Warning: Permanently added 'localhost' (ECDSA) to the list of known hosts.
Starting secondary namenodes [rhel8.itzgeek.local]
2019-05-13 19:39:00,698 WARN util.NativeCodeLoader: Unable to load native-hadoop library for your platform... using builtin-java classes where applicable
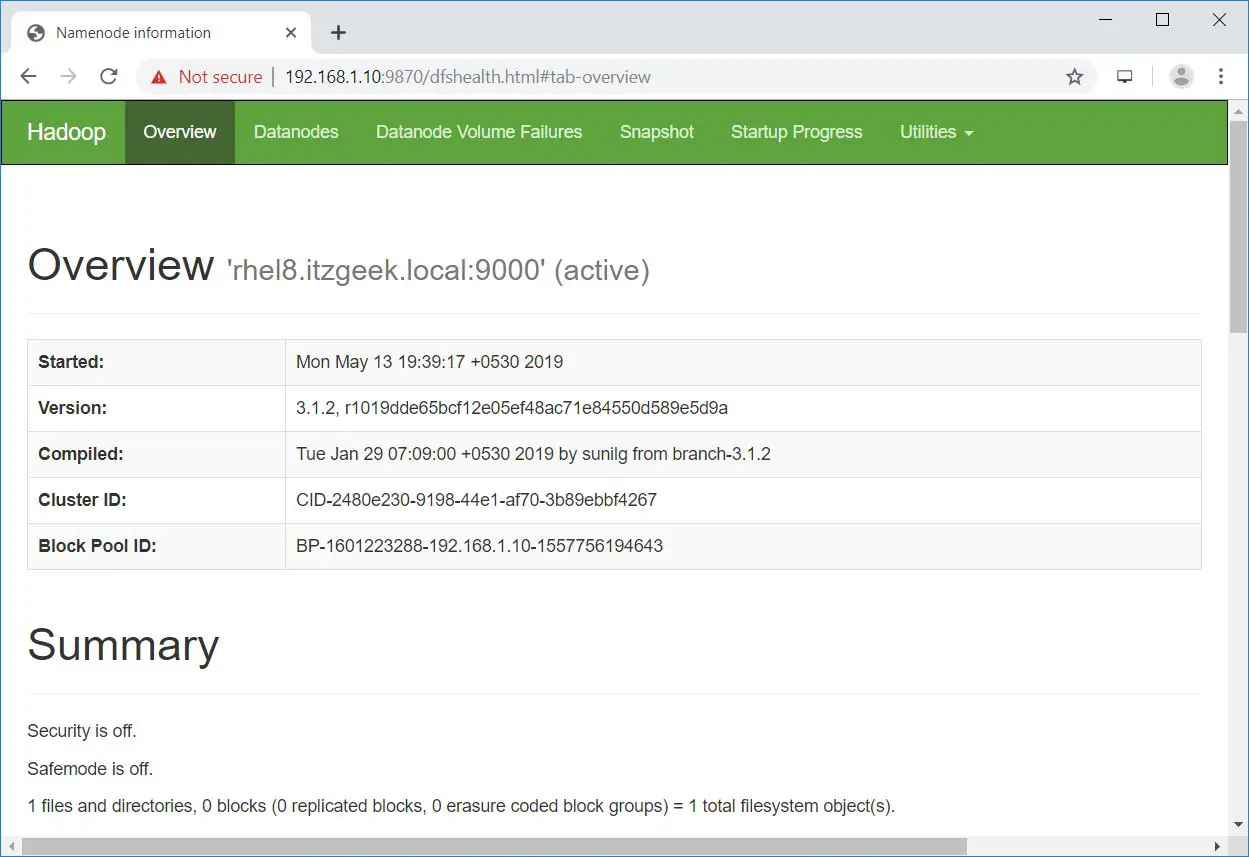
Open a browser and go to the below address to access Namenode.
Start the ResourceManager and NodeManagers.
$ start-yarn.sh
Output:
Starting resourcemanager
Starting nodemanagers
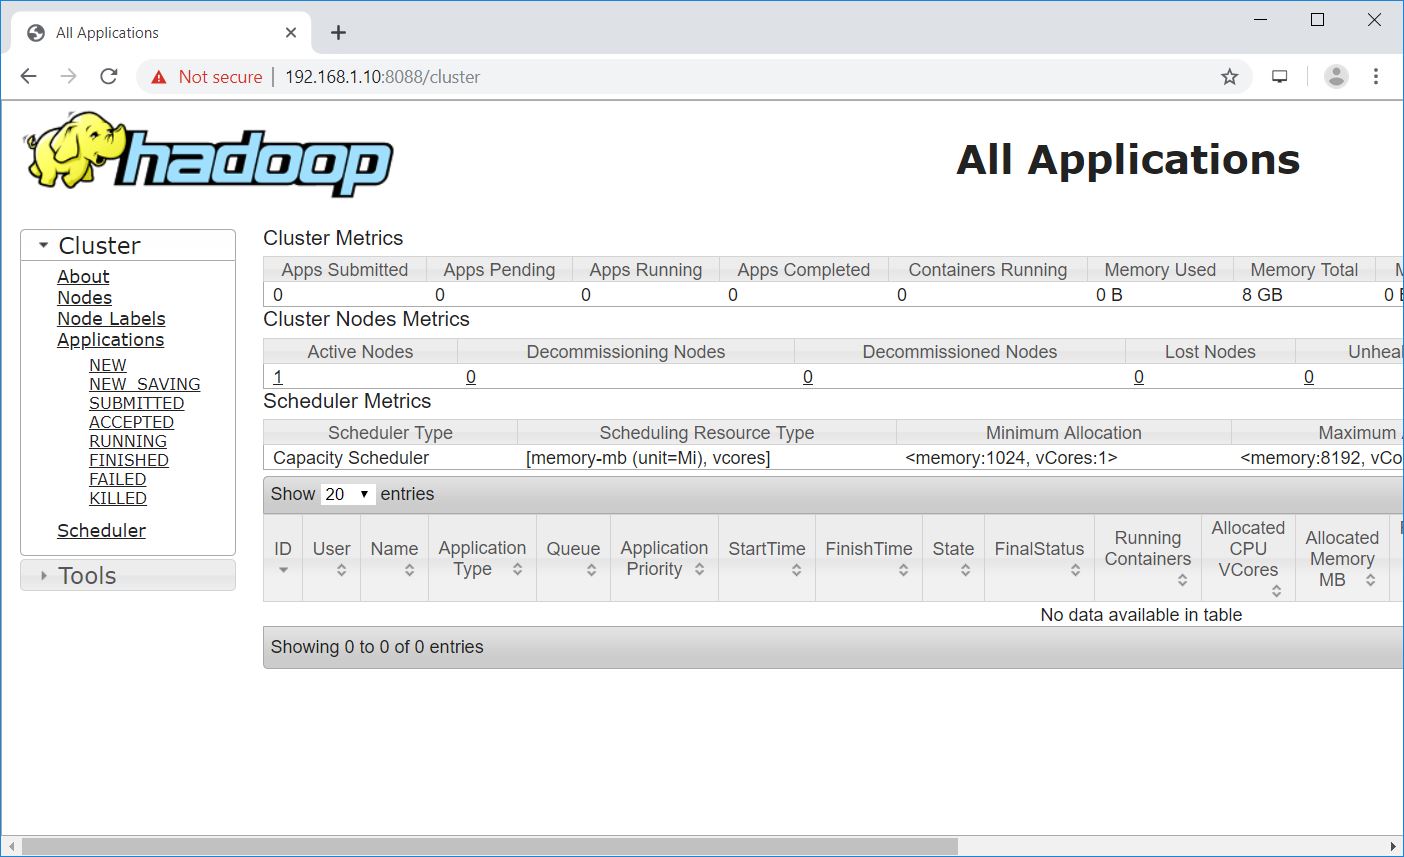
Open a browser and go to the below address to access ResourceManager.
Test Apache Hadoop
We will now test the Apache Hadoop by uploading a sample file on to it. Before uploading a file to HDFS, create a directory in HDFS.
$ hdfs dfs -mkdir /raj
Verify that the created directory exists in HDFS.
hdfs dfs -ls /
Output:
Found 1 items
drwxr-xr-x   - hadoop supergroup          0 2019-05-08 13:20 /raj
Upload a file into HDFS directory raj with the following command.
$ hdfs dfs -put ~/.bashrc /raj
Uploaded files can be viewed by running below command.
$ hdfs dfs -ls /raj
OR
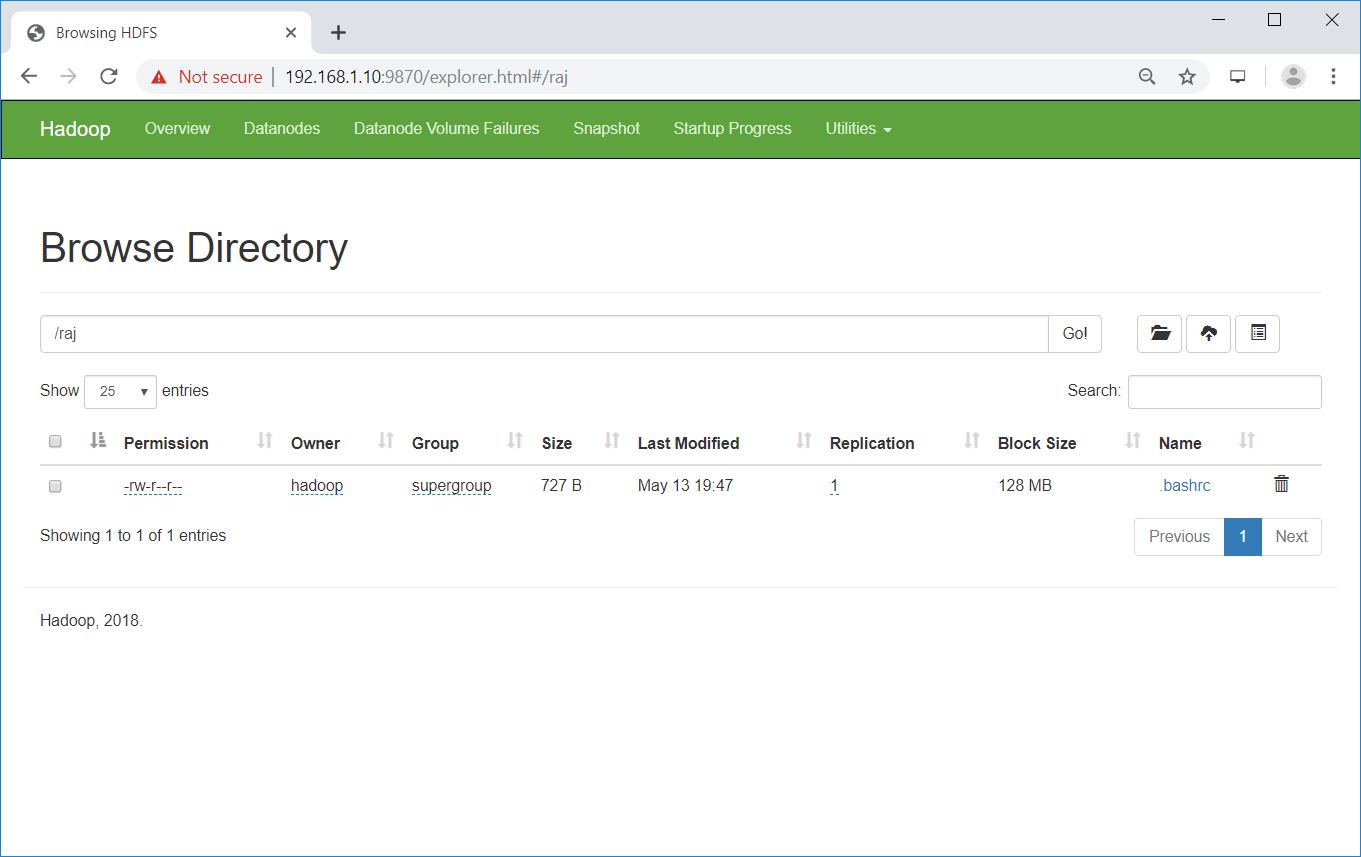
Go to NameNode >> Utilities >> Browse the file system in NameNode.
You can copy the files from HDFS to your local file systems by using the below command.
$ hdfs dfs -get /raj /tmp/
If required, you can delete the files and directories in HDFS using the following commands.
$ hdfs dfs -rm -f /raj/.bashrc

$ hdfs dfs -rmdir /raj
Conclusion
I hope, this post helped you to install and configure a single node Apache Hadoop cluster on RHEL 8. You can read Hadoop’s official documentation for more information. Please share your feedback in the comments section.