How to Setup Docker Private Registry on CentOS 7 / Ubuntu 16.04 / Fedora 26/25
Docker registry is a piece of application that lets you store and distribute the Docker images internally (within your organization). Docker even has a public registry, known as Docker Hub, free to store Docker images.
But, the problem with Docker public registry is that the images you upload on it becomes public. This is not what you or your organization expect when you worked for long hours to build an image and that goes public.
To overcome this hurdle, you can set up a Docker registry for your project privately so that only you or your organization can store the Docker images on it and distribute among your co-worker.
Here, in this tech guide, we will discuss on how to setup Docker Private Registry on CentOS 7/ Ubuntu 16.04 / Fedora 26/ 25.
Infrastructure
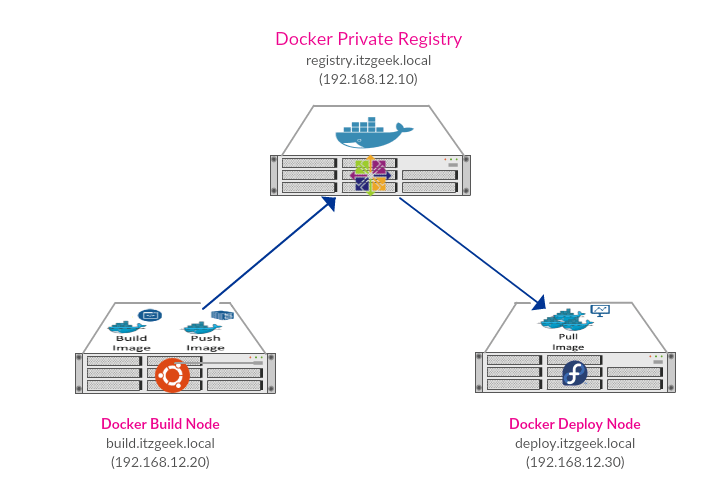
| HostName | IP Address | Operating System | Purpose |
|---|---|---|---|
| registry.itzgeek.local | 192.168.12.10 | CentOS 7 | Acts as Docker private registry server |
| build.itzgeek.local | 192.168.12.20 | Ubuntu 16.04 | Acts as Docker engine node where the developers will build the Docker images either with dockerfile or docker compose, and then upload those images to above docker private registry server. |
| deploy.itzgeek.local | 192.168.12.30 | Fedora 26/25 | Acts as Docker engine node where we deploy containers downloaded (pull) from private registry server. |
Prerequisites
Install Docker engine on all of your nodes and make sure Docker service is up and running.
READ: How to install Docker CE on CentOS 7
READ: How to install Docker CE on Ubuntu 16.04
READ: How to install Docker CE on Fedora 26/25
Setup Docker Private Registry
Login to registry node and pull the registry image from Docker Hub.
[root@registry ~]# docker pull registry
Choose whether you want to go with plain or secured Docker registry.
Plain Docker Registry
[root@registry ~]# docker run -dit -p 5000:5000 --name registry registry
Secure Docker Private Registry
By default, Docker node uses a secure connection over TLS to upload or download images to or from the private registry. You can use TLS certificates signed by CA or self-signed on Registry server.
Here, I will use a self-signed certificate for securing Docker Registry. Let’s create a self-signed certificate using the following command.
[root@registry ~]# mkdir -p /certs

[root@registry ~]# openssl req -newkey rsa:4096 -nodes -sha256 -keyout /certs/ca.key -x509 -days 365 -out /certs/ca.crt

Generating a 4096 bit RSA private key
............................................++
.....................................................................................................++
writing new private key to '/certs/ca.key'
-----
You are about to be asked to enter information that will be incorporated
into your certificate request.
What you are about to enter is what is called a Distinguished Name or a DN.
There are quite a few fields but you can leave some blank
For some fields there will be a default value,
If you enter '.', the field will be left blank.
-----
Country Name (2 letter code) [XX]:IN
State or Province Name (full name) []:TN
Locality Name (eg, city) [Default City]:CHN
Organization Name (eg, company) [Default Company Ltd]:ITzGeek
Organizational Unit Name (eg, section) []:IT
Common Name (eg, your name or your server's hostname) []:registry.itzgeek.local
Email Address []:[email protected]
Replace “registry.itzgeek.local” with the FQDN of your registry server.
Generated certificate “ca.crt” need to be placed on all of your build/deploy nodes for trusting this certificate.
Start Docker registry container with certificate information.
[root@registry ~]# docker run -d -p 5000:5000 --restart=always --name registry -v /certs:/certs -e REGISTRY_HTTP_TLS_CERTIFICATE=/certs/ca.crt -e REGISTRY_HTTP_TLS_KEY=/certs/ca.key registry
Now, you have a registry server container named “registry” running on “registry.itzgeek.local“.
[root@registry ~]# docker ps
Output:
CONTAINER ID        IMAGE               COMMAND                  CREATED             STATUS              PORTS                    NAMES
8641fbc895f5        registry            "/entrypoint.sh /e..."   44 seconds ago      Up 41 seconds       0.0.0.0:5000->5000/tcp   registry
Firewall
You would need to open following ports on firewall for Docker registry to be available outside network (to build.itzgeek.local/deploy.itzgeek.local)
You need to run the following command on Docker Registry server (registry.itzgeek.local), depends on your operating system.
If your Docker Registry is on CentOS 7 / Fedora 26/25,
[root@registry ~]# firewall-cmd --permanent --add-port=5000/tcp
[root@registry ~]# firewall-cmd --reload
If your Docker Registry is on Ubuntu 16.04,
root@registry:~# ufw status
root@registry:~# ufw allow 5000/tcp
root@registry:~# ufw reload ufw enable
Now the Docker Registry is ready for distributing Docker images.
Create and upload a Docker Image to a Private Registry server
Login into your build Docker engine node, Ex. “build.itzgeek.local”
Build a Docker Image
Let’s create a Docker image (for customized docker container) for uploading it into the private registry server. In three ways you can build/create a container images.
1. Commit
2. Dockerfile
3. Docker Compose.
Build and keep your docker image ready for upload by following any one of the methods listed above.
READ: How to Build Docker Images with Docker Commit
READ: How to Build Docker Images with DockerFile
I have built a docker image called “mycentos:httpdv1.0” on “build.itzgeek.local” and we will now upload it onto Private registry server.
root@build:~# docker images
Output:

Now, rename the docker image something like registryserver:portnumber/image name:tag.
If the image name does not match with given format then docker push or pull command will try to upload or download the image from the public registry, not from the private registry.
To rename the docker image use docker tag command.
root@build:~# docker tag mycentos:httpdv1.0 registry.itzgeek.local:5000/mycentos:httpdv1.0
Check again for the list of Docker images.

Upload a Docker Image
Depends on the communication mode (Secure or Non-Secure) of Docker Registry, follow any one of the below methods.
Non-Secure (Plain Http Registry)
Edit/Create the file “daemon.json” in “/etc/docker/” directory.
root@build:~# vi /etc/docker/daemon.json
Add the following contents into it.
{
  "insecure-registries" : ["registry.itzgeek.local:5000"]
}
Secure (Self-signed)
Copy the certificate “ca.crt” from registry server “registry.itzgeek.local” to “/etc/docker/certs.d/registry.itzgeek.local:5000/ca.crt” on “build.itzgeek.local“.
root@build:~# mkdir -p /etc/docker/certs.d/registry.itzgeek.local:5000/

root@build:~# scp -pr [email protected]:/certs/ca.crt /etc/docker/certs.d/registry.itzgeek.local:5000/
In both cases, you would need to restart the Docker engine service.
root@build:~# systemctl restart docker
Upload the docker image to private registry server using the following command.
root@build:~# docker push registry.itzgeek.local:5000/mycentos:httpdv1.0
Download and Deploy Docker Container image from Private Registry server
Login into your deploy Docker engine node, Ex. “deploy.itzgeek.local“.
Depends on the communication mode (Secure or Non-Secure) of Docker Registry, follow any one of the below methods.
Non-Secure (Plain Http Registry)
Edit/Create the file “daemon.json” in “/etc/docker/” directory.
[root@deploy ~]# vi /etc/docker/daemon.json
Add the following contents into it.
{
  "insecure-registries" : ["registry.itzgeek.local:5000"]
}
Secure (Self-signed)
Copy the certificate “ca.crt” from registry server “registry.itzgeek.local” to “/etc/docker/certs.d/registry.itzgeek.local:5000/ca.crt” on “deploy.itzgeek.local“.
[root@deploy ~]# mkdir -p /etc/docker/certs.d/registry.itzgeek.local:5000/

[root@deploy ~]# scp -pr [email protected]:/certs/ca.crt /etc/docker/certs.d/registry.itzgeek.local:5000/
In both cases, you would need to restart the Docker engine service.
[root@deploy ~]# systemctl restart docker
Download the docker image to private registry server using the following command.
[root@deploy ~]# docker pull registry.itzgeek.local:5000/mycentos:httpdv1.0
Now, check the list of available images using “docker images” command
[root@deploy ~]# docker images
Output:

Now the Docker image is ready for deployment.
READ: How to Deploy Docker Containers – Command Line Interface
That’s All.