How To Install VirtualBox On Ubuntu 20.04
VirtualBox is a free and open-source hypervisor software that allows you to create and run virtual machines of Linux, Windows, Solaris, BSD operating system. It can ben be installed on Linux, Windows, Solaris, OS X, and OpenSolaris.
VirtualBox is released under GPL v2, and the Oracle VM VirtualBox extension pack is released under PUEL (Personal Use and Evaluation License).
Here, we will see how to install VirtualBox on Ubuntu 20.04.
Install VirtualBox on Ubuntu 20.04
Add VirtualBox Repository
Import the Oracle VirtualBox public signing key on your system using the following command.
wget -q https://www.virtualbox.org/download/oracle_vbox_2016.asc -O- | sudo apt-key add -
Then, add the VirtualBox repository on to your system.
echo "deb [arch=amd64] http://download.virtualbox.org/virtualbox/debian focal contrib" | sudo tee /etc/apt/sources.list.d/virtualbox.list
Install VirtualBox
Update the Ubuntu package database.
sudo apt update
Install the VirtualBox using the apt command.
sudo apt install -y virtualbox-6.1
After the installation, check the VirtualBox Linux kernel module service status.
sudo systemctl status vboxdrv
Output:

● vboxdrv.service - VirtualBox Linux kernel module
   Loaded: loaded (/usr/lib/virtualbox/vboxdrv.sh; enabled; vendor preset: enabled)
   Active: active (exited) since Thu 2020-05-28 17:53:15 EST; 1min ago
  Process: 1416 ExecStart=/usr/lib/virtualbox/vboxdrv.sh start (code=exited, status=0/SUCCESS)

May 28 17:54:42 ubuntu2004 systemd[1]: Starting VirtualBox Linux kernel module...
May 28 17:54:42 ubuntu2004 vboxdrv.sh[1416]: vboxdrv.sh: Starting VirtualBox services.
May 28 17:54:42 ubuntu2004 vboxdrv.sh[1421]: Starting VirtualBox services.
May 28 17:54:42 ubuntu2004 vboxdrv.sh[1438]: VirtualBox services started.
May 28 17:54:42 ubuntu2004 systemd[1]: Started VirtualBox Linux kernel module.
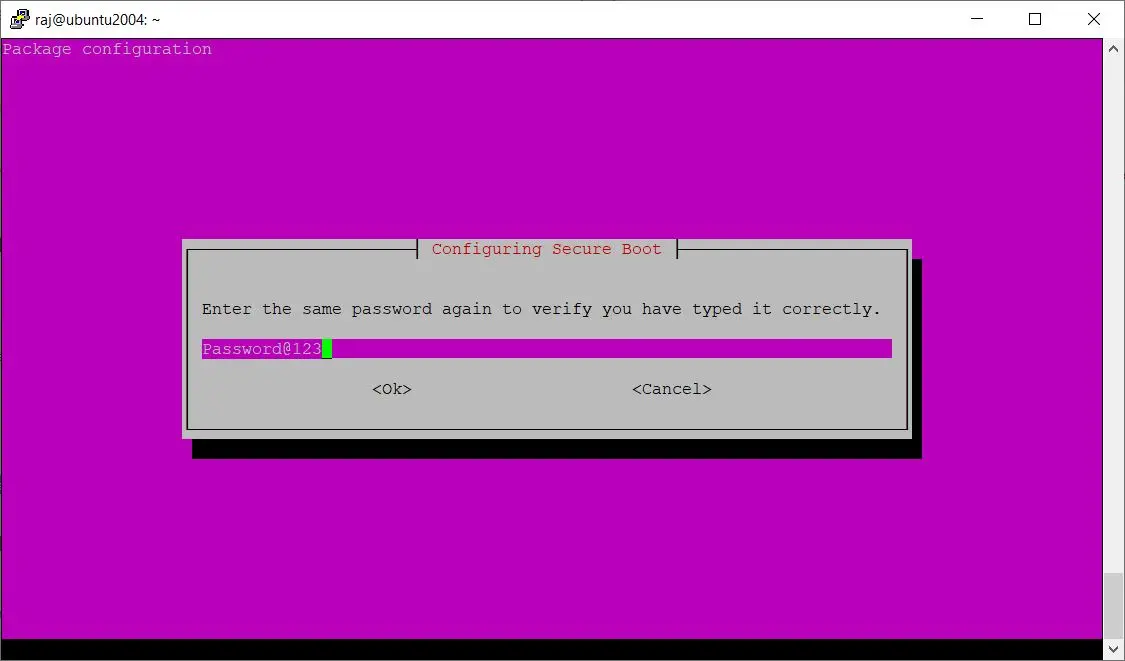
NOTE: UEFI Secure Boot Enabled
If you have an Ubuntu system with UEFI secure boot enabled, during the VirtualBox installation, the system will ask you to set a password (If not already set during the OS installation or MOK is not enrolled after the OS installation) and that can be used at the time of enrolling Machine-Owner key (MOK) in your system’s firmware.
Click OK on configuring secure boot wizard.

Set a password for secure boot.

Enter the password again to confirm the password.
Reboot the system.
sudo reboot
Upon system reboot, you will need to perform MOK management.
Choose Enroll MOK » Continue » Yes » Enter Password (you have set earlier) » Reboot.
Wait for the system to come up after a reboot and then start VirtualBox.
Access VirtualBox
Start the VirtualBox
Command Line Mode
virtualbox
OR
Graphical Mode
Ubuntu 20:04: Activities » Search for Oracle VM VirtualBox.

VirtualBox 6.1 Running on Ubuntu 20.04:

Install VirtualBox Extension Pack
Oracle offers an extension pack to add additional functionalities such as USB 2.0/3.0, Disk encryption, VirtualBox Remote Desktop Protocol (VRDP) support, Intel PXE boot ROM, Host webcam passthrough, and PCI passthrough to the VirtualBox base installation.
READ: How To Install Oracle VM VirtualBox Extension Pack on Ubuntu 20.04
Conclusion
That’s All. I hope you learned how to install VirtualBox on Ubuntu 20.04. Please share your feedback in the comments section.
RELATED POSTS
![How To Upgrade To Ubuntu 20.04 From Ubuntu 18.04 / Ubuntu 19.10 [Detailed Guide]](/post/how-to-upgrade-to-ubuntu-20-04/featured_hu8b7fad8701aaa8998bccee63d00edef2_86059_550x0_resize_q90_lanczos.jpg)


RECENT POSTS

![How To Upgrade To Linux Mint 20 From Linux Mint 19 [Detailed Guide]](/post/how-to-upgrade-to-linux-mint-20/featured_hu3b6c6a25dd04b6406f79faf78c8c0be6_108894_550x0_resize_q90_lanczos.jpg)