Nginx is a free, open-source, high-performance, lightweight HTTP web server for those who do not need the bulk and extra services that Apache may offer and want more performance.
This tutorial shows you how to install Nginx on Linux Mint 18 and LinuxMint 17.
Install Nginx
Both LinuxMint (Ubuntu) and Nginx.org offer Nginx packages for Linux Mint. You can install Nginx either from Ubuntu base repository or Nginx Official repository.
Nginx package available in Nginx official repository will always be the latest version when compared to the version available in Ubuntu repository.
Here, we will see both options to install Nginx on Linux Mint. You can choose either on the of the option to install Ngnix.
Base Repository
To install Nginx from the base repository, you can simply use the apt-get command to install it.
sudo apt-get install nginx
Nginx Repository
Add Nginx public key into the system.
wget https://nginx.org/keys/nginx_signing.key
sudo apt-key add nginx_signing.key
Add Nginx repository by using the following commands.
### LinuxMint 18 ###

echo "deb https://nginx.org/packages/ubuntu/ xenial nginx" | sudo tee /etc/apt/sources.list.d/nginx.list
echo "deb-src https://nginx.org/packages/ubuntu/ xenial nginx" | sudo tee -a /etc/apt/sources.list.d/nginx.list

### LinuxMint 17 ###

echo "deb https://nginx.org/packages/ubuntu/ trusty nginx" | sudo tee /etc/apt/sources.list.d/nginx.list
echo "deb-src https://nginx.org/packages/ubuntu/ trusty nginx" | sudo tee -a /etc/apt/sources.list.d/nginx.list
Update repository index.
sudo apt-get update
Install Nginx package using the apt-get command.
sudo apt-get install nginx
Control Nginx Service
Once installed, start the Nginix by using the following command.
### LinuxMint 18 ###

sudo systemctl start nginx

### LinuxMint 17 ###

sudo service nginx start
Verify Nginx
Open a web browser and visit
You should see the following page saying Welcome to nginx!. This page confirms you that the Nginx is successfully installed on the server.

Important Notes
The location of the default document root and configuration files depends on the source you used to the Nginx package.
Base Repository
If you have installed Nginx from Base repository, then the directory structure will look like below.
/etc/nginx/
|-- conf.d
|-- fastcgi_params
|-- koi-utf
|-- koi-win
|-- mime.types
|-- naxsi_core.rules
|-- naxsi.rules
|-- naxsi-ui.conf.1.4.1
|-- nginx.conf
|-- proxy_params
|-- scgi_params
|-- sites-available
| `-- default
|-- sites-enabled
| `-- default -> /etc/nginx/sites-available/default
|-- uwsgi_params
`-- win-utf
The default configuration file is /etc/nginx/sites-available/default , ,and you can place the virtual host configuration files under /etc/nginx/sites-available and then you can link those to /etc/nginx/sites-enabled directory.
Nginx Repository
If you have installed Nginx from the official repository, then the directory structure will look like below.
/etc/nginx/
├── conf.d
│   └── default.conf
├── fastcgi_params
├── koi-utf
├── koi-win
├── mime.types
├── modules -> /usr/lib/nginx/modules
├── nginx.conf
├── scgi_params
├── uwsgi_params
└── win-utf
The default configuration file is /etc/nginx/conf.d/default.conf and you can place the virtual host configuration files under /etc/nginx/conf.d/ directory.
Summary
| Installation Source | Important Locations | LinuxMint 18 | LinuxMint 17 |
|---|---|---|---|
| OS Repository | Document Root | /var/www/html/ | /usr/share/nginx/html |
| Main Configuration File | /etc/nginx/nginx.conf | /etc/nginx/nginx.conf | |
| Default Configuration File | /etc/nginx/sites-available/default | /etc/nginx/sites-available/default | |
| Additional Config Files | /etc/nginx/sites-available | /etc/nginx/sites-available | |
| Nginx Repository | Document Root | /usr/share/nginx/html | /usr/share/nginx/html |
| Main Configuration File | /etc/nginx/nginx.conf | /etc/nginx/nginx.conf | |
| Default Configuration File | /etc/nginx/conf.d/default.conf | /etc/nginx/conf.d/default.conf | |
| Additional Config Files | /etc/nginx/conf.d/ | /etc/nginx/conf.d/ |
Create Virtual Host
When Nginx process the request, it looks for the server directive in the configuration file. You can add multiple server directives to define multiple virtual servers. We will now configure a virtaul host for the following information.
Server Name: www.itzgeek.local
Document Root: /usr/share/nginx/html/www.itzgeek.local
Create a virtual host configuration file /etc/nginx/conf.d/www.itzgeek.local.conf.
Note: You would need to create a configuration file according to the source of Nginx package.
sudo nano /etc/nginx/conf.d/www.itzgeek.local.conf
The minimal configuration will look like below.
# Virtual Host #

server {
    listen 80;
    server_name www.itzgeek.local;

# Document Root #
    location / {
          root /usr/share/nginx/html/www.itzgeek.local;
          index index.html index.htm;
    }
# Logs #

   access_log /var/log/nginx/www.itzgeek.local.access.log main;

# Error Handler #

   error_page 404 /404.html;

   error_page 500 502 503 504 /50x.html;
         location = /50x.html {
         root /usr/share/nginx/html;
    }
}
You can find the full configuration here.
Create a document root directory to place HTML files.
sudo mkdir /usr/share/nginx/html/www.itzgeek.local
Create an index.html page with some content.
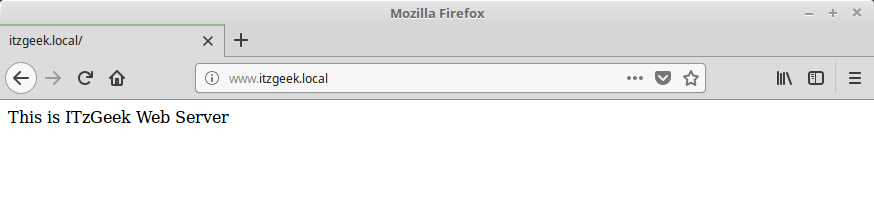
sudo echo "This is ITzGeek Web Server" > /usr/share/nginx/html/www.itzgeek.local/index.html
Restart the Nginx service.
### LinuxMint 18 ###

sudo systemctl restart nginx

### LinuxMint 17 ###

sudo service nginx restart
Verify Virtual Host
Make a host entry on the client machine for www.itzgeek.local or create an A record in the DNS server for name resolution.
your_ip www.itzgeek.local
Open up a web browser and go to the below URL.
Output:
Interested Topics
READ: How to setup LEMP Stack on LinuxMint 18 / LinuxMint 17
READ: How to phpMyAdmin with Nginx on LinuxMint 18 / LinuxMint 17
That’s All.