How To Install MySQL 8.0 on Ubuntu 20.04
MySQL is an open-source database server commonly used in a three-tier application to store and retrieve records and information. It is developed by Oracle Corporation.
MySQL was the primary database server for Linux operating system until MariaDB, a fork of MySQL, came into the picture.
Here, we will see how to install MySQL 8.0 on Ubuntu 20.04.
Install MySQL 8.0 on Ubuntu 20.04
MySQL is now available in both Ubuntu repository and MySQL Dev repository. Both Ubuntu & MySQL community offers only MySQL v8.0 for Ubuntu 20.04.
Install MySQL 8.0 From Ubuntu Repository
Installing MySQL server 8.0 from the Ubuntu repository is a straight forward one.
Update the repository index.
sudo apt update
Use the apt command to install the MySQL database server.
sudo apt install -y mysql-server-8.0 mysql-client-8.0
Use the mysql_secure_installation command to set the MySQL root password and other security settings to secure the MySQL instance.
sudo mysql_secure_installation
Output:

Securing the MySQL server deployment.

Connecting to MySQL using a blank password.

VALIDATE PASSWORD COMPONENT can be used to test passwords
and improve security. It checks the strength of password
and allows the users to set only those passwords which are
secure enough. Would you like to setup VALIDATE PASSWORD component?

Press y|Y for Yes, any other key for No: Y  << Enable Validate password component to improve security

There are three levels of password validation policy:

LOW    Length >= 8
MEDIUM Length >= 8, numeric, mixed case, and special characters
STRONG Length >= 8, numeric, mixed case, special characters and dictionary file

Please enter 0 = LOW, 1 = MEDIUM and 2 = STRONG: 2  << Level of Password Policy
Please set the password for root here.

New password: xxx  << Enter MySQL root password

Re-enter new password: xxx  << Re-Enter MySQL root password

Estimated strength of the password: 100
Do you wish to continue with the password provided?(Press y|Y for Yes, any other key for No) : Y  << Continue with set password
By default, a MySQL installation has an anonymous user,
allowing anyone to log into MySQL without having to have
a user account created for them. This is intended only for
testing, and to make the installation go a bit smoother.
You should remove them before moving into a production
environment.

Remove anonymous users? (Press y|Y for Yes, any other key for No) : Y  << Remove Anonymous users
Success.


Normally, root should only be allowed to connect from
'localhost'. This ensures that someone cannot guess at
the root password from the network.

Disallow root login remotely? (Press y|Y for Yes, any other key for No) : Y  << Disallow root login remotely
Success.

By default, MySQL comes with a database named 'test' that
anyone can access. This is also intended only for testing,
and should be removed before moving into a production
environment.


Remove test database and access to it? (Press y|Y for Yes, any other key for No) : Y  << Remote test database
 - Dropping test database...
Success.

 - Removing privileges on test database...
Success.

Reloading the privilege tables will ensure that all changes
made so far will take effect immediately.

Reload privilege tables now? (Press y|Y for Yes, any other key for No) : Y  << Reload tables
Success.

All done!
MySQL 8.0 uses a new authentication based on improved SHA 256 password methods. Due to the new authentication mechanism, old clients built with libmysqlclient may not be able to connect to the database server.
You can change the default authentication plugin any time by setting the below in the configuration /etc/mysql/my.cnf file.
[mysqld]
default-authentication-plugin=mysql_native_password
Install MySQL 8.0 From MySQL Dev
Download the MySQL repository configuration package on your system.
wget https://dev.mysql.com/get/mysql-apt-config_0.8.15-1_all.deb
Install the repository package using the dpkg command.
sudo dpkg -i mysql-apt-config_0.8.15-1_all.deb
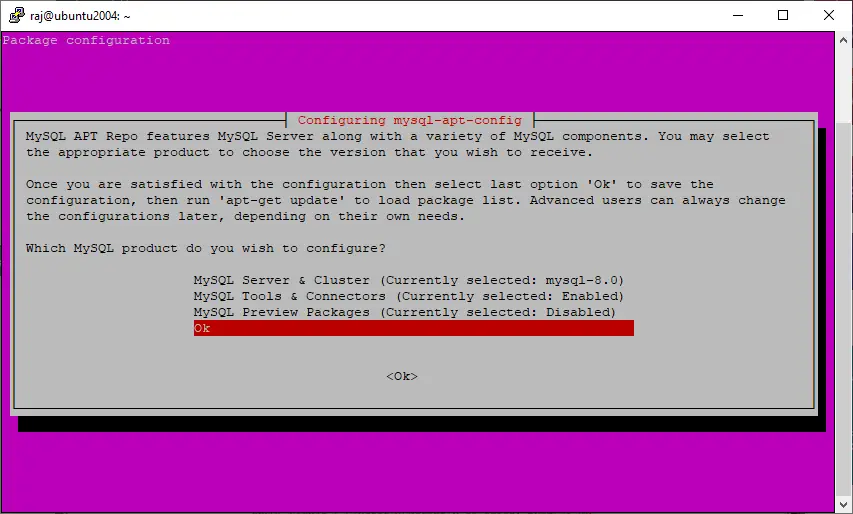
The package installer will prompt you to select the MySQL repository. Since MySQL community offers only MySQL v8.0, just select OK and then press Enter.
Update the repository index using the apt command.
sudo apt update
Use the apt command to install the MySQL database server
sudo apt install -y mysql-server mysql-client
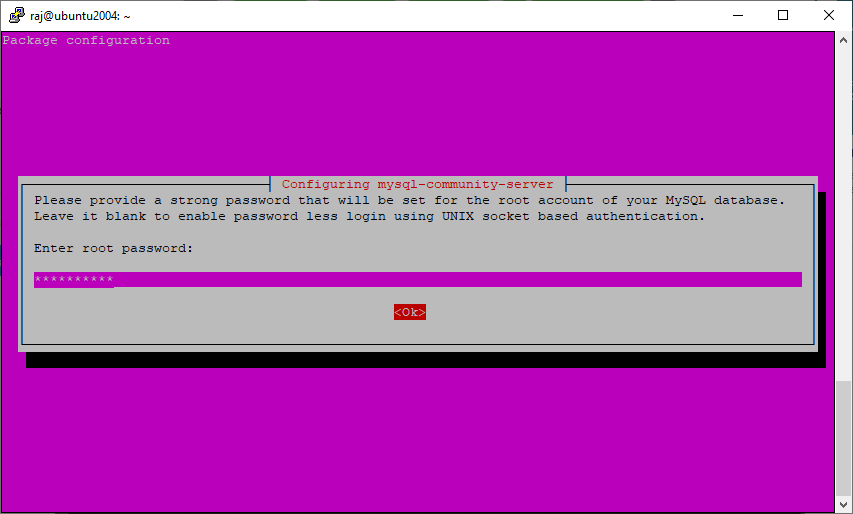
The package installer will prompt you to set the MySQL root password.
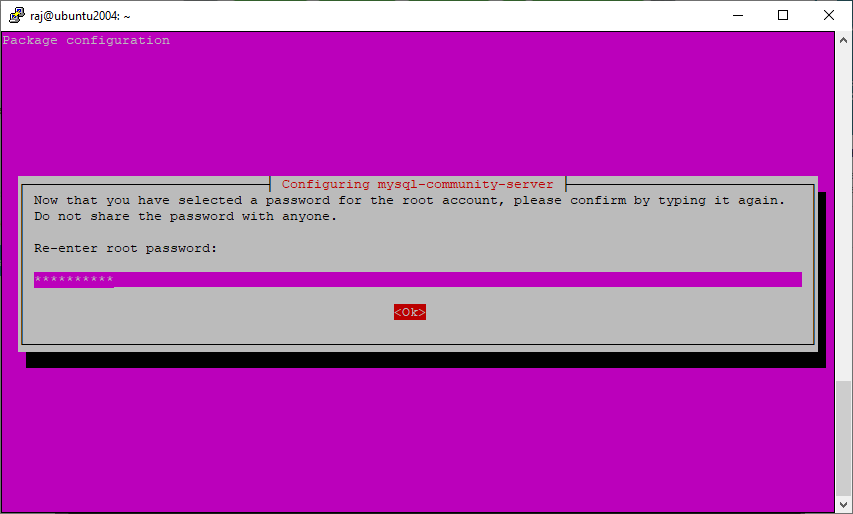
Re-enter the password.
MySQL 8.0 uses a new authentication based on improved SHA 256 password methods. If you choose this option, old clients may not be able to connect to the server.
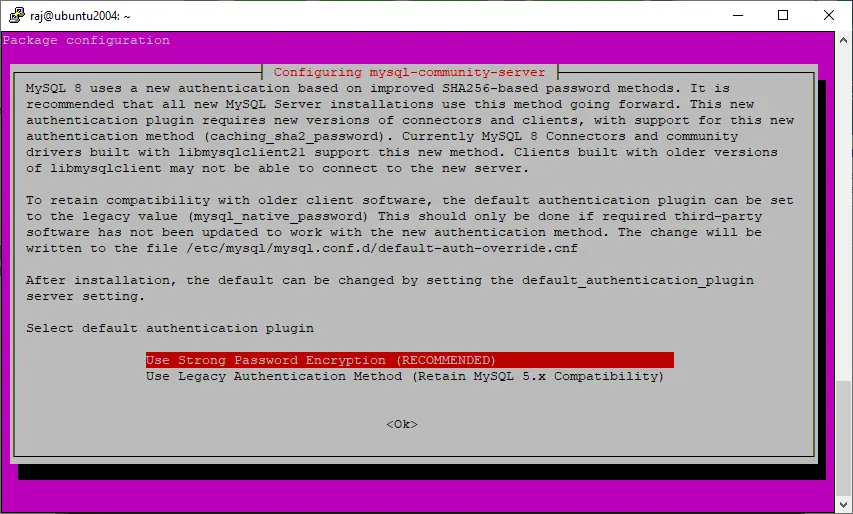
You can change the default authentication plugin any time by setting the below in the configuration /etc/mysql/my.cnf file.
[mysqld]
default-authentication-plugin=mysql_native_password
Use the mysql_secure_installation command to make this MySQL instance more secure.
sudo mysql_secure_installation
Output:

Securing the MySQL server deployment.

Enter password for user root: xxx << Enter MySQL root password you have set during the installation

VALIDATE PASSWORD COMPONENT can be used to test passwords
and improve security. It checks the strength of password
and allows the users to set only those passwords which are
secure enough. Would you like to setup VALIDATE PASSWORD component?

Press y|Y for Yes, any other key for No: Y  << Enable Validate password component to improve security

There are three levels of password validation policy:

LOW    Length >= 8
MEDIUM Length >= 8, numeric, mixed case, and special characters
STRONG Length >= 8, numeric, mixed case, special characters and dictionary file

Please enter 0 = LOW, 1 = MEDIUM and 2 = STRONG: 2  << Level of Password Policy
Using existing password for root.

Estimated strength of the password: 100
Change the password for root ? ((Press y|Y for Yes, any other key for No) : N  << Skip this since we have already set password

 ... skipping.
By default, a MySQL installation has an anonymous user,
allowing anyone to log into MySQL without having to have
a user account created for them. This is intended only for
testing, and to make the installation go a bit smoother.
You should remove them before moving into a production
environment.

Remove anonymous users? (Press y|Y for Yes, any other key for No) : Y  << Remove Anonymous users
Success.


Normally, root should only be allowed to connect from
'localhost'. This ensures that someone cannot guess at
the root password from the network.

Disallow root login remotely? (Press y|Y for Yes, any other key for No) : Y << Disallow root login remotely
Success.

By default, MySQL comes with a database named 'test' that
anyone can access. This is also intended only for testing,
and should be removed before moving into a production
environment.


Remove test database and access to it? (Press y|Y for Yes, any other key for No) : Y << Remote test database
 - Dropping test database...
Success.

 - Removing privileges on test database...
Success.

Reloading the privilege tables will ensure that all changes
made so far will take effect immediately.

Reload privilege tables now? (Press y|Y for Yes, any other key for No) : Y << Reload tables
Success.

All done!
Work with MySQL Server
Log in to the MySQL server.
mysql -u root -p
Welcome to the MySQL monitor.  Commands end with ; or \g.
Your MySQL connection id is 14
Server version: 8.0.20 MySQL Community Server - GPL

Copyright (c) 2000, 2020, Oracle and/or its affiliates. All rights reserved.

Oracle is a registered trademark of Oracle Corporation and/or its
affiliates. Other names may be trademarks of their respective
owners.

Type 'help;' or '\h' for help. Type '\c' to clear the current input statement.

mysql>
Conclusion
That’s All. I hope you have learned how to install MySQL 8.0 on Ubuntu 20.04. If you are new to MySQL databases, use phpMyAdmin to manage them over a web browser.
RELATED POSTS

![How To Upgrade To Ubuntu 20.04 From Ubuntu 18.04 / Ubuntu 19.10 [Detailed Guide]](/post/how-to-upgrade-to-ubuntu-20-04/featured_hu8b7fad8701aaa8998bccee63d00edef2_86059_550x0_resize_q90_lanczos.jpg)


RECENT POSTS


![How To Upgrade To Linux Mint 20 From Linux Mint 19 [Detailed Guide]](/post/how-to-upgrade-to-linux-mint-20/featured_hu3b6c6a25dd04b6406f79faf78c8c0be6_108894_550x0_resize_q90_lanczos.jpg)