The first task for anyone after the installation of Ubuntu will be setting up an IP address to a system. In some cases, these tasks are taken care using DHCP (Dynamic Network Configuration Protocol) which handles assigning IP Address to Desktop and Servers.
But, if you look at the bigger infrastructure, they use static IP to avoid network problems due non-availability of DHCP server.
READ: How to configure DHCP server on CentOS 7 / Ubuntu 18.04 / 16.04 / Debian 9
Here, we will see how to configure static IP Address in Ubuntu 18.04 with netplan – new network configuration tool.
Also, at later of the article, we will take a look at how to use ifupdown (/etc/network/interfaces / Network Manager) for assigning static IP Address in Ubuntu 18.04.
Prerequisites
Switch to the root user.
su -
OR
sudo su -
Find the available network cards on your system
You can run any one of the below commands in the terminal to get a list of network interfaces available on your system.
ifconfig -a
OR
ip a
Choose the desired network interface
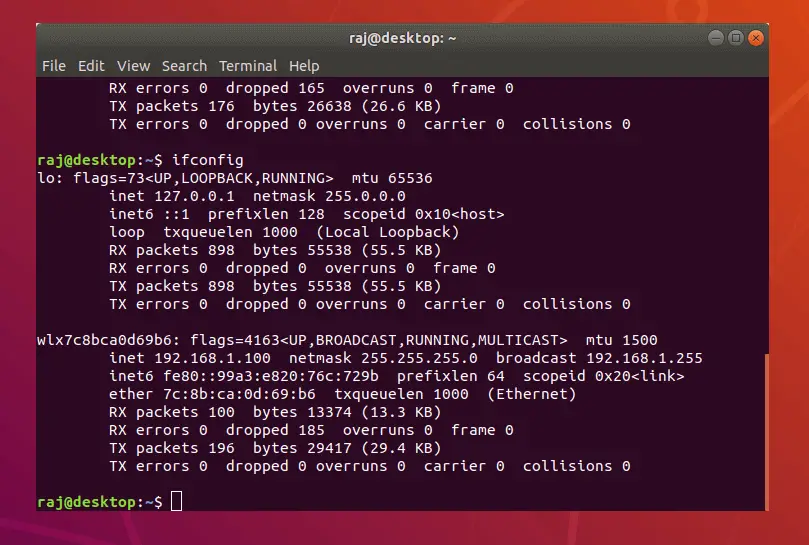
The output of the ifconfig command:
Desktop:
enp0s3
: flags=4163<UP,BROADCAST,RUNNING,MULTICAST> mtu 1500
inet 192.168.1.6 netmask 255.255.255.0 broadcast 192.168.1.255
        inet6 fd50:1d9:9fe3:1400:79fa:c48f:b679:c85  prefixlen 64  scopeid 0x0
        inet6 fd50:1d9:9fe3:1400:a00:27ff:fe36:34ae  prefixlen 64  scopeid 0x0
        inet6 fe80::a00:27ff:fe36:34ae  prefixlen 64  scopeid 0x20
        ether 08:00:27:36:34:ae  txqueuelen 1000  (Ethernet)
        RX packets 226971  bytes 327928478 (312.7 MiB)
        RX errors 0  dropped 0  overruns 0  frame 0
        TX packets 60417  bytes 4869126 (4.6 MiB)
        TX errors 0  dropped 0 overruns 0  carrier 0  collisions 0

lo: flags=73<UP,LOOPBACK,RUNNING>  mtu 65536
        inet 127.0.0.1  netmask 255.0.0.0
        inet6 ::1  prefixlen 128  scopeid 0x10
        loop  txqueuelen 1  (Local Loopback)
        RX packets 4714  bytes 6158753 (5.8 MiB)
        RX errors 0  dropped 0  overruns 0  frame 0
        TX packets 4714  bytes 6158753 (5.8 MiB)
        TX errors 0  dropped 0 overruns 0  carrier 0  collisions 0
At this time, the system interface (enp0s3) takes IP Address from DHCP server.
Laptop:
lo: flags=73<UP,LOOPBACK,RUNNING>  mtu 65536
        inet 127.0.0.1  netmask 255.0.0.0
        inet6 ::1  prefixlen 128  scopeid 0x10
        loop  txqueuelen 1000  (Local Loopback)
        RX packets 188  bytes 13462 (13.4 KB)
        RX errors 0  dropped 0  overruns 0  frame 0
        TX packets 188  bytes 13462 (13.4 KB)
        TX errors 0  dropped 0 overruns 0  carrier 0  collisions 0

wlx7c8bca0d69b6: flags=4163<UP,BROADCAST,RUNNING,MULTICAST>  mtu 1500
        ether 7c:8b:ca:0d:69:b6  txqueuelen 1000  (Ethernet)
        RX packets 972  bytes 346365 (346.3 KB)
        RX errors 0  dropped 465  overruns 0  frame 0
        TX packets 426  bytes 66875 (66.8 KB)
        TX errors 0  dropped 0 overruns 0  carrier 0  collisions 0
My laptop WiFi interface has not been connected to WiFi router. Hence, there is no IP address assigned to it.
For this demo, we will configure a static IP for enp0s3 / wlx7c8bca0d69b6.
IP Address = 192.168.1.100
Netmask = 255.255.255.0
GATEWAY=192.168.1.1
DNS Server 1 = 192.168.1.1
DNS Server 2 = 8.8.8.8
Domain Name = itzgeek.local
Configure Static IP Address using Netplan
Netplan is a new network configuration utility that was introduced in Ubuntu 17.10 that reads the YAML file and generates all the confirguration for renderer tool (NetworkManager or networkd).
Netplan reads network configuration from /etc/netplan/*.yaml.
First, remove the ifupdown package so that we can use netplan to configure network interfaces.
apt remove ifupdown
In Ubuntu 18.04 server, cloud-init manages the network configuration. So, you would need to disable it by editing the below file.
nano /etc/cloud/cloud.cfg.d/99-disable-network-config.cfg
Put the below line into the configuration file.
network: {config: disabled}
Move any files present in /etc/netplan directory to other location.
mv /etc/netplan/* /root
Now, we will create a netplan configuration for the network interface. I recommend you to use vim apt install vim editor for auto syntax.
vim /etc/netplan/01-network-card.yaml
Use the below configuration file.
ETHERNET:
network:
        version: 2
        renderer: networkd
        ethernets:
                enp0s3:
                        dhcp4: no
                        addresses: [192.168.1.100/24]
                        gateway4: 192.168.1.1
                        nameservers:
                                search: [itzgeek.local]
                                addresses: [192.168.1.1,8.8.8.8]
WIFI:
To use NetworkManager, you would need to install the Network Manager sudo apt install network-manager and then use renderer: NetworkManager in the netplan configuration file.
wlx7c8bca0d69b6 – Wifi interface device name
Raj – My Wifi SSID
MyPass – Wifi Password
network:
  version: 2
  renderer: NetworkManager
  wifis:
          wlx7c8bca0d69b6:
                  dhcp4: no
                  addresses: [192.168.1.100/24]
                  gateway4: 192.168.1.1
                  nameservers:
                          addresses: [192.168.1.1,8.8.8.8]
                  access-points:
                          Raj:
                                  password: MyPass
Generate the required configuration for the renderers.
netplan generate
Apply all configuration and restart renderers.
netplan apply
Verify Static IP Address
Verify the static IP using the below commands.
ifconfig -a
OR
ip a
Output:
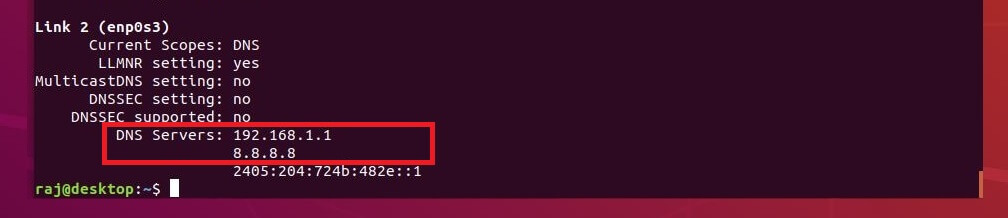
Also, verify the DNS servers entries.
systemd-resolve --status
Output:
Configure Static IP Address using ifupdown / Network Manager
Install the below packages using apt command to support the old method of configuring static IP address to systems.
apt install ifupdown resolvconf
ETHERNET:
Edit the interfaces file.
nano /etc/network/interfaces
Update the file with below information.
# Interface Name #
auto enp0s3
# Static IP Address #
iface enp0s3 inet static
# IP Address #
address 192.168.1.100
# Netmask #
netmask 255.255.255.0
# Gateway #
gateway 192.168.1.1
# DNS Servers #
dns-nameservers 192.168.1.1
dns-nameservers 8.8.8.8
# Search Domain #
dns-search itzgeek.local
Restart the networking using the following command.
systemctl restart networking
WIFI:
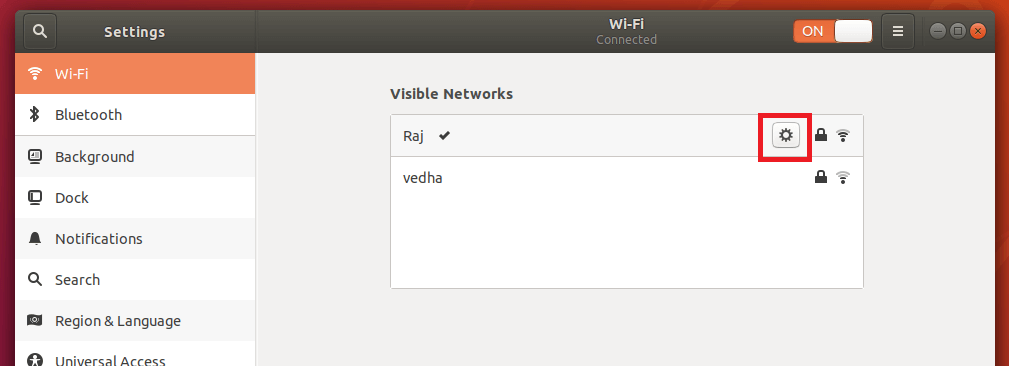
For assigning an IP address to Wifi interface, use the Gnome Network Manager.
gnome-control-center wifi
Click on your Wifi router name and then enter the router’s password to connect. On successful connection, your laptop would automatically receive an IP address from Wifi router which has built-in DHCP service.
If you want to assign static, click on the gear icon in WiFi settings page.
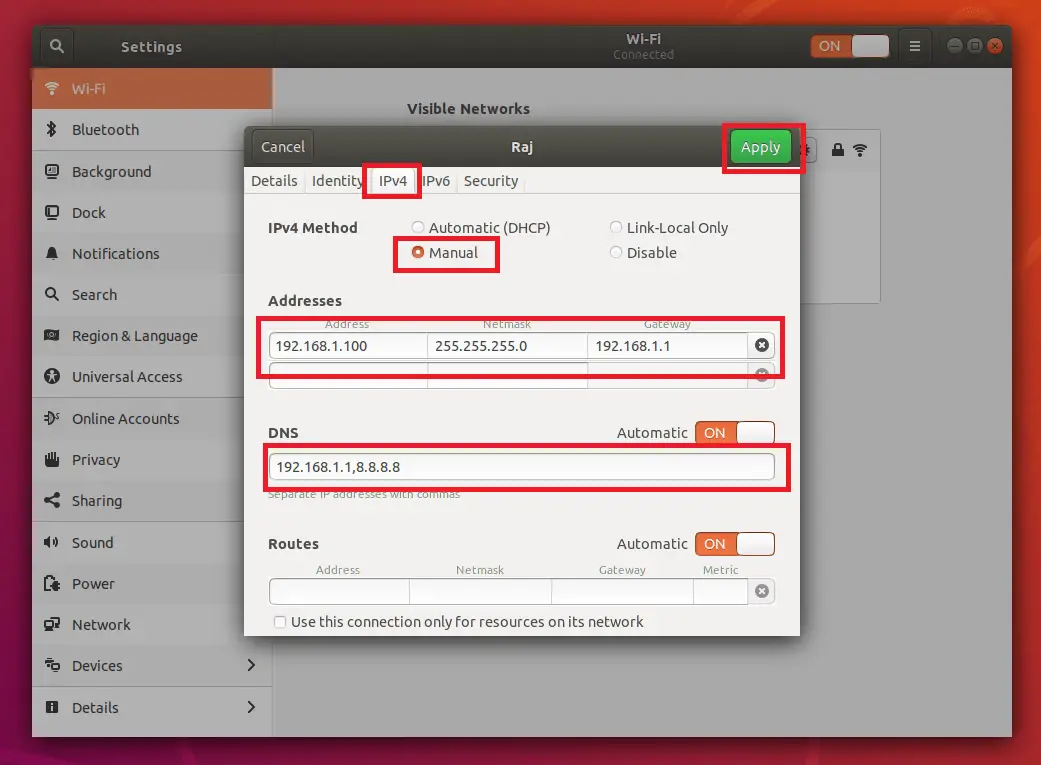
Go to IPv4 tab and enter the IP address details shown like below. Finally, click Apply.
Restart the networking using the following command.
systemctl restart networking
That’s All.