Today we will be going through the steps to install Oracle Java JDK which includes JDK and JRE on Ubuntu 18.04 & Linux Mint 19.
Java JDK is the base for the JAVA developers, and this guide will be more useful for them to build a development environment when they especially use Ubuntu or Linux Mint.
Prerequisites
To be able to install Oracle Java JDK, you need to log in as a user with sudo privileges.
Install Oracle Java JDK
We can install Oracle Java JDK in two ways,
1: Install Oracle Java JDK using Official Source
2: Install Oracle Java JDK using PPA
1: Install Oracle Java JDK Using Official Source
Download Oracle Java
You can either use the command line or browser to download the JDK.
Visit the Oracle JDK page to download.
Oracle Java JDK 12:
Download Oracle JDK 12 (v12.0.2)
Oracle Java JDK 11 (LTS):
Download Oracle JDK 11 (v11.0.4) (Login Required)
Oracle Java JDK 8:
Download Oracle JDK 8 (v8u221) (Login Required)
If you still want to use the command line, use the below command.
### Oracle Java JDK 12 ###

wget --no-check-certificate --no-cookies --header "Cookie: oraclelicense=accept-securebackup-cookie" https://download.oracle.com/otn-pub/java/jdk/12.0.2+10/e482c34c86bd4bf8b56c0b35558996b9/jdk-12.0.2_linux-x64_bin.tar.gz

### Oracle Java JDK 11 ###

LOGIN REQUIRED

### Oracle Java JDK 8 ###

LOGIN REQUIRED
We would need to extract the downloaded JDK archive to some location. Here, I chose to place JDK in /usr/lib/jvm/ directory.
sudo mkdir /usr/lib/jvm/
Extract the downloaded JDK archive using the tar command.
### Oracle JDK 12 ###

sudo tar -zxvf jdk-12.0.2_linux-x64_bin.tar.gz -C /usr/lib/jvm/

### Oracle JDK 11 ###

sudo tar -zxvf jdk-11.0.4_linux-x64_bin.tar.gz -C /usr/lib/jvm/

### Oracle JDK 8 ###

sudo tar -zxvf jdk-8u221-linux-x64.tar.gz -C /usr/lib/jvm/
Install Oracle Java
Run update-alternatives command to install the Java on your system.
### Oracle Java 12 ###

sudo update-alternatives --install /usr/bin/java java /usr/lib/jvm/jdk-12.0.2/bin/java 1

### Oracle Java 11 ###

sudo update-alternatives --install /usr/bin/java java /usr/lib/jvm/jdk-11.0.4/bin/java 2

### Oracle Java 8 ###

sudo update-alternatives --install /usr/bin/java java /usr/lib/jvm/jdk1.8.0_221/bin/java 3
Set Default Java Version
Set the default java using the below command.
sudo update-alternatives --config java
The above command would list all Java JDK installed on your system, like below.
Choose the default Java version by entering the number below Selection column and press enter.
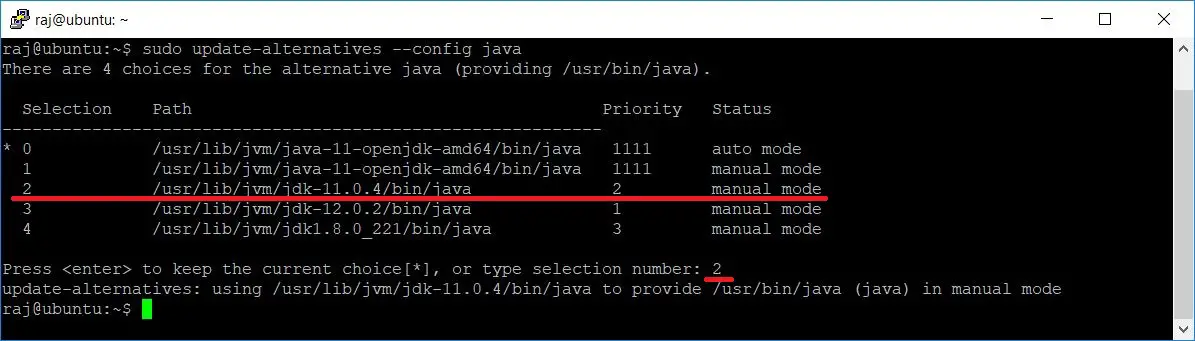
Here, I chose to have Oracle JDK 11 as the default Java version on my system.
2: Install Oracle Java JDK Using PPA
Oracle Java 11 / 8 releases (11.0.3 and older) require signing in using an Oracle account to download the binaries. So, installing Oracle Java JDK using PPA requires the user to download the Oracle JDK 11 .tar.gz and place it in a folder, and then need to install the oracle-java11-installer-local package for JDK installation.
Due to this, I recommend you to install Oracle JDK using the previous method.
Verify Java
Now, check the java version using the following command.
java -version
Output:

The output will vary depending upon the version of Oracle Java installed on your system.
Setup JAVA Environmental Variables
Some Java application installations require prior configuration of environmental variables like JAVA_HOME , JRE_HOME,etc.
To set JAVA environment variables, create a new file under /etc/profile.d directory.
sudo nano /etc/profile.d/javajdk.sh
Place the variables based on the JDK location and version.
Oracle Java 12:
export PATH=$PATH:/usr/lib/jvm/jdk-12.0.2/bin
export JAVA_HOME=/usr/lib/jvm/jdk-12.0.2/
export J2SDKDIR=//usr/lib/jvm/jdk-12.0.2/
Oracle Java 11:
export PATH=$PATH:/usr/lib/jvm/jdk-11.0.4/bin
export JAVA_HOME=/usr/lib/jvm/jdk-11.0.4/
export J2SDKDIR=/usr/lib/jvm/jdk-11.0.4/
Oracle Java 8:
export PATH=$PATH:/usr/lib/jvm/jdk1.8.0_221/bin
export JAVA_HOME=/usr/lib/jvm/jdk1.8.0_221/
export JRE_HOME=/usr/lib/jvm/jdk1.8.0_221/jre/
export J2SDKDIR=/usr/lib/jvm/jdk1.8.0_221/
export J2REDIR=/usr/lib/jvm/jdk1.8.0_221/jre/
To load the environments into the current session, run:
source /etc/profile.d/javajdk.sh
Conclusion
That’s All. I hope this post helped you install Oracle Java on Ubuntu 18.04 & Linux Mint 19. Java is a must to run applications such as Tomcat, Gradle, ELK Stack, Graylog, Eclipse IDE, etc.